
Creating a Carpenter Star Quilt is an enriching experience that blends precision with creativity. This classic quilt pattern is known for its striking design and can be adapted to various styles and sizes. In this detailed guide, we’ll walk you through everything from materials to finishing touches. Whether you’re a beginner or an experienced quilter, this tutorial is perfect for honing your skills and enjoying the art of quilting.
What Is a Carpenter Star Quilt?
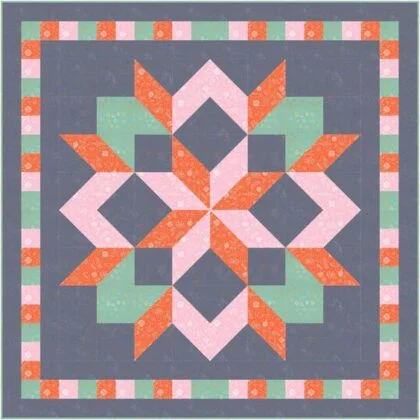
The Carpenter Star Quilt is a traditional quilt block design that forms a large eight-pointed star, often made using half-square triangles (HSTs) and diamond shapes. It is admired for its symmetry and geometric beauty.
This quilt block can be scaled to create anything from a small wall hanging to a full-sized bedspread. The clean lines and intricate appearance make it a popular choice for both modern and traditional quilting styles.
The name “Carpenter Star” is derived from the design’s resemblance to classic woodworking motifs, showcasing the craftsmanship and structure similar to that of a skilled carpenter’s handiwork.
Materials You’ll Need
Before you begin, gather the following materials:
- 1 yard of background fabric (white or light neutral)
- 1 yard of main star fabric (dark or contrasting color)
- 1 yard of accent fabric (complementary tone)
- Rotary cutter and cutting mat
- Quilting ruler
- Sewing machine with a 1/4″ foot
- Iron and ironing board
- Pins or clips
- Batting (size according to your quilt)
- Backing fabric (same size as top)
- Thread (matching or neutral)
Always pre-wash and press your fabrics before cutting to ensure accuracy and prevent shrinkage.
Cutting the Fabric
To start your Carpenter Star Quilt, follow these cutting instructions:
- Cut 16 squares (5.5″ x 5.5″) from the main star fabric
- Cut 16 squares (5.5″ x 5.5″) from the background fabric
- Cut 8 squares (5.5″ x 5.5″) from the accent fabric
- Cut additional 4.5″ squares or strips if you are adding borders
Cutting accurately is crucial for keeping the star points sharp and ensuring the blocks align properly.
Take your time in this step. Use a sharp rotary cutter and measure twice before making each cut.
Making the Half-Square Triangles (HSTs)
The HSTs form the foundation of the Carpenter Star design. Here’s how to make them:
- Pair one square of background fabric with one square of star or accent fabric.
- Draw a diagonal line from corner to corner on the lighter fabric.
- Sew 1/4″ on both sides of the drawn line.
- Cut along the line to create two HSTs.
Press the HSTs open with the seam allowance toward the darker fabric. Trim them to a uniform size (usually 5″) if needed.
Make enough HSTs to complete the layout – typically 32 are needed for a full star block.
Arranging the Blocks
Lay out your blocks on a design wall or large flat surface in the Carpenter Star pattern:
- Place the HSTs so the triangles point outward to form the star
- Fill in the remaining spaces with solid squares
- Double-check the alignment of the star points
This step is where your design truly comes to life. Take a moment to adjust colors or patterns before stitching.
Don’t hesitate to snap a photo of the layout; it can help you remember the arrangement as you begin sewing.
Sewing the Rows Together
Once your layout is finalized, sew the blocks together row by row:
- Start with the top row and work downward
- Use a 1/4″ seam allowance for consistency
- Press each seam flat after sewing, alternating directions between rows
After all the rows are completed, join them to form the quilt top. Press the entire top carefully to set the seams.
This part requires patience, but a precise seam ensures your quilt pattern aligns beautifully.
Adding Borders (Optional)
If desired, add borders around the quilt top:
- Cut strips from your background or accent fabric
- Sew the side borders first, then the top and bottom
- Press seams outward
Borders can frame the star nicely and increase the quilt size. Choose border fabrics that complement your main color scheme.
This is a great opportunity to use a fun print or textured fabric to enhance the final look.
Quilting the Layers
Create your quilt sandwich:
- Lay the backing fabric (right side down)
- Place the batting on top
- Add the quilt top (right side up)
Baste the layers using safety pins or basting spray. Quilt as desired – straight-line quilting or echoing the star shape both work beautifully.
Take your time during quilting. This step adds texture and depth to your piece.
Binding the Quilt
To finish your Carpenter Star Quilt, prepare and attach the binding:
- Cut binding strips (2.5″ wide), join and press into a double-fold
- Sew the binding to the quilt front using a 1/4″ seam
- Fold over to the back and hand-stitch or machine-stitch in place
Binding frames your quilt and gives it a polished look. Choose a binding fabric that coordinates with your quilt top.
Congratulations on finishing your quilt – it’s a true labor of love!
Final Touches and Tips
After binding, give your quilt a final press and inspect all seams.
Label your quilt with your name and the date to document your work.
Consider gifting or displaying your quilt – it’s a masterpiece of effort and creativity!
Conclusion: Explore More Quilt Patterns
The Carpenter Star Quilt is a rewarding project that combines tradition with personal flair.

Whether you choose bold modern fabrics or stick with classic tones, this quilt pattern is sure to shine.
Don’t stop here! Explore other quilt patterns and tutorials to grow your skills and creativity. Try your hand at log cabin blocks, flying geese, or even modern improv designs.
happy quilt! Remember to have fun, experiment with colors, and embrace the joy of quilting. Your next masterpiece is just a few stitches away!