
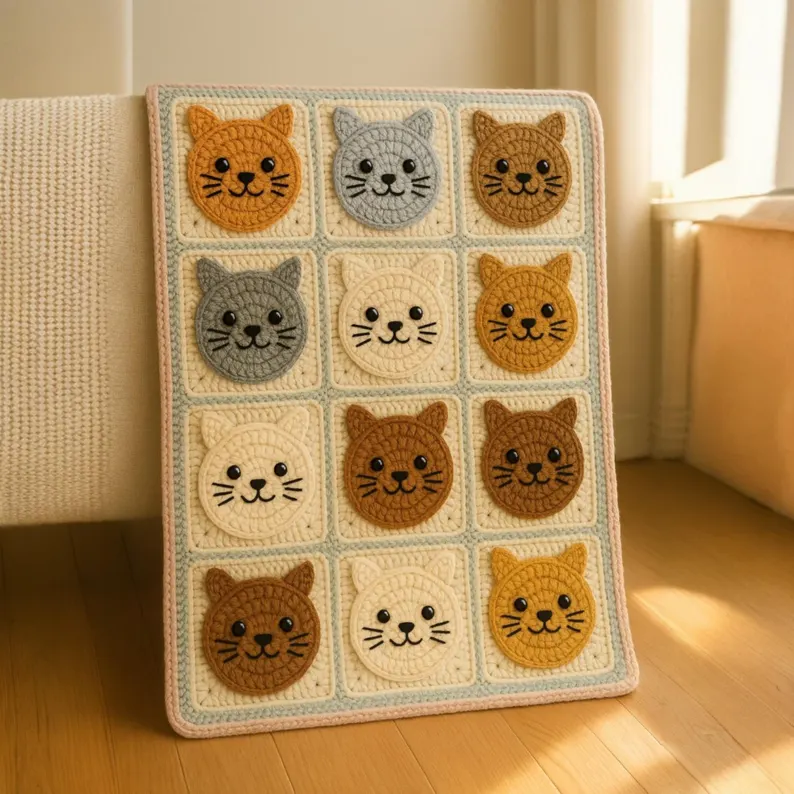
If you’re a crochet enthusiast with a love for cats, then you’re in for a treat. The Cat Granny Square Crochet combines the timeless charm of the granny square with the adorable personality of feline friends. Whether you’re planning to create a cozy blanket, a decorative pillow, or even a quirky tote bag, this cat-themed square adds just the right amount of whimsy to your crochet pattern collection.
In this step-by-step tutorial, we’ll walk you through how to make your very own Cat Granny Square Crochet, from the materials you’ll need to each stitch you’ll work. Ready to start stitching? Let’s dive in!
Why Choose a Cat Granny Square?
A Purr-fect Blend of Fun and Creativity
Crochet projects become even more engaging when they reflect your personality. A cat granny square lets you play with facial features, colors, and textures while maintaining the comforting rhythm of granny square repetition.
Versatile for Many Projects
Once you’ve mastered one cat granny square, you can make dozens more in different colors to match your decor or gift ideas. Use them in blankets, bags, scarves, wall art, or even coasters. The possibilities are endless!
Adds a Personal Touch
Adding a cat motif is a great way to personalize your crochet pattern projects. Whether it’s for a friend who loves cats or your own feline-filled home, this square is bound to draw smiles. Don’t forget to experiment with different color combinations to reflect different cat breeds!
Materials You Will Need
Before you get started, gather the following materials:
- Worsted weight yarn in at least three colors:
- Main Color (for the cat face)
- Accent Color (for ears, whiskers, and border)
- Background Color (granny square base)
- Crochet hook (recommended size: 4.0 mm / G-6)
- Tapestry needle (for weaving in ends and embroidering features)
- Scissors
- Stitch marker (optional)
- Small black buttons or safety eyes (optional, if not crocheting the eyes)
Tip: Use cotton yarn for sturdier squares, especially if the project will be washed frequently.
Step-by-Step: How to Crochet a Cat Granny Square
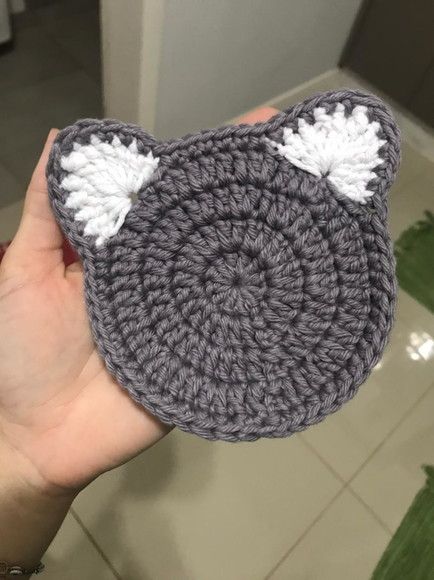
Step 1: Create the Cat Face Center
- Make a magic ring using your main color.
- Chain 2 (does not count as a stitch), then make 12 double crochets into the ring.
- Join with a slip stitch to the first double crochet. (12 sts)
“This center forms the cat’s adorable round face. Keep your tension even for a smooth shape.”
Step 2: Add Cat Ears
- Slip stitch to the next stitch. Chain 2.
- In the same stitch: make 1 double crochet, 1 treble crochet, 1 double crochet, chain 2, and slip stitch into the same stitch.
- Skip 2 stitches and repeat the ear sequence again to form the second ear.
“Ears give your cat character! Try making one ear slightly bent by adjusting your stitches.”
Step 3: Form the Granny Square
- Attach your background color yarn to any stitch between the ears.
- Chain 3 (counts as first double crochet), then work 2 double crochets in the same space.
- Chain 1, skip next space, 3 double crochets — repeat until you’ve gone all around the cat face.
- In corners, place (3 dc, ch 2, 3 dc) for shaping.
“Don’t worry if the square looks a little wobbly at this stage. Blocking will help!”
Facial Features: Bring Your Cat to Life
Eyes, Nose & Whiskers
- You can crochet small circles using white and black yarn for the eyes or use safety eyes/buttons.
- Embroider the nose with pink yarn in a tiny triangle shape.
- Stitch three lines on each side of the face for whiskers.
“This is your chance to give your kitty some personality! Make them sleepy, silly, or even surprised.”
Color Ideas and Customization
Play with Color Combos
- Try black, orange, or grey yarns to mimic real-life cats like tuxedos, tabbies, or calicos.
- Use variegated yarn for a magical look — great for gifts or baby blankets!
Add Texture with Stitches
- Swap in bobble stitches for cheeks.
- Use puff stitches in the ears for added fluffiness.
Make It Seasonal
- Red and green accents for a Christmas cat
- Pastel tones for spring kittens
- Black cats with yellow borders for Halloween
“Perfect for adding a seasonal twist to your next crochet pattern!”
How to Join Cat Granny Squares Together
Seamless Joins
Once you’ve crocheted multiple cat squares, it’s time to assemble them! The best methods include:
- Whip Stitch Join – Easy and nearly invisible
- Flat Slip Stitch Join – Clean and modern look
- Join-As-You-Go (JAYG) – Great for speed and uniformity
Planning Your Layout
Lay out all your cat squares before joining. Try alternating colors or arranging them in diagonal stripes for a quilted effect.
Finishing Touches
Add a border around the entire project with a scallop or picot stitch for extra charm.
“Adding borders ties the whole project together. Try a light neutral color to make your cats pop!”
Washing and Care Tips
To make your Cat Granny Square Crochet last, follow these care suggestions:
- Hand wash in cold water with mild detergent.
- Lay flat to dry to maintain shape.
- Avoid ironing or machine drying.
“Proper care ensures your crochet pattern creation stays cute and cuddly for years!”
Bonus: Cat Granny Square Variations
Want to make things more fun? Try these twists:
- Grumpy Cat Expression – Use embroidery to make a frown
- Rainbow Cat – Each square in a different vibrant hue
- Accessory Add-Ons – Tiny bows, glasses, or scarves
“Let your imagination lead the way — there’s no wrong way to create a cat square!”
Final Thoughts
Creating a Cat Granny Square Crochet is more than just a crafty endeavor — it’s a celebration of creativity, comfort, and cuteness. Whether you’re stitching up a snuggly blanket or adding flair to a bag, these feline-inspired squares are the perfect touch.
Don’t stop here! Explore other granny square designs, mix them into your projects, or even design your own crochet pattern variations. The crochet world is full of inspiration waiting to be hooked.
Did you enjoy making this Cat Granny Square? Tag your projects on social media with #CatGrannySquare and inspire others!
Happy crocheting — and remember, every stitch is a little hug from your creativity!