
The “Cathedral Flower” Patchwork Block Pattern is a beautiful way to combine traditional patchwork construction with curved floral shapes and carefully selected fabrics. Inspired by the project shown in the reference photo, this block creates the impression of a large four-petal flower opening from the center of the design. The combination of deep floral prints, soft neutral fabric, pink accent squares, and small contrasting corner pieces gives the finished block a romantic, vintage character. Although the curves may look complicated at first, the project becomes much easier when it is divided into individual units and assembled gradually. Accurate cutting, careful pressing, and consistent seam allowances are more important than speed when working on this type of patchwork block.
One of the most attractive features of the “Cathedral Flower” Patchwork Block Pattern is the way four similar sections meet to create one larger design. Each quarter of the block contains a curved floral area, a light petal-shaped insert, and a pieced section near the outside corner. Once the four units are rotated toward the center, the individual shapes visually connect and form the complete flower. This construction method is useful for quilters who want to practice curved piecing, fabric placement, block alignment, and precision sewing without making an entire quilt at once. The finished block can become the centerpiece of a cushion, table topper, wall hanging, tote bag, or a larger patchwork quilt.
Fabric selection has a major influence on the final appearance. For a result similar to the photograph, choose a dominant floral quilting cotton in burgundy, red, dusty rose, or another rich color and combine it with a warm cream or ivory background. A smaller-scale neutral print works beautifully for the inner petals because it provides contrast without competing with the main floral fabric. Pink prints and muted gray-green squares can be introduced around the outer corners for additional detail. The goal is not to reproduce every print exactly, but to maintain a clear distinction between the background fabric, flower fabric, inner petals, and accent pieces so that the Cathedral Flower shape remains easy to recognize.
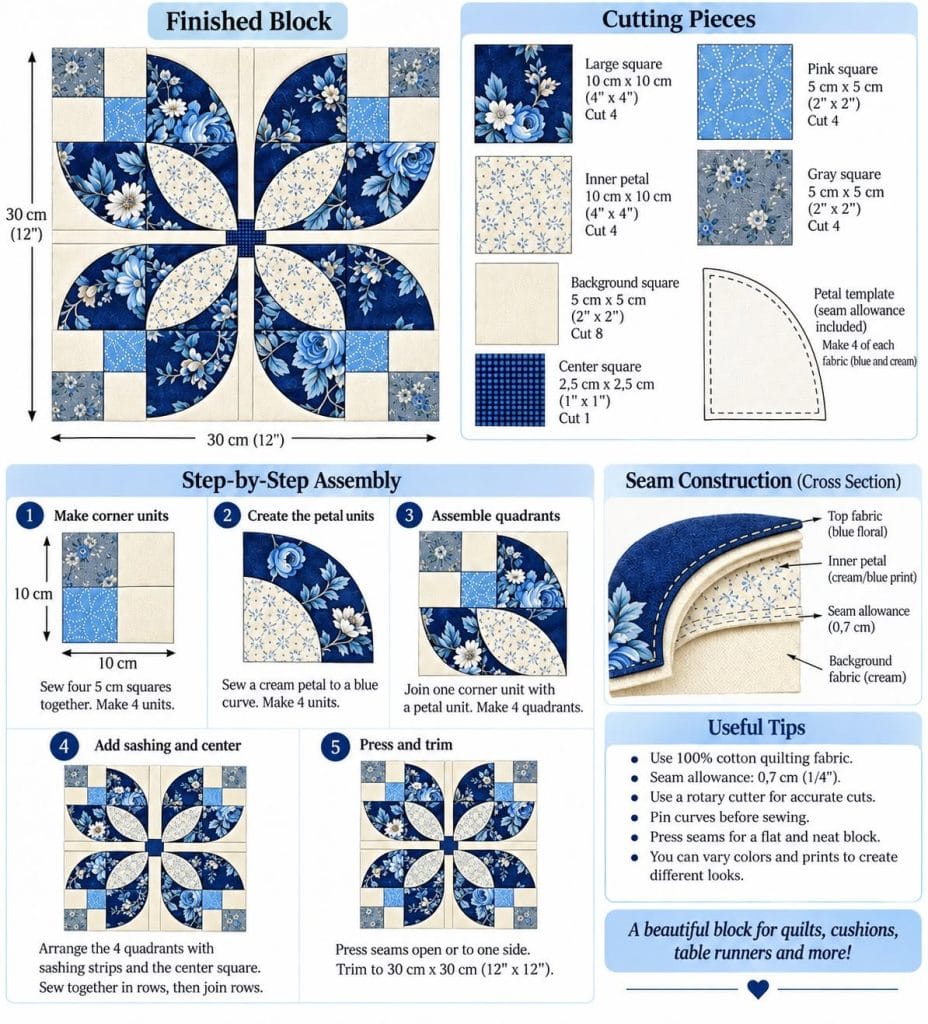
Materials, Fabric Choices, and Preparing the Cathedral Flower Pieces
Start by gathering good-quality 100% cotton quilting fabric, coordinating thread, a rotary cutter, cutting mat, acrylic quilting ruler, fabric scissors, pins or sewing clips, an iron, and a sewing machine. Because the design contains curved sections, a smaller rotary cutter can also be helpful when cutting templates. A seam ripper is worth keeping nearby because correcting a slightly misaligned curved seam early is much easier than trying to compensate for it during final block assembly.
For a practice block, prepare four matching sets of pieces rather than cutting the entire project at once. Each quarter should contain the same basic components: a light background section, a large curved section in the primary floral print, a smaller curved or petal-shaped piece in a contrasting neutral print, and the rectangular or square patchwork pieces that complete the outside corner. Cutting four sets at the same time helps maintain consistency between the quadrants of the “Cathedral Flower” Patchwork Block Pattern.
Because an exact printable template and finished dimensions cannot be reliably recovered from a photograph alone, choose your desired finished block size before drafting the curved pieces. A practical approach is to create one square quarter-block template and divide it according to the visible seams in the reference design. Add a consistent seam allowance around every sewing edge. A seam allowance of approximately 0.6 cm (1/4 inch) is widely used for patchwork and makes it easier to keep all four units consistent.
The large floral curve should occupy much of each quarter block. When four copies are rotated around the center, these sections create the dominant four-lobed flower. Inside each floral curve sits a lighter pointed petal. Make a paper template for these curved components first, label each piece, and mark the top, bottom, and center points. These small registration marks are extremely useful when matching opposing curves.
Pay attention to fabric orientation when cutting large floral prints. A rose or other prominent motif can look dramatically different depending on where the template is positioned. If you want the finished flower to feel balanced, audition the templates over the fabric before cutting. Intentional placement can distribute large flowers around the block rather than accidentally concentrating them in a single quadrant. Directional prints should also be checked before each piece is cut.
Finally, organize the cut components into four separate groups. Lay them on a flat surface exactly as they will appear in the finished project. Rotate each group so that its pointed inner petal faces the center. This simple quilt block layout check can prevent reversed pieces and makes the construction sequence much clearer before you begin sewing.
Step-by-Step Curved Piecing and Quarter-Block Construction
Begin with the smaller patchwork units located toward the outside corners. Sew the small squares and rectangles together with a consistent 0.6 cm seam allowance, following the arrangement established during your layout. In the photographed project, cream pieces are combined with pink and muted accent fabrics. Sew one seam at a time, press it, and check the unit against your intended quarter-block dimensions before adding the next component.
Pressing is especially important in precision patchwork. Instead of aggressively sliding the iron across the fabric, lift and lower it to avoid stretching the pieces. For straight patchwork sections, seam allowances can generally be pressed toward the darker fabric when that produces a flatter result. When several seams will intersect, however, pressing neighboring allowances in opposite directions can help them nest together and produce cleaner intersections.
Next, prepare the curved floral sections. Match the center marking of the light inner petal to the center marking on its corresponding floral curve. Then align the ends. Use fine pins or sewing clips between these points, distributing the fabric evenly along the curve. Do not stretch either piece to force it into position. Curved edges naturally appear mismatched while they are lying flat; they begin to align properly as the seam is sewn.
Sew the curve slowly, keeping the raw edges aligned just in front of the presser foot. Shortening the stitch length slightly can provide greater control on tighter curves. Stop periodically with the needle down, lift the presser foot if necessary, reposition the fabric, and continue. The objective is a smooth seam rather than a fast one. After sewing, inspect the seam for puckers before pressing it.
Press the completed curved section carefully. Depending on the shape and bulk of the fabrics, the seam allowance may naturally prefer one direction. Avoid forcing the seam if doing so distorts the curve. A well-pressed curved unit should lie relatively flat and show a smooth petal edge. If the curve contains a small pucker, correcting it now will produce a much cleaner Cathedral Flower patchwork block later.
Join the completed curved unit to the straight patchwork components to form one full quarter block. Repeat exactly the same process for the remaining three sections. Before assembling them together, place all four quarter blocks on the work surface and rotate them toward the center. You should now clearly see the four large floral shapes and four pale petals forming the recognizable “Cathedral Flower” Patchwork Block Pattern.
Joining the Four Sections and Creating a Precise Flower Center
The center is the visual focal point of this design, so alignment deserves special attention. Arrange the four completed quarter blocks with their pointed petal sections facing inward. The photograph shows narrow light divisions between the floral quadrants and a small contrasting square at the center. Depending on your chosen construction method, these narrow areas can be incorporated into the quarter-block design or created using carefully measured sashing strips.
If you are using narrow sashing strips, cut them consistently from the same background fabric. Their exact dimensions should be determined by your chosen finished block size rather than estimated directly from the photograph. Sew the strips to the appropriate inner edges and press carefully. Maintaining identical strip widths is essential because even a small variation becomes obvious when all four sections converge near the center.
Assemble two quarter blocks to create the upper half and another two to create the lower half. Pin important intersections before sewing. When possible, nest opposing seam allowances so the seams naturally lock into position. Sew the two halves separately and press them before attempting the final center seam. Working in stages provides much more control than trying to manipulate all four units simultaneously.
Place the upper and lower halves right sides together and carefully match the center. Pin or clip the central intersection first, followed by the major curved and straight seam intersections. Sew across the block using the same quarter-inch patchwork seam allowance used throughout construction. Open the block and inspect the center before pressing. If the central points are noticeably displaced, removing a short section of stitching and resewing it can improve the result.
For the small central accent, choose a fabric that contrasts with the background without overpowering the floral sections. The reference image uses a darker red center, which visually connects the four surrounding floral areas. This little detail acts almost like the center of a real flower. Red, burgundy, dusty pink, muted green, or another coordinating fabric can all work depending on the palette you have selected.
After the entire flower is assembled, press the block from the back and then lightly from the front. Use a ruler to check that the outside edges remain straight and that the block is square. Trim only what is necessary. Avoid excessive trimming simply to make one edge look perfect, because removing too much fabric can reduce the seam allowance needed when the patchwork block is joined to another project.
Finishing Ideas, Quilting Methods, FAQ, and Final Tips
Once your “Cathedral Flower” Patchwork Block Pattern is complete, you can use it as a standalone decorative panel or repeat it across a larger quilt. Several blocks arranged together can produce secondary patterns where the background corners meet. Before committing to a large quilt, photograph or arrange several finished blocks in different orientations. This allows you to experiment with the overall composition without sewing anything permanently.
For a cushion cover or small wall hanging, add coordinating borders around the Cathedral Flower block. A narrow cream border can give the flower breathing room, while a wider floral or burgundy border can reinforce the central palette. Measure the block after pressing rather than relying only on its planned dimensions, because small variations naturally occur during curved patchwork piecing.
If you decide to quilt the finished project, create the standard quilt sandwich with the patchwork top, batting, and backing fabric. Straight-line quilting can emphasize the geometric construction, while gentle echo quilting around the curved petals highlights the flower. Stitching in the ditch is another subtle option for quilters who want the fabrics themselves to remain the main visual attraction.
Beginners should consider making a test quarter block from scrap fabric first. This provides an opportunity to practice matching the curved pieces without risking favorite fabrics. It also reveals whether your templates, seam allowances, and pressing method produce the expected dimensions. Once the test unit lies flat and measures correctly, use the same technique for all four final sections.
Color variation can completely transform this pattern. Blue and white fabrics can produce a crisp traditional appearance, while yellow, coral, and green create a cheerful spring-inspired block. Scraps can also be used for a more eclectic design. Whatever palette you choose, maintain enough value contrast between the inner petals and the main curved flower fabric so the signature Cathedral Flower structure remains visible.
Most importantly, treat precision as a gradual process. You do not need every seam to be perfect on your first attempt. Concentrate on consistent seam allowances, careful cutting, smooth curves, accurate center matching, and controlled pressing. These fundamental quilting techniques are transferable to many other patchwork designs, making the project useful both as a decorative block and as a skill-building exercise.
FAQ About the “Cathedral Flower” Patchwork Block Pattern
Is the “Cathedral Flower” Patchwork Block Pattern suitable for beginners?
Yes, especially for an adventurous beginner who already understands basic straight seams and patchwork assembly. The curved sections add an extra challenge, but breaking the project into four quarter blocks makes the process manageable. Practicing one curved unit with scrap fabric before cutting the final fabrics is a useful way to build confidence.
What is the best fabric for this patchwork block?
Good-quality quilting cotton is an excellent choice because it is stable, easy to cut, and relatively easy to press. Using fabrics of similar weight also helps the curved seams behave consistently. Very stretchy or slippery materials can make precision piecing more difficult.
How much seam allowance should I use?
A 0.6 cm (approximately 1/4 inch) seam allowance is a practical choice for traditional patchwork construction. More important than the exact allowance is consistency. Every unit should be sewn with the same allowance so that the four quarter blocks finish at matching dimensions.
How can I sew curved pieces without puckering the fabric?
Mark the midpoint of both curved edges and match those marks first. Match the ends next, then distribute the remaining fabric evenly. Sew slowly and avoid pulling either layer. Fine pins, clips, and a shorter stitch length can provide additional control. Careful pressing after sewing also helps create a smooth curve.
Do I need special quilting tools for this project?
No specialized machine is required. A regular sewing machine capable of making a reliable straight stitch is enough. However, a rotary cutter, cutting mat, quilting ruler, fine pins, iron, and accurate paper or template-plastic patterns can make the construction considerably easier.
Can I make the Cathedral Flower block in different sizes?
Yes. The overall design can be scaled, but every related template piece must be resized proportionally. Remember that seam allowances should normally be added after scaling the finished shapes rather than scaled along with them. Making a test block is recommended whenever you substantially change the dimensions.
Why do my four petals not meet evenly in the center?
The most common causes are inconsistent seam allowances, slightly different quarter-block sizes, stretched curved edges, or intersections that were not matched before sewing. Measure all four units before joining them. Small corrections made at the quarter-block stage are much easier than trying to repair the completed center.
Should curved seams be clipped?
That depends on the depth of the curve and how the seam allowance behaves. Gentle curves may press smoothly without clipping. For tighter areas, small controlled clips or careful grading may help the seam lie flatter. Never cut through the stitching line.
Can I use scraps for the “Cathedral Flower” Patchwork Block Pattern?
Absolutely. This design can work beautifully as a scrap quilt block. For the flower to remain visually clear, however, group fabrics by color or value. For example, use darker scraps for the large curved flower areas and lighter scraps for the inner petals and background.
What can I make with one completed Cathedral Flower block?
A single block can become a cushion front, tote bag panel, table centerpiece, mini quilt, wall decoration, or decorative fabric panel. Multiple blocks can be combined into runners, throws, bed quilts, or larger patchwork projects.
How can I make the floral print look balanced like the reference project?
Use fussy cutting or intentional fabric placement. Before cutting, move the template across the floral fabric and observe which motifs will appear inside each curved section. Distributing large flowers and leaves across the four quadrants helps the finished block look balanced rather than visually heavy on one side.
Should I prewash the fabric before sewing?
Prewashing is a personal quilting preference. If you expect the finished project to be washed frequently, prewashing can reveal shrinkage or excess dye before construction. Whichever method you choose, treating all fabrics consistently is generally preferable to prewashing only some of them.
Conclusion
The “Cathedral Flower” Patchwork Block Pattern combines the charm of traditional patchwork with an eye-catching floral composition. By constructing four coordinated quarter blocks, sewing the curved petals carefully, adding contrasting outer patchwork pieces, and accurately matching everything at the center, you can recreate the overall visual style shown in the reference project while choosing fabrics and dimensions that make the block uniquely yours.
Throughout this tutorial, the most important skills were accurate cutting, consistent 0.6 cm seam allowances, controlled curved piecing, careful pressing, fabric placement, center alignment, and final squaring. Working slowly through these stages is far more effective than rushing toward the finished block. Once you understand how one quarter is constructed, the remaining sections follow the same basic logic.
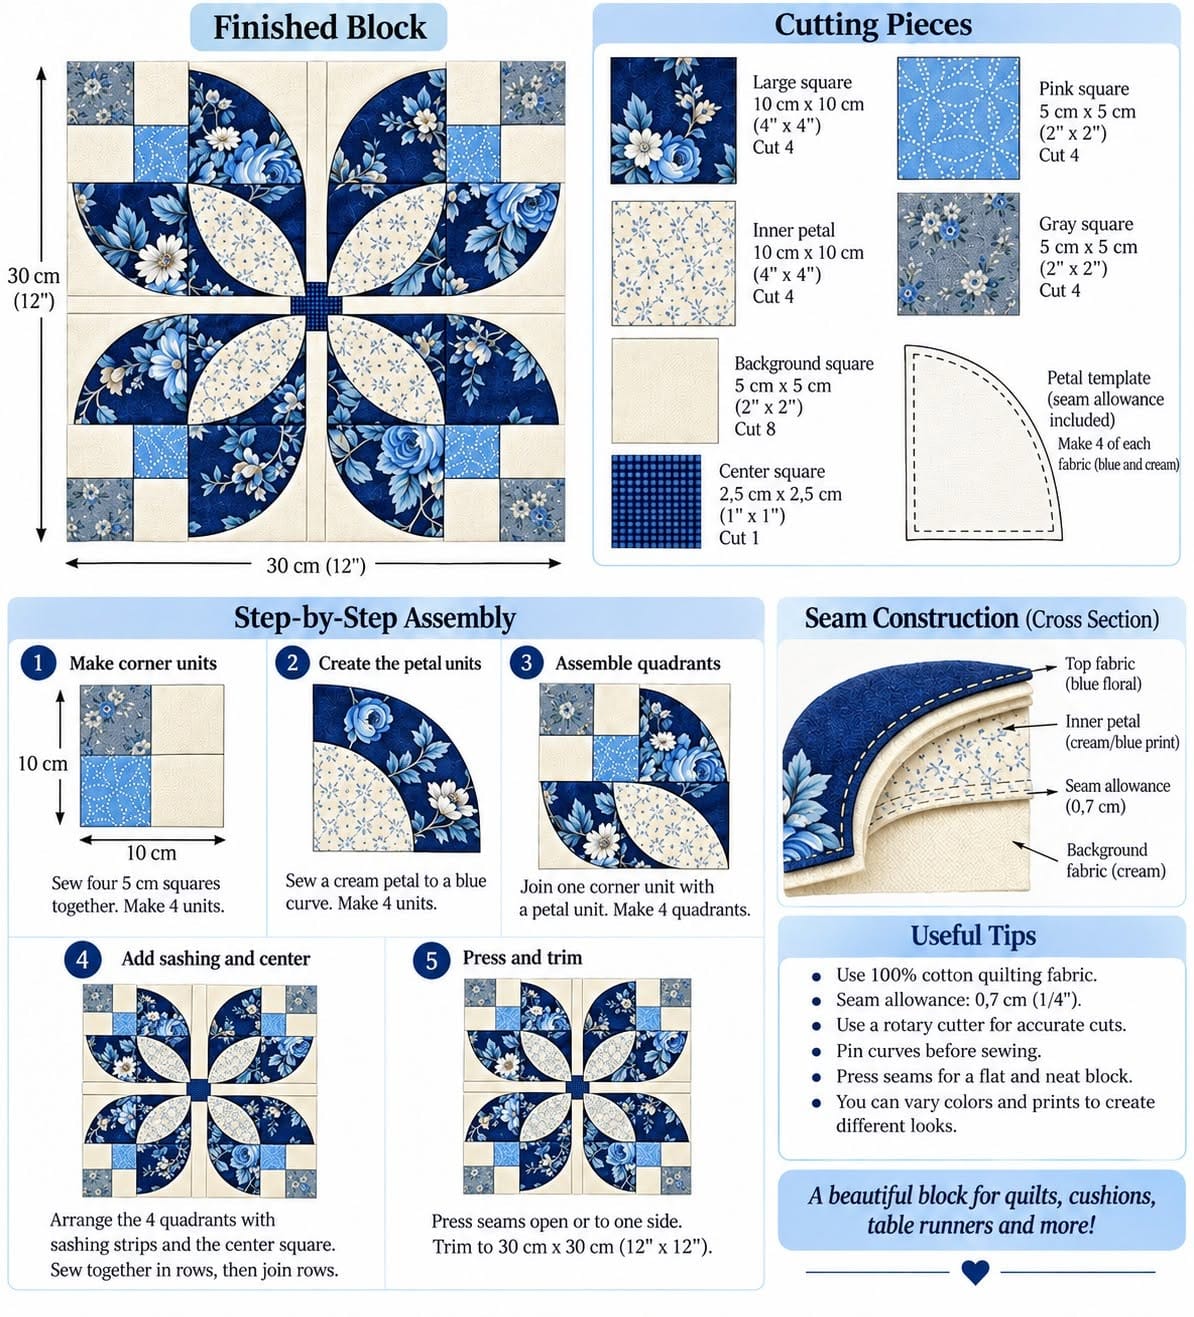
This pattern is also an excellent opportunity to experiment with color. Romantic floral fabrics create a vintage look similar to the reference image, while modern solids, small geometric prints, pastels, or coordinated scraps can give the same Cathedral Flower patchwork design an entirely different personality. The construction principles remain the same even when the fabrics change dramatically. If you make your own “Cathedral Flower” Patchwork Block Pattern, leave your sincere opinion about the project and share your suggestions. Which fabric combination would you choose for your Cathedral Flower, and what would you make with the finished block? Your ideas can inspire new color combinations and creative ways to use this beautiful patchwork design.