Creating a quilted chair cover is a wonderful way to combine creativity, practicality, and home décor into one rewarding project. A Chair Cover made with Quilt techniques not only protects your furniture but also adds warmth, texture, and personality to any space. Whether you are decorating a dining room, home office, or cozy reading corner, this tutorial will guide you step by step.
This Chair Cover – Tutorial was designed especially for beginners who want to explore Quilting Pattern basics without feeling overwhelmed. You do not need advanced skills or expensive tools to get started. With simple measurements, straight seams, and flexible design options, this project is both achievable and satisfying.
Throughout this article, you will learn how to choose materials, cut fabric accurately, assemble layers, quilt your piece, and finish a polished chair cover. You will also discover ideas to personalize your project so it reflects your style and complements your home.
Why a Quilted Chair Cover Is a Great Project
A quilted chair cover is an excellent project because it serves both decorative and functional purposes. Quilting adds durability and structure, making the cover last longer while protecting chairs from spills, scratches, and daily wear. At the same time, it allows you to experiment with colors, patterns, and textures.
For beginners, this project is ideal because it introduces core Quilt concepts such as layering, basting, straight-line quilting, and binding. These are foundational skills that can later be applied to larger Quilting Pattern projects like table runners, placemats, or even full-size quilts.
Another advantage is flexibility. You can adapt the size, shape, and design of your chair cover depending on the type of chair you have. This makes the project forgiving and customizable, reducing pressure and increasing confidence as you sew.
Materials and Tools You Will Need
Before starting your Chair Cover – Tutorial, gather all necessary materials to ensure a smooth workflow. You will need cotton fabric for the top layer, which can feature a single print or a patchwork design. Choose fabrics that coordinate well with your décor and are easy to wash.
You will also need batting for the middle layer, which gives your Quilt its padded, cozy feel. Low- to medium-loft batting is recommended for chair covers because it provides comfort without excessive bulk. For the backing, a sturdy cotton fabric works best.
In terms of tools, prepare a rotary cutter, cutting mat, ruler, sewing machine, thread, pins or clips, and scissors. Optional tools include quilting gloves, a walking foot, and fabric marking tools. Having everything ready beforehand will make the process more enjoyable and stress-free.
Measuring and Preparing the Chair Cover
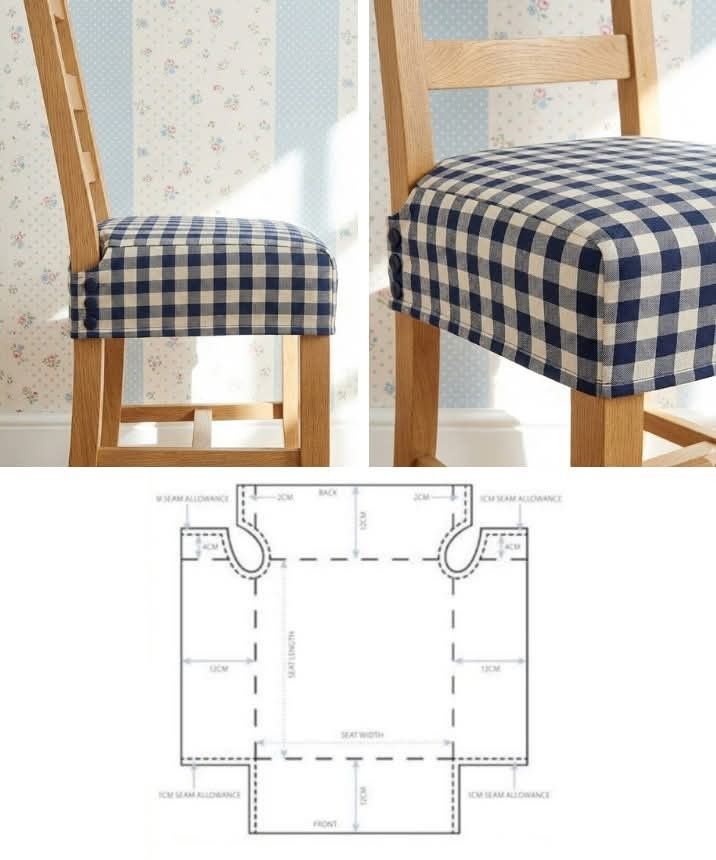
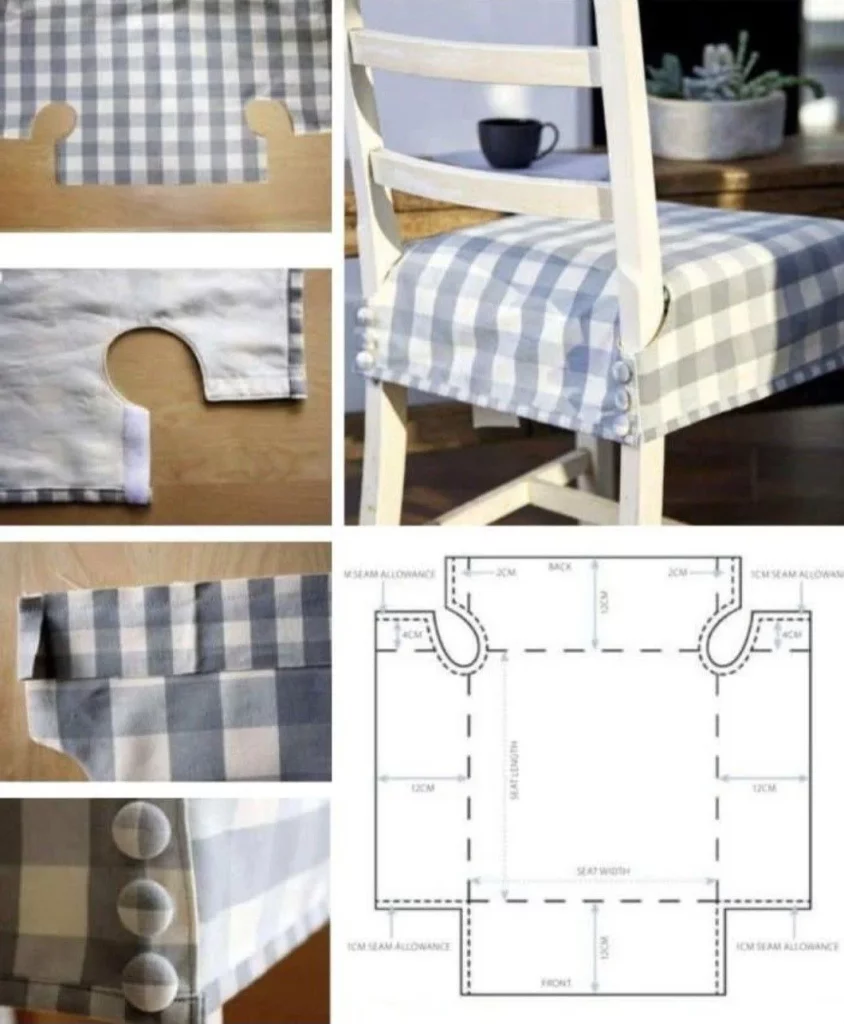
Accurate measurements are key to creating a well-fitting chair cover. Start by measuring the width and depth of the chair seat, as well as the height if you want the cover to drape slightly over the edges. Add seam allowances and extra length for quilting shrinkage.
Once measurements are complete, cut your top fabric, batting, and backing fabric according to your desired size. Make sure all layers are cut evenly so they align properly during quilting. Press your fabrics to remove wrinkles, which helps maintain accuracy.
If you plan to use a Quilting Pattern, this is the stage where you lay out your design. Arrange fabric pieces for patchwork or mark quilting lines lightly with a fabric-safe marker. Taking time during preparation ensures better results later.
Assembling the Quilt Layers
To assemble your chair cover, create a quilt sandwich by placing the backing fabric right side down, the batting in the middle, and the top fabric right side up. Smooth out each layer carefully to avoid wrinkles or puckers.
Baste the layers together using pins, clips, or spray basting. This step is essential because it keeps the layers from shifting while quilting. For beginners, pin basting in a grid pattern is often the most reliable method.
After basting, check that all edges are aligned and trim any excess batting or backing fabric. A well-prepared quilt sandwich sets the foundation for clean stitching and even quilting lines.
Quilting the Chair Cover Step by Step
Quilting is where your Chair Cover truly comes to life. For beginners, straight-line quilting is highly recommended. You can quilt parallel lines, a simple grid, or follow the seams if you used a patchwork top.
Start quilting from the center and work outward to prevent fabric distortion. Sew slowly and consistently, guiding the fabric gently through the machine. Using a walking foot can help feed layers evenly, especially when working with thicker Quilt projects.
As you quilt, take breaks to reposition the fabric and check your progress. Remember, small imperfections are part of the handmade charm. With each line of stitching, your confidence and skill will grow.
Trimming and Binding the Edges
Once quilting is complete, trim the edges of your chair cover so all layers are flush. This step gives your project a clean, professional appearance and prepares it for binding.
Binding finishes the edges and secures all layers together. Cut binding strips from coordinating fabric, join them into one long strip, and attach it around the perimeter of the Quilt. Fold the binding over and stitch it down neatly.
For beginners, machine binding is faster and easier, while hand-finished binding adds a traditional touch. Choose the method that feels most comfortable for you and fits your time frame.
Personalization and Creative Ideas
One of the most enjoyable parts of this Chair Cover – Tutorial is personalization. You can use seasonal fabrics, bold prints, or neutral tones depending on your décor. Adding contrast binding or decorative stitching enhances visual interest.
You may also customize your Quilting Pattern by incorporating appliqué, embroidered initials, or textured fabrics. These details make each chair cover unique and meaningful, especially if it is intended as a gift.
Another idea is to create a matching set for multiple chairs using the same color palette but different fabric placements. This creates a cohesive look while allowing creative variation across pieces.
Care, Use, and Long-Term Durability
Proper care ensures your quilted chair cover lasts for years. Most cotton Quilts can be machine washed on a gentle cycle with mild detergent. Always test fabric combinations beforehand if you are unsure about colorfastness.
Air drying or tumble drying on low heat helps preserve the batting and stitching. Avoid high heat, as it may cause shrinkage or wear. Regular care keeps your project looking fresh and inviting.
With daily use, quilted chair covers often become softer and more comfortable over time. This durability is one of the many reasons Quilting Pattern projects are so popular for home décor.
Final Thoughts and Invitation to Share
Making a quilted chair cover is a rewarding project that blends creativity, functionality, and learning. This Chair Cover – Tutorial was designed to guide beginners through each stage with clarity and encouragement, proving that quilting is accessible to everyone.
By completing this project, you gain practical experience with Quilt techniques while creating something beautiful and useful for your home. Each stitch tells a story and reflects the care you put into handmade work.
If you enjoyed this tutorial, share your finished chair cover with friends, on social media, or in crafting communities. Inspire others to explore Quilting Pattern projects and celebrate the joy of creating something with your own hands.