Creating your own Chicken Basket using a Quilt pattern is a fun, creative, and rewarding project—especially if you love farmhouse style or handmade decor. This beginner-friendly tutorial will guide you step by step, helping you transform simple fabric pieces into a charming and functional basket. Whether you’re new to quilting or looking for a quick weekend project, this design is perfect for building confidence and enjoying the process.
In this tutorial, you’ll learn everything from choosing materials to assembling your Chicken Basket Quilt. Along the way, you’ll also discover helpful tips, customization ideas, and inspiration to make your project uniquely yours. Let’s get started and bring this adorable basket to life!
Introduction to the Chicken Basket Quilt Pattern
The Chicken Basket Quilt pattern is inspired by rustic country living, combining the charm of chickens with the practicality of a fabric basket. This project is not only decorative but also functional—you can use it to store eggs, sewing supplies, or small household items. It’s a perfect example of how quilting can go beyond blankets and turn into something useful.
For beginners, this Quilt project is a great starting point because it uses basic techniques such as cutting, piecing, and simple stitching. You don’t need advanced skills or expensive tools. With a little patience and creativity, you can achieve beautiful results that look professional and handmade at the same time.
Another reason this Quilt pattern is so popular is its versatility. You can easily adapt the colors, fabrics, and size to suit your personal style. Whether you prefer bright, playful prints or neutral farmhouse tones, this Chicken Basket can reflect your personality while improving your quilting skills.
Materials You Will Need
Before you begin, it’s important to gather all your materials. Having everything ready will make the process smoother and more enjoyable. Most of these items are easy to find and beginner-friendly.
Here’s what you’ll need:
- Cotton fabric (for outer basket and lining)
- Fabric scraps for chicken appliqué
- Batting or interfacing for structure
- Sewing thread (matching or contrasting)
- Fabric scissors or rotary cutter
- Quilting ruler
- Pins or clips
- Sewing machine (or needle for hand sewing)
- Iron and ironing board
Choosing the right fabric is key to achieving a beautiful result. For a classic Quilt look, consider using floral prints, gingham, or polka dots. If you want a more modern style, solid colors or minimalist patterns work just as well. The combination of fabrics can completely change the final appearance of your basket.
Don’t forget to pre-wash your fabric if needed. This helps prevent shrinking later and ensures your Chicken Basket Quilt maintains its shape after use. Taking a few extra minutes for preparation can make a big difference in the final result.
Cutting and Preparing Your Fabric
The first step in creating your Chicken Basket Quilt pattern is cutting your fabric pieces. Accuracy is important here, as it will make assembling the basket much easier later on. Use a quilting ruler and rotary cutter for clean, straight edges.
You will need:
- Two rectangular pieces for the outer basket
- Two matching pieces for the lining
- Batting pieces of the same size
- Smaller fabric pieces for the chicken appliqué
Once everything is cut, take a moment to organize your pieces. Keeping them neatly arranged will help you stay focused and avoid confusion during assembly. This is especially helpful if you’re new to working with Quilt patterns.
Next, press all your fabric pieces with an iron. Smooth, wrinkle-free fabric is much easier to sew and results in cleaner seams. This simple step can elevate the overall quality of your project and make the sewing process more enjoyable.
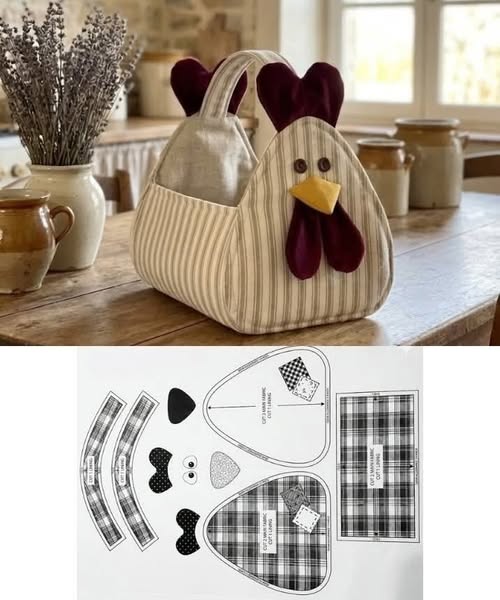
Creating the Chicken Appliqué Design
The highlight of this Quilt pattern is the adorable chicken design. This is where your creativity can really shine. You can keep the design simple or add extra details depending on your skill level.
Start by sketching or tracing a basic chicken shape onto your fabric. Cut out the pieces for the body, wings, beak, and comb. Arrange them on your basket panel until you’re happy with the layout. This step allows you to experiment before committing to stitching.
Once positioned, secure the pieces using pins or fabric glue. Then stitch them in place using a zigzag stitch or straight stitch. If you’re comfortable, you can also try decorative stitching for added texture and charm.
Adding small details like embroidered eyes or patterned wings can make your Chicken Basket Quilt even more unique. Don’t worry about perfection—handmade charm is what makes this project special.
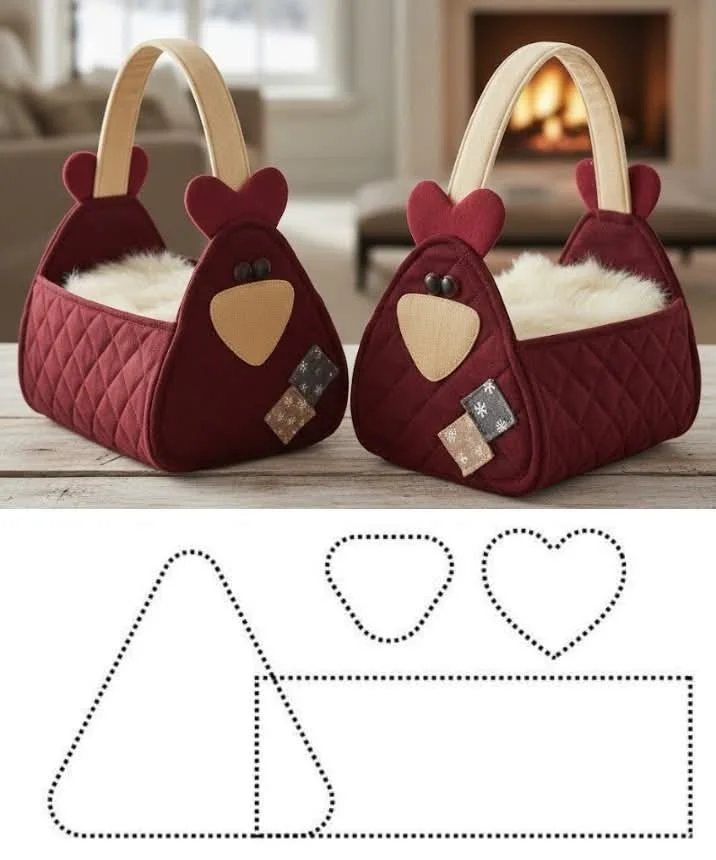
Assembling the Basket
Now it’s time to bring everything together. Begin by layering your outer fabric with batting. This adds structure and gives your basket that classic Quilt feel. Stitch around the edges to secure the layers.
Next, sew the outer pieces together along the sides and bottom, leaving the top open. Repeat the same process with the lining pieces. Make sure your seams are straight and secure, as this will affect the final shape of the basket.
To create depth, box the corners by folding them and stitching across. This step transforms your flat fabric into a three-dimensional basket. It may seem tricky at first, but once you try it, you’ll see how simple and effective it is.
Finally, place the lining inside the outer basket, right sides facing each other. Sew around the top edge, leaving a small opening to turn the basket right side out. Once turned, press the edges and topstitch for a clean finish.
Finishing Touches and Details
The finishing touches are what truly bring your Chicken Basket Quilt pattern to life. This is your chance to refine your work and add personality to your project.
Consider adding a small handle on each side for easy carrying. You can also include decorative buttons, lace, or embroidery to enhance the farmhouse aesthetic. These small details can make your basket look even more charming and unique.
Take time to press your finished basket and check for any loose threads. A clean, polished finish will make your Quilt project look more professional and long-lasting.
Customization Ideas
One of the best parts of working with a Quilt pattern is the ability to customize your project. You can easily adapt this Chicken Basket to suit different occasions or personal preferences.
Try changing the size to create a larger storage basket or a smaller decorative piece. You can also experiment with seasonal fabrics, such as pastel colors for spring or warm tones for autumn.
Another fun idea is to personalize your basket with initials or themed appliqués. This makes your project perfect for gifts or selling as handmade items.
Final Thoughts and Share Your Project
Creating a Chicken Basket using a Quilt pattern is a delightful way to explore your creativity while making something practical. This beginner-friendly project helps you build confidence and develop essential quilting skills.
Remember, every stitch you make is part of your learning journey. Don’t be afraid to experiment, make mistakes, and try new ideas. That’s how you grow as a quilter.
Now it’s your turn! Once you finish your Chicken Basket Quilt, share your project with friends, family, or your online community. Your creation might inspire someone else to start their own quilting journey.