
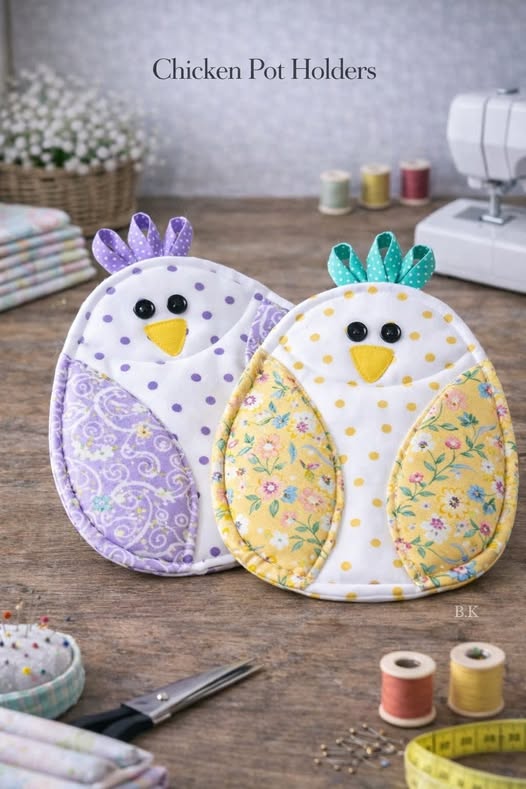
Creating something beautiful with your own hands is always rewarding, especially when it’s both decorative and functional. This Chicken Quilt Potholder tutorial is perfect for beginners who want to explore the world of Quilt projects while making something adorable for their kitchen. With its charming design and practical use, this quilt Pattern will quickly become one of your favorites.
In this tutorial, you’ll learn step by step how to create a chicken-shaped potholder using simple quilting techniques. Even if you are new to sewing or quilting, don’t worry—this guide is designed to be accessible, clear, and inspiring. By the end, you’ll have a handmade piece you can proudly use or gift.
Let’s dive into this creative journey and bring your Chicken Quilt Potholder to life!
Why You’ll Love This Chicken Quilt Project
One of the best things about this project is how beginner-friendly it is. You don’t need advanced quilting skills to complete this quilt Pattern. Basic sewing knowledge, a little patience, and creativity are enough to achieve a beautiful result.
Another reason to love this project is its versatility. You can customize colors, fabrics, and details to match your kitchen decor or seasonal themes. Whether you prefer bright farmhouse colors or soft pastels, your Chicken Quilt can reflect your personal style.
Lastly, it’s a quick and satisfying project. Unlike larger Quilt pieces that take days or weeks, this potholder can be completed in just a few hours. It’s perfect for those moments when you want a creative break without a long-term commitment.
Materials You Will Need
Before starting your Chicken Quilt Potholder, gather all the necessary materials. Having everything ready will make the process smoother and more enjoyable.
You will need cotton fabric in different colors: one for the chicken body, one for the wings, one for the beak, and one for the comb. Quilting cotton works best because it’s durable and easy to handle. You’ll also need batting or thermal lining to make your potholder heat-resistant.
Other essential supplies include scissors or a rotary cutter, pins or clips, a sewing machine (or needle for hand sewing), thread, and a fabric marker or chalk. Optional items include embroidery thread for details and bias tape for finishing edges.
Choosing quality materials will make your Quilt project more durable and professional-looking. Don’t hesitate to use fabric scraps—this is a great scrap-busting quilt Pattern!
Preparing Your Quilt Pattern Pieces
Start by drawing or printing your Chicken Quilt Pattern. The basic shapes include an oval or rounded body, a small triangle for the beak, a comb shape for the top, and a wing piece. Keep the design simple if you are a beginner.
Once your pattern is ready, place it on your fabric and carefully cut out each piece. Make sure to cut two body pieces (front and back) and one layer of batting. Precision here will make assembling your Quilt much easier later.
Before sewing, lay out all the pieces to visualize your final design. This step helps you adjust colors and placement before committing. It’s also a great moment to get creative and experiment with your quilt Pattern layout.
Step-by-Step Sewing Instructions
Begin by assembling the decorative parts of your chicken. Sew the beak and comb onto the front body piece. If you want to add eyes or details, you can embroider them or use fabric paint at this stage.
Next, attach the wing piece. You can sew it flat or add a slight padding underneath for a 3D effect. This adds texture and makes your Chicken Quilt Potholder even more charming and unique.
Once the front is complete, layer your pieces: place the back fabric right side down, then the batting, and finally the front piece right side up. Pin everything together and sew around the edges, leaving a small opening to turn it inside out.
Quilting and Finishing Touches
After turning your potholder right side out, gently push out the edges to shape your chicken. Then, topstitch around the entire piece to close the opening and give it a clean finish. This step also strengthens your Quilt.
Now comes the quilting part. You can sew simple lines across the body or follow the shape of the chicken for a decorative effect. Quilting not only enhances the look but also secures the layers together.
Finally, add a loop for hanging if desired. You can use bias tape or a small fabric strip. This finishing touch makes your Chicken Quilt Potholder practical and easy to store in your kitchen.
Creative Customization Ideas
One of the most exciting parts of working with a quilt Pattern is personalization. Try using different fabric prints like florals, polka dots, or even themed fabrics for holidays. Each variation creates a completely new look.
You can also experiment with colors. A classic chicken might be white with a red comb, but why not try blue, yellow, or even multicolored designs? This is your chance to let your creativity shine through your Quilt.
Another idea is to make a set of potholders with different chicken expressions or accessories. Add tiny bows, aprons, or stitched patterns to give each piece its own personality. These also make wonderful handmade gifts.
Tips for Beginners
If you are new to quilting, take your time with each step. Rushing can lead to mistakes, especially when cutting and aligning your fabric pieces. Precision is key in any Quilt project.
Practice stitching on scrap fabric before working on your actual project. This helps you get comfortable with your sewing machine and ensures neat, even seams throughout your quilt Pattern.
Don’t be afraid of imperfections. Handmade items have character, and each piece you create will improve your skills. Enjoy the process and celebrate your progress as you learn.
Final Thoughts and Share Your Creation
Creating a Chicken Quilt Potholder is more than just a sewing project—it’s a joyful and creative experience. From selecting fabrics to adding the final stitches, each step allows you to express your personality through your Quilt.
This beginner-friendly quilt Pattern is a great way to build confidence and develop new skills. Plus, the end result is both practical and decorative, making it a perfect addition to your kitchen or a thoughtful handmade gift.
Now it’s your turn! Try this tutorial, create your own version, and don’t forget to share your finished Chicken Quilt Potholder with friends, family, or on social media. Your creativity might inspire someone else to start their own quilting journey!