
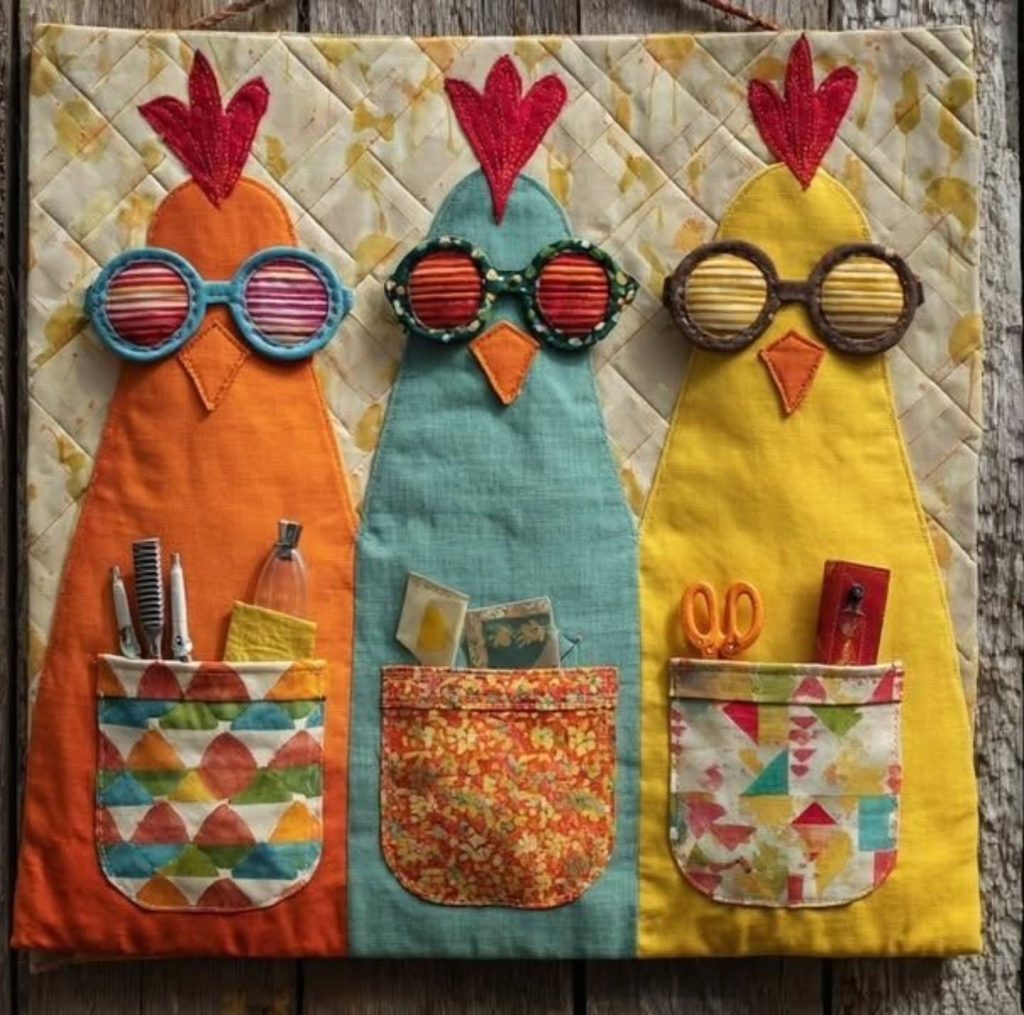
Quilting is more than just creating beautiful blankets—it’s about adding joy, personality, and function to your daily space. One of the most charming ways to do this is by making a Chicken Wall Organizer. This adorable project combines the warmth of traditional quilting patterns with practical storage, all while adding a rustic farmhouse touch to your kitchen, sewing room, or even entryway.
The beauty of this organizer lies in its balance between decoration and functionality. You get a whimsical wall hanging shaped like a chicken, complete with pockets where you can store notes, bills, recipes, scissors, or other little essentials. Instead of keeping clutter on countertops, you can store items neatly while still showing off your quilting skills.
If you are a beginner quilter, don’t worry—this project is perfect for you! The steps are simple, the quilting pattern is forgiving, and the end result is guaranteed to make you smile every time you walk by it. Let’s dive into the full tutorial, from the materials you’ll need to the finishing touches that will make your Chicken Wall Organizer uniquely yours.
Materials You’ll Need
Before you begin, it’s important to gather all your supplies in one place. Having everything ready will make the process smoother and more enjoyable. Since this project uses basic quilting techniques, you won’t need any complicated tools.
Here’s what you’ll need:
- Fabric scraps in different colors and prints (cotton is best)
- Quilting batting or felt for structure
- Backing fabric (a solid or neutral print works well)
- Scissors or rotary cutter
- Sewing machine (though you can hand-sew if you prefer)
- Pins or fabric clips
- Fabric marker or chalk
- Iron and ironing board
- Ribbon, twine, or fabric strip for hanging
- Optional: buttons, embroidery thread, or ric-rac trim for decoration
Choosing your fabrics is where creativity shines. Mix playful chicken prints, plaids, florals, or even modern geometric designs. Quilting is all about storytelling with fabric, and your wall organizer can reflect your personality or home décor style.
Cutting Your Pattern Pieces
The organizer starts with a simple chicken shape, which can be traced from a paper template. Don’t stress if your drawing isn’t perfect—quilting is forgiving, and your chicken will look adorable no matter what.
First, trace the chicken body onto two pieces of fabric and one piece of batting. This will create a quilt sandwich later on. Then, cut smaller fabric pieces for the wings, comb, beak, and tail feathers. These smaller elements add charm and detail to the overall quilting pattern.
For the pockets, cut rectangular or half-circle shapes that will attach to the chicken’s body. These can be in contrasting fabrics to really stand out. Think of each pocket as an opportunity to showcase a mini quilt block, like a log cabin or flying geese design. Not only will this highlight your quilting skills, but it will also add depth and texture to the project.
Assembling the Chicken Body
Start by layering the chicken body pieces. Place the batting in the middle, with one fabric piece facing right side up and the other facing down. Pin or clip them together, then sew around the edges, leaving a small opening for turning. Turn the piece right side out and press with an iron for crisp edges.
Once the body is ready, stitch on the smaller pieces like the beak, comb, and wings. These can be raw-edge appliquéd, which is both easy and beginner-friendly. Simply place the shapes on the chicken body and sew around the edges using a zig-zag or straight stitch. This step is where your chicken’s personality really comes to life!
If you want to quilt the chicken body, now is the time. Use straight-line quilting, free-motion designs, or even hand quilting to secure the layers. This not only adds structure but also creates a beautiful texture that makes your project look polished and professional.
Adding the Pockets
The pockets are the highlight of the organizer—they transform your quilted chicken into something functional. Take the pocket pieces you cut earlier, fold down the top edge, and hem it neatly. This prevents fraying and makes the pocket look finished.
Position the pockets onto the chicken body. Pin them securely, making sure the open side is facing upward. Sew along the sides and bottom, leaving the top open for storage. You can divide larger pockets by stitching vertical lines down the middle, creating smaller compartments for scissors, pens, or recipe cards.
Feel free to quilt the pockets before attaching them to the chicken. A simple diagonal quilting pattern not only adds structure but also ensures that the layers don’t shift with use. Remember, quilting is both decorative and practical—it holds everything together beautifully.
Finishing Touches
Once the main organizer is assembled, it’s time for the fun details. This is where your creativity takes center stage. Add buttons for eyes, stitch a little smile, or sew on some ric-rac trim for extra charm. A touch of embroidery can also make your chicken unique—for example, stitching feathers or flowers along the wings.
To hang your organizer, sew a ribbon, twine, or a fabric strip along the top edge. Make sure it’s secure, as the organizer will hold items inside the pockets. If you prefer a sturdier hanging method, you can insert a dowel rod into a fabric sleeve across the top, then tie string to the rod for balance.
Give the whole piece a final press with your iron, checking for any loose threads or uneven seams. Step back and admire your work—you’ve just transformed fabric scraps and a quilting pattern into a functional, farmhouse-chic piece of décor!
Personalization Ideas
One of the best things about quilting projects is how easily they can be personalized. The Chicken Wall Organizer is no exception, and you can make yours truly one-of-a-kind.
For a farmhouse kitchen, choose country-inspired fabrics like gingham, plaid, or chicken-themed prints. For a more modern look, experiment with bold solids or minimalist geometric designs. You can even create seasonal versions—pastels for spring, bright florals for summer, warm plaids for autumn, or festive reds and greens for Christmas.
If you enjoy traditional quilting, consider using quilt blocks as pockets. Imagine a patchwork pocket made from tiny half-square triangles or a star block peeking out from your chicken’s belly. Not only does this add visual interest, but it also lets you practice different quilting patterns on a small scale.
Why This Project is Perfect for Beginners
The Chicken Wall Organizer is a fantastic introduction to quilting for several reasons. First, the small size makes it less intimidating than a full quilt, but you still get to practice key skills like cutting, piecing, quilting, and binding.
Second, the playful design keeps the process fun and lighthearted. Beginners often feel pressure to make something perfect, but the whimsical chicken shape encourages creativity over precision. Even if your stitches aren’t perfectly straight, the end result will still look delightful and handmade.
Finally, this project gives you instant gratification. Instead of spending weeks on a quilt, you can complete the Chicken Wall Organizer in just a few sessions. Seeing a finished project so quickly is motivating and helps build confidence for tackling larger quilting patterns in the future.
Conclusion: Share Your Chicken Wall Organizer!
Now you have a complete step-by-step guide to making your very own Chicken Wall Organizer using a simple quilting pattern. You’ve learned how to cut, assemble, quilt, and personalize your project, and hopefully discovered how much fun quilting can be when it combines function with creativity.
The best part of quilting is sharing your work with others. Hang your organizer proudly in your home, or gift it to a friend who loves farmhouse décor. Better yet, share your finished piece on social media or with your quilting group—you might inspire someone else to try this cheerful project.
So grab your fabric scraps, fire up your sewing machine, and bring a little feathered fun to your walls. Quilting is all about creativity, community, and joy—and this Chicken Wall Organizer is the perfect place to start. Happy quilting!