
Sewing for children is always a delightful project, and creating a dress from a simple quilting pattern makes it even more special. This tutorial will guide you step by step through making a children’s dress using an easy-to-follow pattern. Whether you are a beginner or have some sewing experience, you will enjoy this process. Plus, we’ll include tips on personalization and creative ways to make your dress unique.
Getting Started: Why Make a Children’s Dress?
Sewing a children’s dress is one of the most rewarding projects you can take on. Not only do you get to create something adorable, but you also end up with a handmade garment filled with love and creativity. Unlike store-bought options, your creation will stand out and can even become a cherished keepsake for years to come.
The best part of using a quilting pattern for this project is the flexibility it offers. Quilting patterns are often straightforward, easy to trace, and can be adapted to different fabrics and designs. You can also use leftover fabric scraps from other quilting projects to make this dress, reducing waste while adding a unique touch.
If you are new to sewing, don’t worry. This guide is written for beginners and will walk you through each step in detail. You’ll learn not only how to cut and assemble the dress but also how to customize it to reflect your child’s personality.
Materials You Will Need
Before diving into the sewing process, gather all the necessary materials. Having everything ready will make your experience smoother and more enjoyable. Here’s a comprehensive list of what you’ll need:
- Fabric: Choose cotton or another lightweight, breathable fabric. Quilting cotton works beautifully for this dress.
- Pattern Paper: You can print or draw the dress pattern, or use the measurements provided.
- Scissors or Rotary Cutter: For cutting fabric accurately.
- Pins or Fabric Clips: To hold pieces together while sewing.
- Sewing Machine: A basic machine with a straight stitch is sufficient.
- Thread: Choose a color that matches or contrasts your fabric.
- Buttons or Snaps: For fastening at the shoulders.
- Iron and Ironing Board: To press seams and fabric pieces.
- Optional Embellishments: Patches, lace, or appliqué designs.
Having these materials on hand ensures you can follow the steps without interruptions. Remember, choosing high-quality quilting cotton not only makes sewing easier but also ensures comfort for the child wearing the dress.
Cutting the Dress Pattern
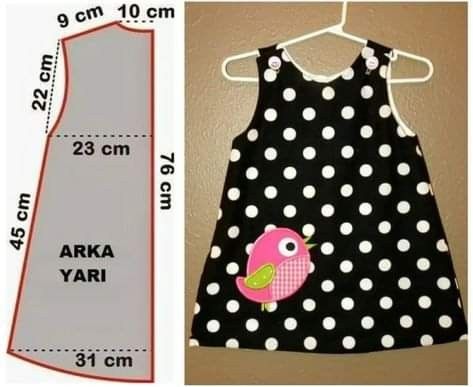
Start by preparing your quilting pattern. The dress is made from simple shapes, so even if you’re not familiar with sewing patterns, you’ll find it manageable. The key measurements are included: shoulder width, armhole depth, chest, and overall length.
Lay your fabric on a flat surface and fold it in half. Place your pattern piece on top of the fabric, aligning it with the fold where indicated. Pin the pattern securely in place to avoid shifting while cutting. Using sharp scissors or a rotary cutter, carefully cut along the edges of the pattern.
Be sure to cut two main pieces: the front and the back. The back is slightly longer at the neckline to accommodate the shoulder fastening. Mark any notches or guidelines from the pattern onto your fabric with tailor’s chalk, as these will help align the pieces later.
Sewing the Dress Step by Step
Now that your pieces are cut, it’s time to assemble the dress. Follow these steps for a neat and professional finish:
- Join the Shoulder Seams: Place the front and back pieces right sides together. Pin at the shoulders and sew using a straight stitch. Press the seams open with an iron.
- Sew the Side Seams: Keeping the pieces right sides together, align and pin the side edges. Stitch from the armhole down to the hemline. Again, press seams open.
- Finish the Neckline and Armholes: Fold the raw edges inward by about 1 cm and press. Stitch along the fold to secure, or use bias tape for a cleaner finish.
Once these steps are complete, the basic structure of your dress will be ready. Take your time with each seam, pressing as you go, since pressing is just as important as stitching when it comes to achieving a polished look.
Adding Buttons and Closures
A key feature of this children’s dress pattern is the shoulder closure. It makes the dress easy to put on and take off, while also adding a charming detail. You can choose between buttons, snaps, or even decorative ties.
To add buttons, fold and stitch the shoulder seam allowances neatly. Mark where your buttons and buttonholes will go, ensuring they align perfectly. Sew buttonholes on one shoulder and attach buttons on the opposite side. If you prefer snaps, simply attach them using snap pliers.
Closures are not only functional but can also be decorative. Consider choosing colorful buttons, themed snaps, or even handmade fabric-covered buttons to give your dress a personal touch.
Hemming the Dress
The hemline is the final step in sewing your dress. Fold the raw edge of the bottom hem up by 1 cm and press. Then fold it up again by another 2–3 cm to encase the raw edge. Pin and sew along the folded edge to secure.
A neatly finished hem not only looks professional but also ensures durability. Take care to keep your stitching straight and even. For an extra special touch, you could use a decorative stitch on your sewing machine.
If you’re making the dress as part of a quilting project, consider using a contrasting fabric strip for the hem. This creates a playful border and ties into the quilting theme.
Ideas for Personalization
One of the joys of making handmade clothing is the opportunity to personalize it. With this children’s dress quilting pattern, you can experiment with endless customization options.
Appliqué is a popular choice. Add a fun shape like a bird, flower, or heart to the front of the dress. You can cut these shapes from fabric scraps left over from other quilting projects. Another option is embroidery—stitch a child’s initials, a favorite animal, or a whimsical design to make the dress unique.
You can also mix and match fabrics. Try using a solid fabric for the main dress and a coordinating quilting cotton with patterns for the pockets, hem, or shoulder straps. This not only adds visual interest but also makes your project more creative and personal.
Using Quilt Techniques in Dressmaking
While this project is primarily about sewing a dress, incorporating quilting techniques can make it even more special. For instance, you can use patchwork for the front panel, creating a colorful, quilted effect. This not only uses up small fabric scraps but also adds a textured look.
Quilted appliqué is another great idea. Cut quilt block shapes, such as stars or hearts, and sew them onto the dress. These little details bring the quilting tradition into garment-making, blending the two crafts beautifully.
If you’re already familiar with quilting patterns, you might enjoy designing a dress that reflects your favorite block designs. Imagine a dress with a Log Cabin-inspired hem or a Nine-Patch bodice detail—it’s a wonderful way to merge quilting and dressmaking.
Caring for the Finished Dress
Once your handmade dress is complete, it’s important to care for it properly. Since quilting cotton is often used, the dress will be durable but may shrink if not pre-washed. Always pre-wash your fabric before sewing to avoid size changes later.
Wash the dress in cold water on a gentle cycle to preserve colors and prevent wear. Air-dry when possible, or tumble dry on low heat. Iron as needed, but take care with appliqué or embellishments.
With proper care, this handmade children’s dress will last for years. It can even be passed down to siblings, cousins, or kept as a keepsake of your sewing journey.
Share Your Project!
Now that you’ve completed your children’s dress, it’s time to celebrate your accomplishment! Handmade projects deserve to be shown off, whether to family, friends, or fellow sewing enthusiasts. Share pictures of your finished dress on social media or quilting forums to inspire others.
If you’ve added your own twist to the quilting pattern, be sure to mention it. Others love seeing creative ideas, and your work might inspire someone else’s project. Handmade crafts thrive in communities where people share and learn from one another.
So, grab your fabric, set up your sewing machine, and start creating. With this tutorial, you have everything you need to make a beautiful, personalized children’s dress. Happy sewing, and don’t forget to share your quilting pattern masterpiece with the world!