
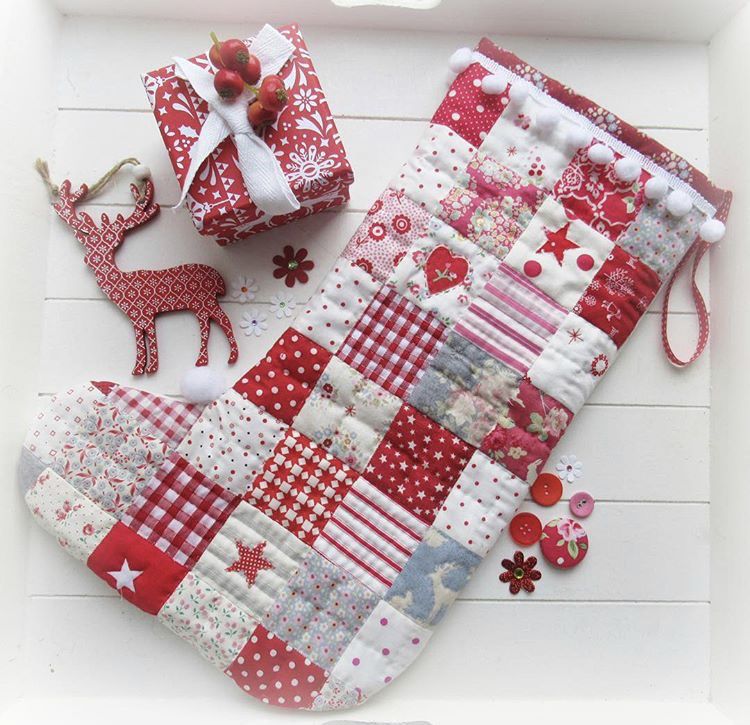
The holiday season is the perfect time to bring out your sewing machine, colorful fabrics, and a touch of creativity. One of the most heartwarming projects you can try is making a Christmas Stocking Quilt, a festive decoration that combines the coziness of quilting with the magic of the holidays. Quilts have long been cherished as keepsakes, and when transformed into stockings, they add a handmade charm that feels extra special.
This project is not only a wonderful way to decorate your home but also a thoughtful gift idea. Imagine family members hanging personalized quilted stockings by the fireplace, each crafted with love. Whether you are a beginner or have years of quilting experience, this tutorial will guide you step by step through the process, ensuring your finished stocking is as festive as it is functional.
Throughout this tutorial, we’ll cover everything from gathering materials to assembling your stocking. By the end, you’ll have a beautiful quilt pattern that can be reused year after year, and you’ll also learn a few ideas for customization to make each stocking truly unique.
Materials You’ll Need
Before starting, it’s important to prepare all the materials and tools for your Christmas Stocking Quilt. Gathering everything beforehand will make the sewing process smooth and enjoyable. Here’s what you’ll need:
- Fabric scraps in festive colors (reds, greens, golds, whites, or holiday prints)
- Lining fabric (cotton or flannel works well)
- Batting (to give the stocking its quilted texture)
- Stocking template (you can draw your own or print one online)
- Scissors or rotary cutter and cutting mat
- Sewing machine and matching thread
- Pins or clips
- Optional embellishments: ribbons, buttons, lace, or embroidery
These materials are easy to find and affordable, making this an accessible project for all skill levels. Using fabric scraps is also a fantastic way to repurpose leftover quilting pieces while adding variety and charm to your stocking.
If you don’t already have a quilt pattern for your stocking, don’t worry. You can simply sketch a stocking shape on paper and cut it out as your template. Quilting is all about creativity, and there’s plenty of room for flexibility in this project.
Preparing the Fabric Pieces
Once your materials are ready, the next step is preparing your fabric pieces. Begin by choosing the fabrics you’d like to use for your quilted stocking. Mixing solid colors with holiday-themed prints creates a balanced look, while metallic fabrics can add a festive sparkle.
Cut your fabrics into small squares, rectangles, or strips, depending on the quilt design you want. For beginners, a simple patchwork design made from 4-inch squares is an excellent choice. Lay the pieces out in the shape of a stocking to get an idea of how they’ll look once sewn together.
Don’t forget to cut two pieces of lining fabric and two pieces of batting in the shape of your stocking template. These will give the quilted stocking structure and a soft, cozy feel. The key is precision—cutting carefully ensures the quilt pieces align properly when sewn together.
Assembling the Quilt Pattern
Now it’s time to bring your quilt pattern to life. Start by sewing your fabric pieces together using a ¼-inch seam allowance. Press the seams flat with an iron as you go to keep everything neat and professional-looking. This step not only improves the appearance but also makes the sewing process smoother.
Once your quilt top is complete, layer it with batting and lining. The order should be: quilt top (right side up), batting, and then lining (right side down). Pin or clip them together carefully, ensuring the layers stay aligned. Quilting stitches can now be added across the surface, either in straight lines, diagonal crisscross patterns, or even free-motion quilting if you feel adventurous.
After quilting, place the stocking template on top of the quilted fabric and trace the shape. Cut out two stocking shapes (front and back), making sure both are mirror images so they align correctly when sewn together.
Sewing the Stocking Together
With your quilted stocking shapes ready, it’s time to sew them into a finished stocking. Place the two quilted pieces right sides together and pin around the edges. Sew along the outer edge, leaving the top open. Clip the curves to prevent bulk and turn the stocking right side out.
Next, prepare the lining. Place the two lining pieces right sides together and sew along the edge, again leaving the top open. Do not turn the lining right side out—this will help when inserting it into the quilted stocking. Slide the lining inside the stocking, aligning the seams and raw edges.
Finally, prepare a small strip of fabric or ribbon as a hanging loop. Place it between the lining and stocking at the top edge. Sew around the top edge to secure everything in place, then turn the lining inside to finish. Press the stocking gently, and you’ll see your festive project come to life.
Personalization Ideas
One of the best aspects of creating a Christmas Stocking Quilt is the ability to personalize it. Each family member can have their own unique stocking, reflecting their personality and style. For example, you can embroider names along the cuff of the stocking or add appliqué shapes such as stars, snowflakes, or even reindeer.
If you love experimenting with quilt patterns, try using a log cabin or star block design instead of simple patchwork. These designs give the stocking a more intricate look and allow you to showcase your quilting skills. You could even use fabric scraps from previous projects to add sentimental value.
For extra flair, consider embellishments like lace trims, pom-poms, or buttons. Metallic thread can also add a sparkle to your quilting stitches, making the stocking even more festive. Personalization not only makes the stockings unique but also turns them into cherished family keepsakes.
Sharing the Holiday Spirit
Now that your Christmas Stocking Quilt is complete, you can enjoy the joy it brings to your home. Hang it by the fireplace, use it as a holiday gift bag, or display it as part of your festive décor. Handmade decorations carry warmth and love that store-bought items simply cannot match.

Don’t forget to share your creation with friends and family. Handmade quilted stockings make thoughtful gifts, especially when personalized. They’re practical, decorative, and infused with the effort and care you’ve put into them.
We’d love to see your finished stocking, too! Share your project online or with your quilting community. By exchanging ideas and designs, you’ll inspire others to try this quilt pattern and spread the holiday spirit one stitch at a time.