
There’s something incredibly charming about handmade Christmas decorations. Beyond the shimmer of store-bought ornaments, nothing compares to the warmth and personal touch of a piece you’ve created yourself. If you’ve ever wondered how to combine your love for quilting with festive décor, this tutorial is the perfect place to start. Using nothing more than fabric scraps and a simple quilting pattern, you can create one-of-a-kind Christmas tree decorations that add heart and history to your holiday home.
Quilting is often about storytelling. Each scrap of fabric carries memories—whether from an old quilt, a favorite dress, or leftover sewing projects. By transforming these scraps into Christmas tree ornaments, you’re not only reducing waste but also weaving your personal story into your holiday decorations. The end result is more than just pretty décor; it’s a collection of meaningful keepsakes.
This project is ideal for beginners. Even if you’re new to sewing or quilting, the steps are easy to follow, and you can complete each ornament in under an hour. With just a handful of supplies and a little creativity, you’ll have a festive set of decorations ready to hang or gift. Let’s dive into this quilting-inspired holiday project!
Materials You’ll Need
Before we begin, let’s gather the essentials. The beauty of this quilting pattern is that it doesn’t require fancy fabrics or expensive tools—just what you already have in your sewing kit. Scraps of cotton fabric are perfect, especially if they’re colorful, patterned, or textured. Think plaids, florals, or festive prints.
Here’s a complete list of materials for your Christmas tree decorations:
- A variety of fabric scraps (cotton or quilting cotton works best)
- Lightweight fusible interfacing or batting for structure
- Needle and thread (or a sewing machine)
- Ribbon or twine for hanging
- Scissors or a rotary cutter
- Pins or fabric clips
- A simple quilting pattern for trees or stars (you can hand-draw your own)
Optional extras include buttons, beads, sequins, or embroidery floss to add extra sparkle. If you’ve ever worked on a quilt before, you may already have most of these materials on hand, which makes this project both affordable and eco-friendly.
Step-by-Step Instructions: Cutting and Preparing the Fabric
The first step is preparing your fabric scraps. Choose pieces that complement each other in color and pattern. For a cohesive look, stick with a holiday palette like reds, greens, and golds. If you prefer a modern vibe, try neutrals or even bright, unconventional shades.
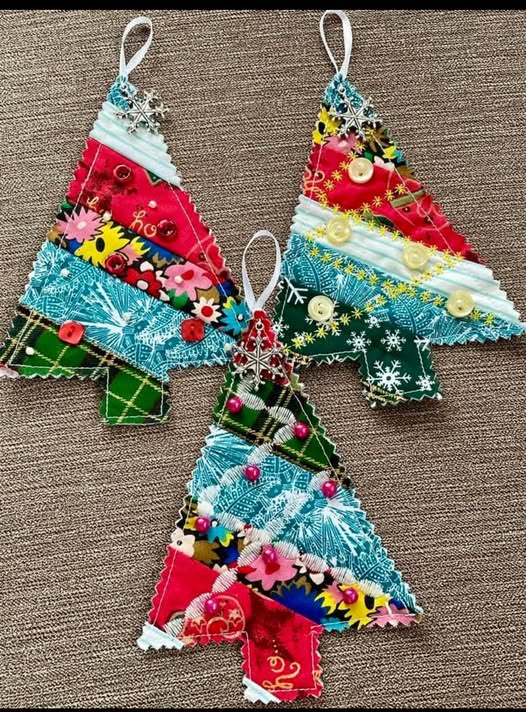
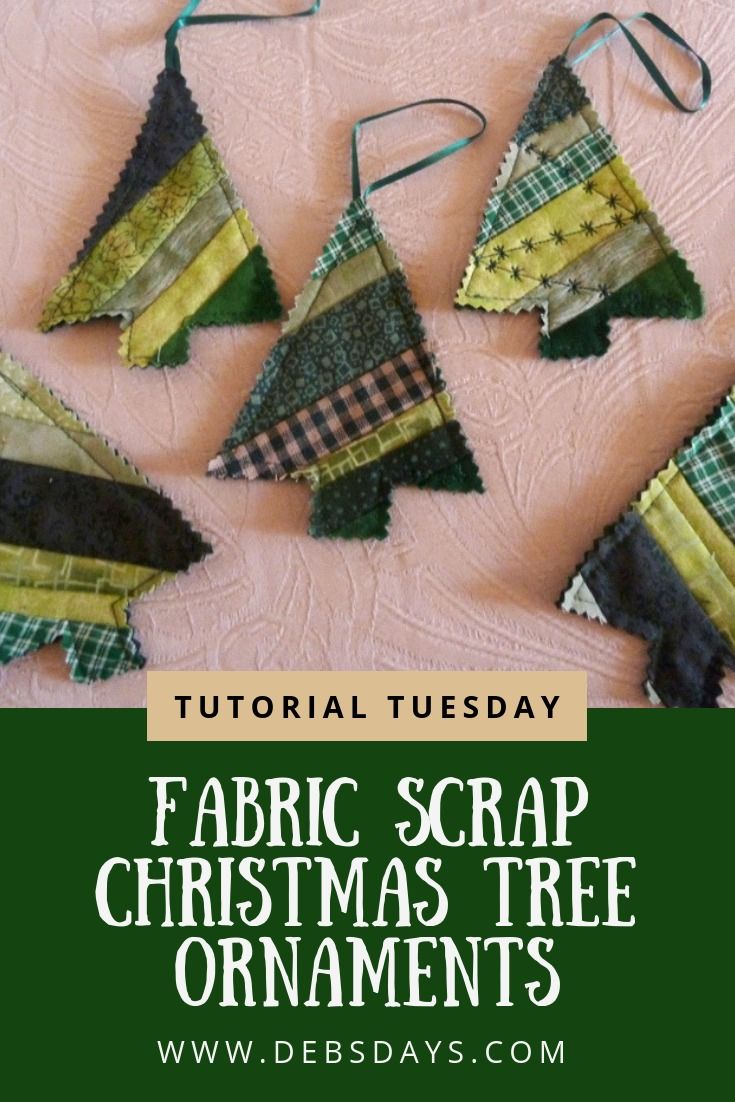
Next, print or sketch a simple Christmas tree quilting pattern. You can make a classic triangle-shaped tree, a star, or even a heart. Place your pattern on the back of your fabric scrap, trace around it, and cut out two identical pieces. These will form the front and back of your ornament.
To give your decoration structure, cut a piece of interfacing or batting in the same shape. Sandwich this between your two fabric pieces. This not only adds durability but also gives your ornament a soft, quilted look that mimics the feel of a mini quilt block.
Sewing the Decorations Together
Now it’s time to stitch! Place the two fabric shapes right sides together with the batting or interfacing on top. Sew around the edges, leaving a small opening so you can turn the piece inside out. If you’re hand-stitching, a simple running stitch works fine. If you’re using a sewing machine, a small straight stitch will keep everything secure.
After sewing, carefully turn the piece right side out through the opening. Use a pencil or blunt tool to push out the corners for crisp edges. Give it a quick press with an iron to smooth out wrinkles and help the fabric hold its shape.
Before you close the opening, insert a small loop of ribbon or twine at the top of your ornament. This will allow you to hang your creation on the Christmas tree. Once the ribbon is in place, stitch the opening closed by hand or machine, making sure the loop is firmly secured.
Adding Quilting Details and Embellishments
Here’s where the quilting magic comes in. Using a needle and thread or your sewing machine, add decorative quilting stitches to the surface of your ornament. You can stitch straight lines, crosshatch designs, or even tiny stars and snowflakes. This step gives your decoration that authentic quilted look while also adding texture and durability.
If you love embellishments, now is the time to get creative. Sew on buttons as ornaments, add beads for sparkle, or embroider tiny details like garlands or initials. Each stitch adds a layer of personality to your decoration. Because these are small projects, they’re also perfect for practicing new quilting techniques without committing to a large quilt.
Don’t worry about perfection—these ornaments are meant to be charmingly handmade. Sometimes the wonky stitches or uneven edges are what make them extra special. The goal is to create something joyful and festive, not flawless.
Creative Variations and Personalization
One of the joys of quilting is the endless room for creativity. With this simple pattern, you can experiment with countless variations. Instead of Christmas trees, try making stars, bells, or mitten-shaped ornaments. Each shape can be made using the same basic method: fabric scraps, batting, stitching, and a ribbon loop.
Another fun idea is to use themed fabrics. For example, use fabric scraps from an old quilt you made, turning leftover pieces into decorations that match your bedding or holiday table runner. This makes your quilting projects feel connected and cohesive. You could also make a set of ornaments from scraps of a baby quilt, creating a sentimental keepsake for a child’s first Christmas.
You can even go beyond the tree—these quilted ornaments make wonderful gift toppers, garlands, or stocking stuffers. Tie one onto a wrapped present, and the recipient gets not only a gift but also a handmade decoration they can treasure.
Why Fabric Scrap Decorations Are Special
Unlike store-bought ornaments, fabric scrap decorations have a heartwarming authenticity. They embody the spirit of quilting—resourcefulness, creativity, and the joy of making something by hand. Every scrap carries its own history, and when stitched together, they create ornaments that feel like heirlooms.
These decorations are also a wonderful way to practice quilting on a small scale. If you’re learning new stitches or experimenting with a quilting pattern, a small ornament is less intimidating than a full quilt. It allows you to play, practice, and improve while creating something useful and beautiful.
Plus, making these ornaments is a delightful holiday activity for families. Kids can help choose fabrics, cut shapes, or add embellishments, making the process itself a memory worth cherishing. The decorations you create together will become part of your holiday traditions for years to come.
Conclusion: Share the Joy of Handmade Quilting
By now, you’ve seen how easy and rewarding it is to make Christmas tree decorations from fabric scraps. With just a simple quilting pattern, a few stitches, and a little imagination, you can transform leftover fabric into festive ornaments that brighten your home. These handmade treasures are not just décor—they’re stories, memories, and tokens of love stitched into every seam.
So, gather your scraps, set up your sewing space, and start quilting your way into the holiday spirit. Whether you make one ornament or a whole collection, each piece will reflect your creativity and heart. Don’t be afraid to experiment, personalize, and enjoy the process.
Finally, we’d love to see your creations! Share your finished fabric scrap decorations with friends, family, or on social media. Inspire others to try quilting and show how simple scraps can become magical Christmas keepsakes. Happy quilting and happy holidays!