
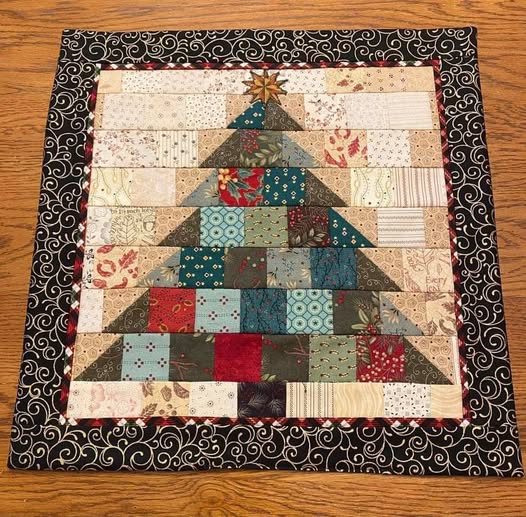
The holiday season is the perfect time to get creative with quilting, and what better way to celebrate than making a Christmas Tree Quilt? This charming quilt pattern brings festive cheer to any room and makes a wonderful gift for loved ones. Whether you are a beginner or have some quilting experience, this tutorial will guide you through every step to create your own Christmas Tree Quilt.
Quilting is not just about sewing pieces of fabric together; it’s about telling a story through patterns, colors, and textures. The Christmas Tree Quilt pattern combines traditional holiday motifs with simple geometric shapes, making it approachable yet visually striking. With this tutorial, you will learn not only the basic techniques but also tips to personalize your quilt for a unique holiday touch.
Before diving into the steps, it’s important to gather all necessary materials and understand the basic layout of your quilt. Planning ahead ensures a smooth process and a beautiful finished product. Keep reading to discover a step-by-step guide to crafting your festive quilt masterpiece.
Materials Needed for Your Christmas Tree Quilt
Before you start sewing, make sure you have all the materials ready. This ensures your project progresses without interruptions and allows you to focus on the fun part: quilting!
For this Christmas Tree Quilt, you will need:
- Assorted fabrics for the tree, ornaments, and background
- Quilting cotton for the main pieces
- Batting for the quilt’s middle layer
- Backing fabric
- Thread in coordinating colors
- Rotary cutter, cutting mat, and quilting ruler
- Pins or fabric clips
- Sewing machine or needle for hand sewing
Choosing festive fabrics can make your quilt really pop. Think of greens for the tree, reds and golds for ornaments, and a neutral background like cream or white. Using the right fabrics and tools is essential for achieving clean lines and crisp shapes in your quilt pattern.
Consider investing in a quilting ruler and rotary cutter if you don’t already have them. These tools make cutting fabric easier and more precise, which is especially helpful for beginners working on a detailed quilt pattern like this one.
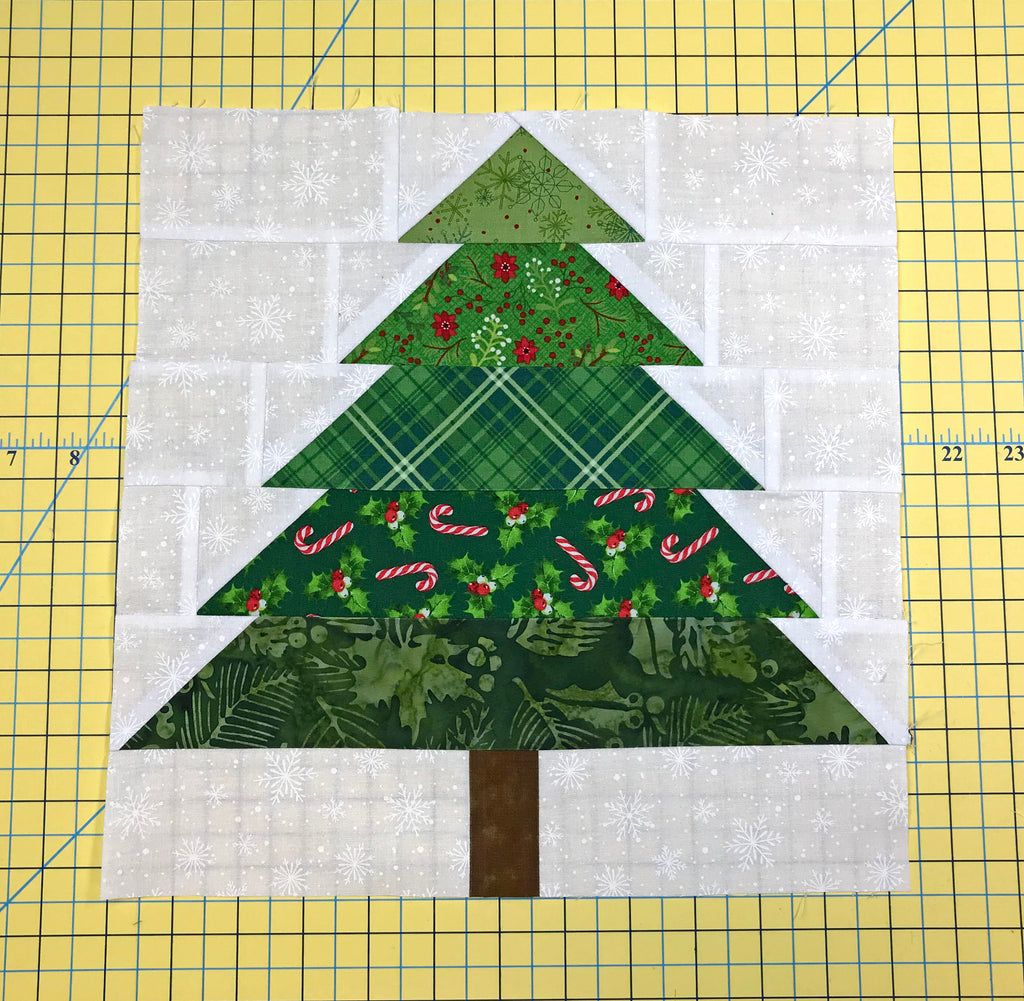
Step 1: Cutting Your Fabric Pieces
The first step in your Christmas Tree Quilt is to cut all fabric pieces according to the quilt pattern. Precise cutting ensures your quilt blocks fit together perfectly.
Begin by cutting triangles for the Christmas trees, squares for the background, and small shapes for ornaments if you want to include them. The size of each piece will depend on the overall dimensions of your quilt, but a simple layout could include 12” squares for blocks and triangles of varying sizes to form the tree.
Labeling your fabric pieces can prevent confusion while assembling. You can even arrange them on a design wall or large surface to visualize how your quilt pattern will look. This step is crucial in making sure your quilt has a balanced and harmonious design.
Step 2: Assembling the Quilt Blocks
Once all fabric pieces are cut, it’s time to assemble your quilt blocks. This is where the Christmas tree design begins to take shape.
Start by sewing triangles together to form the tree shape. Then, attach the background squares around the tree. Press seams carefully after each step to ensure a flat and neat finish. Precision here enhances the overall look of your Christmas Tree Quilt pattern.
If you’re adding ornaments or decorative accents, sew them onto the tree blocks now. Appliqué techniques can add texture and dimension to your quilt, making it even more festive. Take your time with this step; attention to detail will pay off in the final result.
Step 3: Piecing the Quilt Top
After assembling all individual blocks, it’s time to piece them together to form the quilt top. This is when your quilt truly starts to come alive.
Lay out all blocks according to your planned design, ensuring even spacing and alignment. Sew blocks together in rows, then join the rows to complete the quilt top. Press seams carefully, and check for any alignment issues before moving on.
At this stage, step back and admire your work. You’ve transformed individual fabric pieces into a cohesive quilt pattern, and you’re almost ready to move to the quilting stage. The quilt top is your canvas; ensure you’re happy with the design before proceeding.
Step 4: Adding Batting and Backing
Once your quilt top is complete, it’s time to add batting and backing to give your quilt warmth and structure.
Place the backing fabric right side down, then layer the batting, followed by the quilt top right side up. Smooth out wrinkles and secure layers with pins or basting spray. This sandwich forms the basis for quilting and ensures your Christmas Tree Quilt holds together beautifully.
Take care to align all layers properly. Wrinkles or shifts at this stage can cause uneven quilting, which might affect the overall appearance of your quilt pattern. Preparation here sets you up for smooth quilting.
Step 5: Quilting Your Christmas Tree Quilt
With your quilt sandwich ready, it’s time to quilt! This step adds texture, secures layers, and brings your Christmas Tree Quilt to life.
You can quilt by hand or use a sewing machine, depending on your preference. Simple straight-line quilting works well for beginners and emphasizes the geometric shapes of your quilt pattern. Alternatively, free-motion quilting allows for creative designs, like swirling patterns around the trees or ornaments.
Quilt slowly and carefully, especially around intricate areas. Your stitching not only secures the quilt but also adds a unique decorative touch. Remember, the goal is to enhance the design while keeping layers stable.
Step 6: Binding the Quilt
The final step in making your Christmas Tree Quilt is binding. Binding finishes the edges, giving your quilt a polished and professional look.
Cut strips of fabric for the binding, fold them in half, and sew them around the edges of the quilt. Miter corners for a clean finish, and hand-stitch the binding to the back for a neat appearance. Choosing a festive color for the binding can enhance your quilt’s holiday theme.
Binding not only frames your quilt but also protects the edges from fraying. Take your time and enjoy this finishing touch—it’s the final step in turning your quilt pattern into a beautiful holiday decoration.
Ideas for Personalizing Your Christmas Tree Quilt
One of the most enjoyable parts of quilting is adding personal touches. Your Christmas Tree Quilt pattern can reflect your style, family traditions, or holiday colors.
Consider adding fabric appliqués like stars, gifts, or snowflakes for extra charm. Embroidery or fabric paint can also personalize the quilt with names, dates, or festive messages. For a modern twist, use bold, unconventional colors instead of traditional greens and reds.
Personalization makes your quilt a memorable keepsake. Each decision—from fabrics to embellishments—adds to the story your quilt tells. Don’t be afraid to experiment and make it uniquely yours!
Sharing Your Quilt and Inspiring Others
After finishing your Christmas Tree Quilt, it’s time to celebrate and share your creation. Quilting is a community activity, and your work can inspire others to start their own projects.
Take photos and share them on social media, quilting forums, or with friends and family. Explain the quilt pattern you used, any personalization you added, and tips you learned along the way. Sharing your process encourages creativity and connects you with other quilters.
Remember, every quilt tells a story. By sharing your Christmas Tree Quilt, you’re spreading festive cheer and inspiring others to start their own quilting journey.
Making a Christmas Tree Quilt is a joyful and rewarding experience. From selecting fabrics to stitching the final binding, each step allows you to explore your creativity and celebrate the holiday season. This step-by-step tutorial, with clear instructions and thoughtful tips, is designed to help even beginners succeed in creating a beautiful quilt pattern. Enjoy the process, personalize your design, and don’t forget to share your festive masterpiece!