
Nothing captures the warmth and charm of the holidays quite like a Christmas Wreath Quilt. With its festive colors, cozy design, and beautiful craftsmanship, this quilt pattern is perfect for gifting, decorating, or simply enjoying on a chilly winter evening. Whether you’re a beginner looking for your first holiday quilt or a seasoned quilter seeking a new seasonal project, this guide will walk you through creating your own Christmas Wreath Quilt – from fabric selection to the final stitch.
In this tutorial, we’ll explore everything you need to know about this cheerful quilt pattern, with clear instructions, useful tips, and a helpful materials list. Let’s get started!
Materials Needed for Your Christmas Wreath Quilt
Before diving into the process, make sure you have everything ready. Here’s a full list of materials you’ll need to create this festive quilt.
Fabric Requirements:
- 1 yard of green fabric (for the wreath)
- ½ yard of red fabric (for berries, ribbons, and accent)
- 1 yard of white or cream background fabric
- ¼ yard of gold or metallic fabric (optional, for decorative bows or sparkle)
- ½ yard of binding fabric
- 1½ yards of backing fabric
- Batting (at least 42″ x 42″)
Tools & Notions:
- Rotary cutter and cutting mat
- Quilting ruler
- Fabric scissors
- Sewing machine with a ¼” foot
- Iron and ironing board
- Quilting pins or clips
- Quilting thread (white, green, and red)
- Marking tool or chalk pencil
Having these supplies on hand will ensure a smooth quilting experience. Always pre-wash your fabrics if they are prone to shrinking.
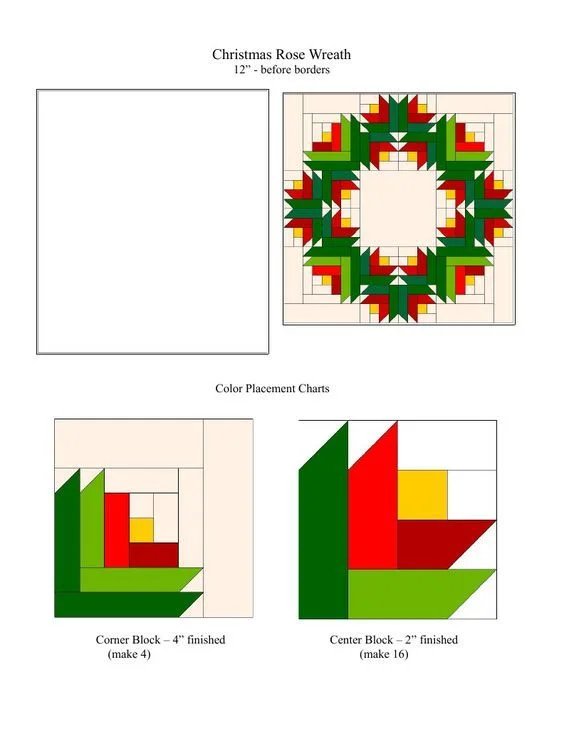
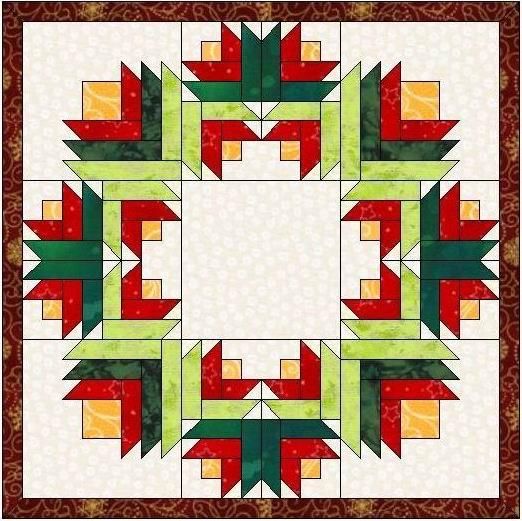
Designing the Christmas Wreath Quilt Pattern
Creating a Christmas Wreath quilt pattern is all about combining simple shapes in festive colors. Think traditional holiday motifs—wreaths, bows, berries, and ribbons—arranged in a visually balanced block layout.
Classic Wreath Layout
The design typically centers around a circular wreath made from green fabric strips or leaf-shaped blocks. You can piece this together using half-square triangles or appliqué for more detailed leaves. The red berries can be added using small circle appliqués or simple patchwork squares.
Bow and Ribbon Embellishments
Adding a bright red bow at the bottom or top of the wreath instantly enhances the holiday spirit. You can use contrasting fabrics or add a metallic fabric for sparkle. Don’t forget to plan where these embellishments go as you arrange your quilt top.
Block Sizes and Layout
This quilt is typically constructed as a single large centerpiece block (around 36″ x 36″) or multiple smaller blocks (e.g., 4 blocks of 18″ x 18″) laid out in a 2×2 grid. Make sure your measurements and seam allowances are consistent to keep your blocks aligned.
Cutting the Fabric Pieces
Precision is key in quilting. Take your time while cutting to ensure your blocks and borders fit together smoothly.
Cutting Instructions:
- Green Fabric (Wreath Leaves):
- 24 half-square triangles, 4″ x 4″
- 12 rectangles, 2″ x 6″
- Red Fabric (Berries & Bow):
- 8 circles, 1.5″ diameter
- 2 bow pieces, 3″ x 5″
- 4 squares, 2″ x 2″ (for corner accents)
- Background Fabric:
- 16 squares, 4″ x 4″
- 12 rectangles, 2″ x 6″
- 4 corner triangles, cut from 5″ squares
- Binding Fabric:
- 5 strips, 2.5″ x WOF (width of fabric)
Take care when cutting circles and curves for the appliqué elements. Using freezer paper templates or fusible web can make appliqué much easier and cleaner.
Assembling the Quilt Top
With your pieces cut and ready, it’s time to start piecing your quilt pattern together. This step is where your design starts to come to life.
Laying Out Your Design
Start by laying your blocks on a flat surface or design wall. Arrange the green and red pieces to form a wreath shape, with background blocks filling the negative space. Make sure the symmetry and color balance look appealing before sewing anything.
Piecing the Blocks
Use a ¼” seam allowance to piece each unit together. Begin by joining your half-square triangles to form leaf shapes. Then assemble the main wreath block, followed by any corner embellishments. Press each seam flat as you go to maintain accuracy.
Adding Appliqué Accents
Now it’s time to attach your berries and bow. You can use hand stitching, a zig-zag stitch, or raw-edge appliqué depending on your style. This is a great opportunity to add metallic threads or embroidery for extra texture and charm.
Quilting the Layers
Once your quilt top is complete, it’s time to layer, baste, and quilt.
Making the Quilt Sandwich
Create your quilt sandwich by layering the backing fabric (wrong side up), batting, and quilt top (right side up). Smooth each layer carefully to prevent wrinkles and use safety pins or basting spray to hold them together.
Choosing a Quilting Design
For this project, a simple echo quilting or diagonal cross-hatch pattern works beautifully. You can also outline the wreath and bow for a more sculpted look. If you’re comfortable with free-motion quilting, consider adding swirls or snowflakes in the background.
Quilting Tips
Start quilting from the center and work outward to avoid puckering. Use a walking foot if you’re doing straight-line quilting. Keep your stitches even and check the back frequently to ensure no bunching occurs.
Binding and Finishing
Binding is the final touch that frames your quilt and completes the project.
Attaching the Binding
Use the strips you cut earlier to bind your quilt. Fold each strip in half lengthwise and press. Attach the binding to the front of the quilt using a ¼” seam, mitering the corners as you go. Then fold it over to the back and hand-stitch or machine-stitch in place.
Adding a Label
Don’t forget to sign your work! Add a fabric label with the date and a holiday message. This is especially important if you’re gifting the quilt—it adds a personal and heartfelt touch.
Washing and Care
Wash your quilt on a gentle cycle with cold water and tumble dry low or lay flat to dry. This will give your quilt a soft, crinkled look and make it extra cozy for the holidays.
Creative Ideas and Variations
If you love this design, there are endless ways to make it your own!
Color Variations
Try using plaid fabrics, icy blues and silvers for a winter wonderland vibe, or even vintage holiday prints for a nostalgic twist. Don’t be afraid to experiment!
Embellishment Options
Add buttons for berries, jingle bells on the bow, or even embroidery details like snowflakes or names. These extras make your quilt pattern stand out and feel truly unique.
Gifting Suggestions
This quilt makes a wonderful holiday gift. Wrap it in a large ribbon or place it in a keepsake box with a holiday card. Handmade quilts are among the most treasured presents someone can receive.
Conclusion
Creating your own Christmas Wreath Quilt is more than just sewing—it’s a joyful expression of creativity, tradition, and warmth. This quilt pattern offers a perfect blend of festive design and cozy comfort, making it ideal for your holiday home or as a heartfelt gift.
We hope this guide has inspired you to start stitching your very own holiday masterpiece. Whether you follow the classic design or create a modern twist, remember to enjoy the process and infuse your quilt with love and cheer.
Happy quilting, and Merry Christmas!