
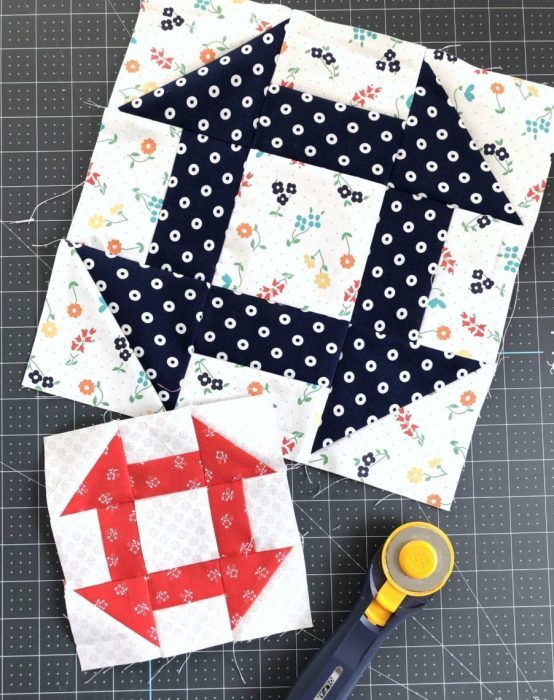
The Churn Dash quilt block is one of the most beloved and recognizable quilt patterns in the quilting world. Its simple design, made up of squares, half-square triangles, and rectangles, makes it an excellent choice for beginners who want to create something traditional yet versatile. Despite its simplicity, the Churn Dash block can look incredibly sophisticated when pieced together in different fabrics and color palettes.
This quilt block gets its name from its resemblance to the paddles of an old-fashioned butter churn. It’s a design that has been around for centuries and continues to inspire quilters of all skill levels. Whether you’re new to quilting or a seasoned maker, the Churn Dash quilt pattern offers the perfect balance of history, beauty, and creativity.
In this tutorial, we’ll walk step by step through making a Churn Dash quilt block, starting with the materials you’ll need, cutting instructions, piecing methods, and some fun customization ideas. By the end, you’ll feel confident making this block and maybe even start a full quilt made entirely of Churn Dash blocks.
Materials You Will Need
To get started with your Churn Dash quilt block, you’ll need just a few basic materials. Most of these are already staples in a quilter’s toolbox, which makes this project approachable and cost-friendly. The beauty of this quilt pattern is that it doesn’t require any special tools or advanced techniques, just accurate cutting and sewing.
Here’s what you’ll need:
- Two contrasting fabrics (one for the background and one for the block design)
- Rotary cutter and cutting mat
- Quilting ruler
- Sewing machine with a ¼” foot (or the ability to sew a consistent seam)
- Thread in a neutral color
- Iron and pressing surface
If you’re creating multiple Churn Dash blocks to assemble into a larger quilt, make sure to cut enough fabric ahead of time. Choosing high-quality cotton fabric will ensure your quilt block pieces hold their shape and press beautifully, making the assembly process smoother.
Cutting Instructions
For this tutorial, we’ll be making a 12” finished Churn Dash quilt block. You can easily resize the block by adjusting the cutting measurements proportionally, but this size is a classic choice for beginners.
Cut from your background fabric:
- 1 square at 4 ½” x 4 ½” (center)
- 4 rectangles at 2 ½” x 4 ½”
- 2 squares at 5” x 5” (for half-square triangles)
Cut from your contrasting fabric:
- 4 squares at 2 ½” x 2 ½”
- 2 squares at 5” x 5” (for half-square triangles)
Having everything cut accurately at this stage will set you up for success. Double-check your measurements and use a sharp rotary cutter to keep your edges clean. Accuracy in cutting ensures that your pieces will fit together perfectly when you start sewing.
Making the Half-Square Triangles (HSTs)
The Churn Dash block features four half-square triangles (HSTs), which are key to creating the block’s distinctive design. Don’t worry if you’re new to HSTs—they’re one of the simplest and most common units in quilting.
To make your HSTs, place one background square and one contrasting square (both 5” x 5”) right sides together. Draw a diagonal line from one corner to the opposite corner on the back of the lighter square. Sew a ¼” seam on both sides of this line, then cut along the drawn line. You’ll now have two HST units.
Press the seams toward the darker fabric and trim each HST to 4 ½” x 4 ½”. Repeat the process with your second pair of 5” squares. When finished, you’ll have four HSTs that fit perfectly with the other units of your Churn Dash quilt block.
Piecing the Rectangles and Squares
The next step is to assemble the rectangle and small square units, which form the distinctive “bars” of the Churn Dash design. This step is straightforward but important for achieving a balanced look in your block.
Take each 2 ½” square of contrasting fabric and sew it to the short end of a 2 ½” x 4 ½” rectangle of background fabric. Use a ¼” seam and press the seams toward the darker fabric. Repeat this process until you have four identical rectangle-square units.
These units, along with the HSTs and center square, will form the outer edges of the Churn Dash block. Laying them out in advance on your table or design wall can help you visualize how the quilt pattern is coming together and ensure everything is oriented correctly.
Assembling the Churn Dash Quilt Block
Now it’s time to put all the pieces together and see the Churn Dash block come to life. This step is where your careful cutting and piecing pay off.
Lay out all your units in a 3×3 grid: the center square goes in the middle, the HSTs go in each corner (oriented so the darker fabric forms a diagonal), and the rectangle-square units go on each side with the squares facing outward. Take a moment to double-check the layout—it’s easy to flip an HST or rectangle the wrong way.
Sew the units together row by row, pressing the seams in opposite directions to reduce bulk. Finally, sew the three rows together, pressing the final seams flat. When finished, you should have a 12 ½” x 12 ½” unfinished block, which will measure 12” x 12” once sewn into a quilt.
Ideas for Customizing Your Churn Dash Block
One of the best things about the Churn Dash quilt pattern is how versatile it is. A simple change in fabric choice or layout can make your quilt block look completely different. You can play with colors, prints, and even block sizes to make your project uniquely yours.
For a modern twist, try using solid fabrics in bold, contrasting colors. If you love traditional quilting, choose reproduction fabrics or florals for a classic, timeless feel. Scrappy versions are also popular—you can use small pieces of fabric from your stash for a charming, patchwork effect.
Beyond fabric choices, you can experiment with the block layout itself. Try rotating the Churn Dash blocks, alternating background colors, or even mixing them with other quilt patterns for a truly dynamic quilt design. The possibilities are endless, and each choice reflects your personal quilting style.
Finishing and Next Steps
Once you’ve completed your Churn Dash block, you might wonder what to do next. The beauty of this block is that it works well as a standalone project or as part of a larger quilt. You could make several blocks and stitch them together for a beautiful Churn Dash quilt, or use a single block for a pillow cover, table runner, or wall hanging.
If you’re making a full quilt, consider sashing between the blocks to give each Churn Dash design room to stand out. You can also alternate block colors for a striking checkerboard effect. Once you’ve assembled your quilt top, layer it with batting and backing fabric, quilt it with your preferred quilting style, and finish with binding.
Finishing a quilt is always a rewarding moment. Seeing the Churn Dash quilt pattern transform from fabric pieces into a cohesive project is a reminder of why quilting is such a joyful and creative craft.
Share Your Churn Dash Quilt Project
Quilting is a craft best shared with others, and the Churn Dash quilt block is the perfect project to show off. Whether you’re proud of your first block or have completed a full quilt, take a moment to celebrate your creativity. Share your finished project with friends, family, or in quilting groups online.

Posting your progress on social media or quilt community forums is a wonderful way to connect with other makers. You might inspire someone else to try the Churn Dash quilt pattern, or even learn new tips from fellow quilters. Remember, quilting is not just about the end product—it’s about the joy of creating and the community that surrounds it.
So, grab your fabric, follow this step-by-step tutorial, and start making your own Churn Dash quilt block. And don’t forget to share your project—you never know who you’ll inspire along the way!