
If you love handmade projects, creating your own clothespin holder is a fun and useful way to combine creativity with practicality. A clothespin holder keeps your clothespins organized, within reach, and adds a charming handmade touch to your laundry routine. Instead of buying a generic plastic container, you can make something unique that reflects your personal style.
For those who enjoy sewing or quilting, this project is an excellent opportunity to use leftover fabric scraps or even experiment with a small quilt pattern. Incorporating quilting techniques allows you to turn a simple utility item into a miniature piece of art. Every time you hang laundry outside, you’ll smile knowing that your clothespin holder is handmade.
This tutorial will guide you step by step, making it easy for beginners to follow. You’ll find a complete list of materials, detailed instructions, and ideas for customization. Whether you choose a classic design, patchwork style, or something bold and colorful, this project is flexible enough for every taste.
Materials You’ll Need
Before you begin, gather all your supplies. The good news is that most of the materials for this clothespin holder can be found around the house or in your craft stash. For those who quilt regularly, you probably already have everything you need.
- Fabric (cotton works best; you can use solid or patterned fabric, or even quilt scraps)
- Batting or interfacing (optional, if you want a sturdier quilted look)
- Bias tape or fabric strips (for edging and finishing)
- Wooden hanger (the base structure of your clothespin holder)
- Sewing machine, thread, and needles
- Scissors, pins, and fabric chalk
- Iron and ironing board
Optional additions include buttons, ribbons, lace trims, or embroidery if you’d like to personalize your project further. Using small quilt blocks as the outer fabric is a wonderful way to practice quilt patterns on a smaller scale.
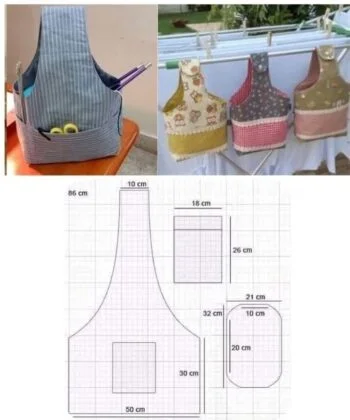
Cutting and Preparing the Fabric
The first step is preparing your fabric pieces. Start by measuring your hanger, since it will determine the overall size of the clothespin holder. Typically, the clothespin holder is about 12 inches wide and 15 inches long, but measurements can vary depending on the hanger.
Cut two rectangles of fabric for the front and back of the holder. Then, cut an additional piece for the pocket, which should cover about half of the front. If you want a quilted look, consider piecing together small quilt blocks to create your front panel. This adds both beauty and structure to the design.
Once all your fabric pieces are cut, press them with an iron to remove wrinkles. If you’re using batting or interfacing, cut pieces of the same size and layer them with your fabric. This will give the clothespin holder a sturdier, quilt-like feel that makes it more durable.
Sewing the Pocket
The pocket is the heart of your clothespin holder because it will hold all the pins. Take your pocket fabric, fold over the top edge about half an inch, and press with an iron. Sew a straight stitch across to secure the fold. This creates a neat finish and prevents fraying.
If you want extra durability, you can line the pocket with another fabric layer. This not only strengthens the pocket but also gives you the chance to add a quilt pattern to the interior. Quilted pockets look stylish and make the project more interesting.
Pin the pocket piece to the front panel, aligning the edges at the bottom. Sew along the sides and bottom, leaving the top open. For a decorative touch, you can divide the pocket into sections by sewing vertical lines, creating smaller compartments for clothespins.
Assembling the Holder
Now it’s time to put everything together. Place the front and back fabric pieces right sides facing each other. If you’re using batting, layer it on the outside. Pin the edges to hold everything in place.
Sew along the sides and bottom, leaving the top open. Once stitched, trim any excess fabric and clip the corners to reduce bulk. Turn the holder right side out and press with an iron. At this stage, your project will start to resemble a bag.
Slide your hanger inside the open top. To secure the hanger in place, fold the fabric edges inward and sew around the top opening. Be sure to leave a small gap for the hook of the hanger to pass through. Bias tape works beautifully here to create a clean, quilt-like edge.
Adding Quilted Details
If you love quilting, this is the stage where you can enhance your clothespin holder with quilt-inspired details. Adding topstitching in a diamond or grid quilt pattern makes the fabric sturdier and adds a professional touch. You can also use colorful thread for a playful effect.
Another option is to create your holder from pre-made quilt blocks. For example, a log cabin or nine-patch quilt pattern can turn your clothespin holder into a mini quilting showcase. This is an excellent way to use leftover quilt squares from bigger projects.
Don’t be afraid to mix textures and patterns. Using quilt scraps for the pocket while keeping the body solid can create a balanced, modern design. The quilting element makes your clothespin holder unique, standing out as both practical and decorative.
Customization Ideas
One of the joys of making a handmade clothespin holder is the freedom to customize it. You can add embroidery with your initials, small applique shapes, or even decorative buttons. Ribbons and lace trims along the pocket edge give a more vintage look.
If you love seasonal projects, consider making different versions for different times of the year. A spring-themed clothespin holder with floral quilt fabrics, a bright summer one with bold patterns, and a cozy autumn version with warm tones make laundry more cheerful throughout the year.
You could also make matching sets if you enjoy quilting. For example, create a clothespin holder along with a small laundry bag or even a matching quilted apron. This adds a coordinated and stylish theme to your household chores.
Finishing Touches
Before you start using your clothespin holder, give it a final press with an iron. Check all seams and make sure the pocket is sturdy enough to hold a good number of pins. If needed, reinforce the pocket stitching for durability.
Adding bias tape around the edges not only gives a polished finish but also makes the clothespin holder look like a mini quilt project. Choose contrasting colors for a fun look, or match your fabric for a seamless style.
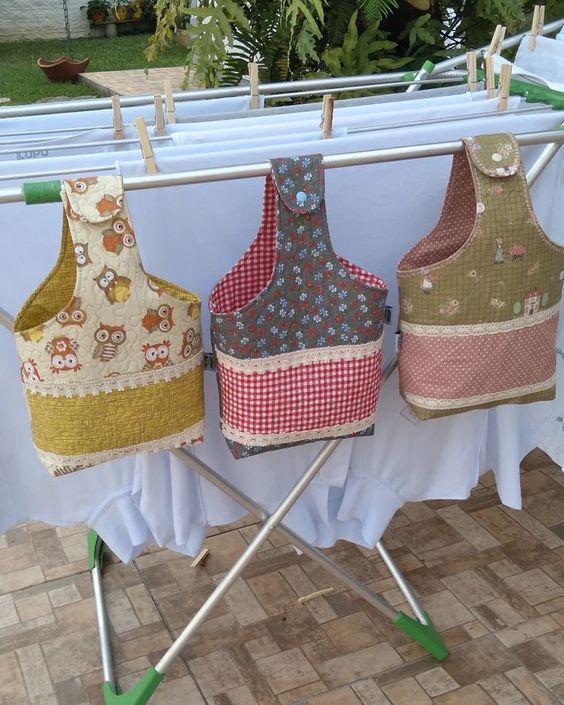
Once complete, hang your new clothespin holder on the clothesline and fill it with pins. You’ll immediately notice how convenient it is to have them all organized and easy to reach. Plus, every time you use it, you’ll be reminded of the joy of making something both beautiful and practical.
Conclusion: Share Your Handmade Creation
Making a clothespin holder is a simple yet rewarding sewing project. It combines function with creativity, offering endless opportunities for personalization. By incorporating quilt patterns or quilt scraps, you can transform this utility item into a unique piece of handmade art.
This project is ideal for beginners, but even experienced quilters will enjoy experimenting with different fabric combinations. It’s quick, affordable, and a wonderful way to practice sewing or quilting skills on a small scale.

Now that you’ve completed your clothespin holder, we’d love to see your creation! Share your project with friends, family, or in quilting groups online. Inspiring others to make their own clothespin holder spreads the joy of crafting and builds community around quilting and sewing.