
If you are looking for a Crochet project that feels both classic and luxurious, the Crochet basket stitch blanket pattern is a perfect choice. This beautiful textured design creates a woven look that resembles a basket, giving your blanket a rich, cozy appearance. Even better, while it looks intricate, it is surprisingly beginner-friendly once you understand the basic technique.
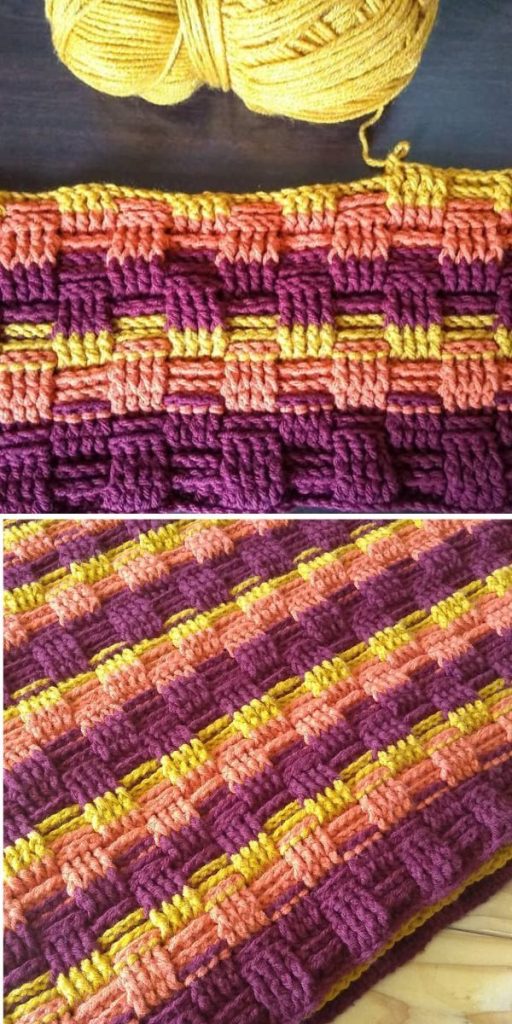
The basket stitch is created using front post and back post double crochet stitches. These stitches form raised and recessed sections that create depth and texture. Because of this unique structure, your finished blanket will feel thick, warm, and incredibly soft—ideal for cold evenings, baby gifts, or home décor.
In this tutorial, you will learn everything you need to know to create your own Crochet basket stitch blanket from start to finish. We will cover materials, stitch explanations, a complete step-by-step guide, customization ideas, and helpful tips to ensure success. Whether you are new to Crochet or expanding your skills, this Crochet Pattern will guide you with confidence.
Understanding the Basket Stitch Texture
The magic behind the basket stitch lies in alternating groups of front post double crochet (FPDC) and back post double crochet (BPDC). By working around the post of the stitch instead of through the top loops, you create a raised texture. This technique may sound intimidating at first, but with a little practice, it becomes very natural.
Front post stitches pop forward, while back post stitches recede slightly. When worked in blocks of several stitches, they create a woven effect that looks like strips going over and under each other. As a result, your blanket gains visual interest without complicated shaping or color changes.
Another advantage of this Crochet Pattern is that it builds thickness quickly. Because post stitches use more yarn than regular double crochet, your project will grow into a plush, warm blanket perfect for winter or as a thoughtful handmade gift.
Materials You Will Need
Before starting your Crochet basket stitch blanket, gather the following materials to ensure a smooth process:
• Medium weight yarn (Category 4) – approximately 1,200 to 2,000 yards depending on blanket size
• Crochet hook – 5.5 mm (I-9) or size recommended for your yarn
• Scissors
• Yarn needle for weaving in ends
• Measuring tape
• Stitch markers (optional but helpful)
For beginners, choosing a smooth, light-colored yarn is recommended. Lighter shades make it easier to see the raised front and back post stitches clearly. Acrylic yarn is affordable and easy to care for, making it ideal for everyday blankets.
You can adjust the hook size slightly depending on how tight or loose you crochet. If your stitches feel too stiff, try going up half a millimeter. Comfort is key when working on a larger Crochet project like a blanket.
Abbreviations Used in This Crochet Pattern
Understanding common abbreviations will make following this Crochet Pattern much easier:
ch – chain
dc – double crochet
FPDC – front post double crochet
BPDC – back post double crochet
st – stitch
sk – skip
rep – repeat
If you are unfamiliar with front post or back post double crochet, take a few minutes to practice on a small swatch before beginning your blanket. This extra step will build confidence and help your tension remain consistent throughout the project.
Step-by-Step Instructions for the Basket Stitch Blanket
To begin, decide on your blanket width. The basket stitch typically works best in multiples of 8 stitches plus 4 extra stitches for balance. For example, you might chain 100 + 4 for a medium-sized throw.
Step 1: Foundation Chain
Chain your desired number of stitches (multiple of 8 + 4). Make sure your foundation chain is not too tight. A relaxed chain will prevent the bottom edge from curling.
Step 2: Row 1 – Base Row
In the fourth chain from the hook, work a double crochet. Continue placing one double crochet in each chain across the row. Turn your work.
Step 3: Row 2 – Begin Basket Pattern
Chain 3 (counts as first dc). Work 4 FPDC around the next four stitches. Then work 4 BPDC around the next four stitches. Repeat this pattern across the row until you reach the final stitch. Finish with a double crochet in the top of the turning chain. Turn.
Step 4: Row 3 – Repeat Vertical Blocks
Chain 3. Work FPDC around each of the next four front post stitches and BPDC around the next four back post stitches. Continue across. This maintains the vertical textured blocks. Turn.
Step 5: Row 4 – Continue Pattern
Repeat Row 3. After completing four rows of the same pattern, you will shift the texture to create the woven effect.
Step 6: Row 5 – Reverse the Blocks
Chain 3. Now work 4 BPDC where you previously made FPDC, and 4 FPDC where you previously made BPDC. This switch creates the alternating basket look. Continue across and turn.
Step 7: Row 6–8
Repeat Row 5 for four rows total. Then switch back to the original arrangement (as in Row 2) for the next four rows.
Continue alternating every four rows until your blanket reaches the desired length. Finally, fasten off and weave in all ends neatly using a yarn needle.
Adding a Simple Border
A border gives your Crochet blanket a clean and finished appearance. Fortunately, the basket stitch pairs beautifully with simple edging.
Round 1: Attach yarn in any corner. Work single crochet evenly around the entire blanket. Place three single crochets in each corner stitch to help the blanket lay flat.
Round 2: Continue with single crochet or switch to half double crochet for a slightly taller border. Keep your tension even and consistent.
For a decorative touch, you can add a crab stitch (reverse single crochet) as the final round. This adds subtle texture without overpowering the basket stitch design.
Customization Ideas for Your Blanket
One of the best parts of any Crochet Pattern is making it uniquely yours. The basket stitch blanket offers many customization options to match your personal style.
First, consider playing with color. You can create wide stripes by changing colors every eight rows (one full basket repeat). Neutral tones create a modern farmhouse look, while bold colors make a statement piece for your living room.
Second, adjust the size easily. For a baby blanket, use fewer starting chains and lighter yarn. For a king-sized bedspread, simply increase the starting chain while maintaining the stitch multiple.
You can also experiment with different yarn textures. Chunky yarn creates a dramatic, oversized basket effect, while cotton yarn results in a lighter, breathable blanket perfect for warmer climates.
Helpful Tips for Beginners
If your edges appear uneven, count your stitches at the end of every row. Post stitches can sometimes hide or stretch stitches, so counting helps maintain straight sides.
Keep your tension consistent. Post stitches use more yarn and may feel tighter at first. Relax your grip and allow the hook to glide naturally around the post.
Finally, take breaks. Larger Crochet projects can be repetitive, but that repetition also makes this pattern relaxing and meditative. Enjoy the rhythm of the stitches and celebrate your progress row by row.
Why the Basket Stitch Blanket Is Worth Making
The Crochet basket stitch blanket pattern combines beauty, texture, and practicality. It looks impressive enough to gift, yet it remains accessible to beginners willing to practice basic post stitches.
Because this Crochet Pattern builds thickness and warmth, it is ideal for cozy nights, thoughtful handmade presents, or even selling at craft fairs. Handmade textured blankets often attract attention because they look complex and high quality.
Most importantly, completing a large Crochet project builds confidence. Each finished row brings you closer to a stunning handmade blanket that you created entirely with your own hands.
Final Thoughts and Share Your Project
Now that you have a complete step-by-step guide, you are ready to start your own Crochet basket stitch blanket. Take your time, choose yarn that makes you smile, and enjoy the relaxing process of building texture stitch by stitch.
Once your blanket is finished, consider sharing it on social media, in Crochet groups, or with friends and family. Handmade creations inspire others to try new patterns and explore their creativity.
If you loved this Crochet Pattern, save it for later, share it with fellow makers, and tag your finished project so others can admire your beautiful basket stitch blanket. Happy Crocheting!

PATTERN HERE
Crochet – Tutorial
FULL PATTERN ACCESS
You will be redirected to another site