
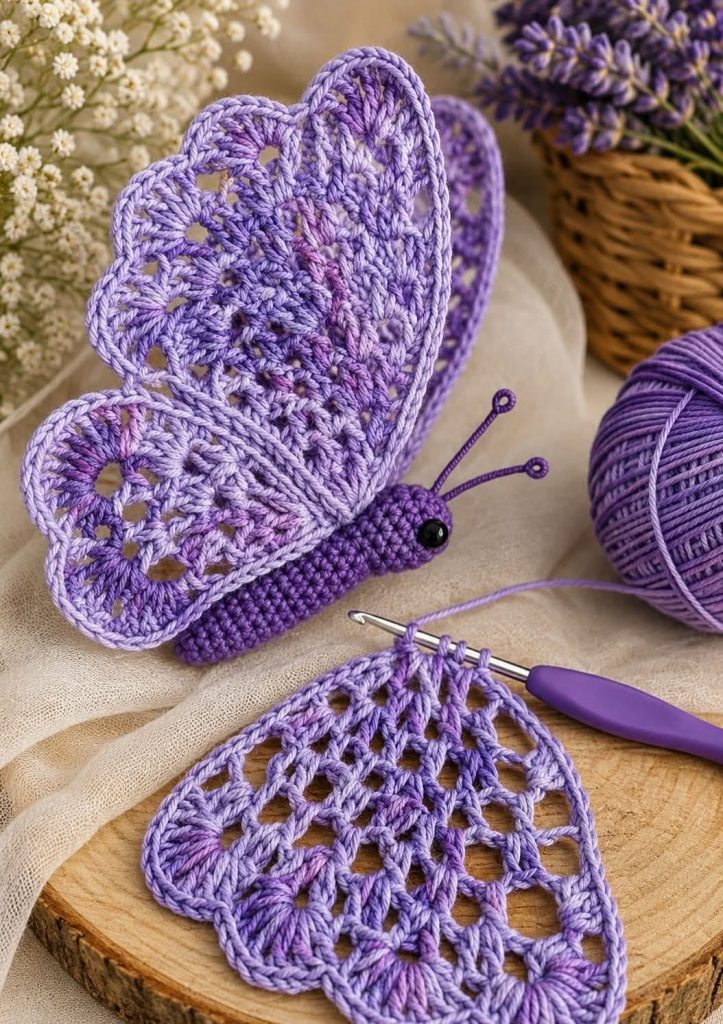
Crochet Butterfly Pattern is a beautiful decorative crochet project that combines delicate lace-style wings with a softly shaped amigurumi body. Inspired by the butterfly shown in the image, this design uses open spaces, tall stitches, shell-like groups, and a contrasting solid body to create a three-dimensional butterfly that can be used as home décor, appliqué, a hanging ornament, gift decoration, or a handmade spring accessory.
One of the most attractive features of this crochet butterfly is the contrast between the airy wings and the dense body. The wings are worked with combinations of chains, single crochet, double crochet, treble crochet, chain spaces, and shell stitches, while the body is crocheted more tightly so it keeps its shape. A variegated lavender yarn creates beautiful natural shading across the wings, while a deeper purple makes the body visually distinct.
Although the finished butterfly looks detailed, the construction becomes much easier when it is divided into individual components. You can crochet the wings separately, shape a small body and head, add antennae, and then assemble everything carefully. This tutorial uses U.S. crochet terminology and provides approximate measurements that can be adjusted according to yarn weight, hook size, and your preferred finished butterfly size.
Materials, Measurements and Crochet Stitches
For a butterfly approximately 8–10 inches (20–25 cm) wide and 6–8 inches (15–20 cm) tall, choose a smooth cotton or cotton-blend yarn in DK or light worsted weight. Cotton is particularly suitable because it produces crisp stitch definition in the lace sections.
Use approximately 70–100 yards (64–91 m) of lavender or variegated purple yarn for the wings and approximately 25–40 yards (23–37 m) of darker purple for the body, head, and antennae. Yardage varies according to your gauge and desired dimensions.
A 3.0–3.5 mm crochet hook works well with many DK cotton yarns. If your wings feel too loose, move down one hook size. If they feel stiff and difficult to shape, move up slightly.
You will also need a yarn needle, scissors, stitch markers, a small amount of polyester fiberfill, and optional craft wire for additional wing or antenna support. If the butterfly will be used around small children or pets, avoid exposed wire and detachable components.
For the eyes, you can use embroidered yarn details or safety eyes. If making the butterfly for a young child, embroidered eyes are preferable because they eliminate removable plastic pieces.
The primary U.S. crochet abbreviations used in this tutorial are ch = chain, sl st = slip stitch, sc = single crochet, hdc = half double crochet, dc = double crochet, tr = treble crochet, st = stitch, sp = space, and rep = repeat.
Gauge is not critical for decorative butterflies. However, both wings should have approximately the same tension so the completed project remains symmetrical.
The upper wings should be slightly larger than the lower wings. A useful target is approximately 4½–5 inches (11–13 cm) from the body to the widest point of each upper wing.
The lower wings can measure approximately 3½–4 inches (9–10 cm) from the body to their outer edge. These proportions create the recognizable butterfly silhouette seen in the inspiration.
Before beginning, crochet a small sample containing chains and double crochet stitches. The chains should remain open without becoming floppy, while the tall stitches should lie smoothly.
Blocking will be important. Lace crochet often looks uneven immediately after finishing, but gentle blocking opens the chain spaces and makes the decorative stitch pattern considerably more defined.
How to Crochet the Lace Butterfly Wings
Begin with one upper butterfly wing. Ch 6 and join with a sl st to form a small center ring. This ring becomes the inner attachment area closest to the butterfly’s body.
For the first round, ch 3 to represent the height of a dc. Work several dc stitches into the ring, separating groups with ch-1 or ch-2 spaces. The goal is to establish a small fan-shaped foundation rather than a complete circular motif.
Turn the work and begin expanding the fan. Work dc groups into the previous chain spaces, placing additional chains between groups. Increasing inside these spaces allows the wing to become wider with each row.
On the next row, alternate groups such as 2 dc, ch 2, 2 dc with open chain sections. These small V-shaped clusters form the internal framework visible through the finished lace wing.
Continue increasing toward the outer edge. Use taller stitches such as tr in areas where additional height is required. The top edge should gradually curve upward while the lower edge remains slightly narrower.
A useful decorative sequence is to work dc, tr, tr, dc into selected chain spaces. This creates soft petal-like sections without making the fabric excessively dense.
As you approach the outer portion of the wing, increase the number of stitches inside selected spaces. The fabric should naturally spread into a broad oval or teardrop shape.
For the decorative outer border, work shell groups consisting of approximately 5 dc into selected chain spaces. Anchor each shell with a sc or sl st in the neighboring space.
Larger shells can be created with 7 dc if your yarn is fine enough. The exact number is less important than maintaining a smooth scalloped border.
The top of the wing should contain the largest scallops. Gradually make them slightly smaller as you approach the body.
Finish with a row of sc or sl st along the inner edge. This produces a firm attachment area for sewing the wing onto the body.
Fasten off, leaving a tail approximately 12 inches (30 cm) long for assembly.
Make a second upper wing using exactly the same stitch sequence. Compare both pieces frequently rather than waiting until the end.
Now create the lower wings. Begin with the same small foundation ring, but use fewer increases so the finished piece remains smaller.
Work a combination of dc groups and chain spaces to produce a rounded triangular or teardrop shape.
The lower wing can feature a wider scallop near its bottom edge. Work several dc stitches into one chain space to produce a pronounced rounded lobe.
Continue the border with progressively smaller shells toward the body.
Make the second lower wing, weave in unnecessary ends, and arrange all four pieces on a flat surface.
At this stage, lightly block the wings. Pin each one into the desired shape and allow it to dry completely before assembly.
Crocheting the Butterfly Body, Head and Antennae
The body of this Crochet Butterfly Pattern is intentionally much denser than the wings. Using dark purple yarn gives the center a strong visual anchor.
Begin with a magic ring and work 6 sc into the ring. Pull the ring closed.
For the next round, work 2 sc in each stitch for a total of 12 stitches.
Continue increasing gradually until the body reaches approximately 1¼–1½ inches (3–4 cm) in diameter.
Work several rounds evenly without increasing. This begins forming the cylindrical body.
For a butterfly approximately 8–10 inches wide, aim for a body around 4½–5½ inches (11–14 cm) long.
Stuff the body gradually with polyester fiberfill. Do not overstuff it because an extremely firm body can become difficult to shape.
To form a slightly tapered abdomen, begin decreasing toward the lower end. Work invisible decreases at evenly spaced intervals.
Close the final opening and weave the yarn tail securely through the remaining stitches.
The head can be crocheted separately. Start with 6 sc in a magic ring, increase to 12 stitches, and then continue increasing until the head is proportional to the body.
Work several rounds without increases, insert the eyes or embroider them, and add a small amount of stuffing.
Decrease evenly until only a small opening remains. Fasten off with a long sewing tail.
Sew the head firmly to the upper end of the body. Position it slightly forward to create a natural butterfly profile.
For the antennae, crochet two narrow cords. A simple method is to ch 10–16, depending on the desired length, and work sl st back along the chain.
Alternatively, create an I-cord-style antenna for a thicker appearance.
For the small curled tips shown in the inspiration, make several additional chains at the end and join them into a tiny loop.
Sew both antennae securely to the top of the head. Adjust their angles so they spread outward naturally.
If the butterfly is intended only as adult home décor, thin covered craft wire can be inserted into the antennae for shaping. For toys or children’s decorations, use soft yarn-only antennae instead.
Assembling, Shaping and Finishing the Crochet Butterfly
Place the completed body vertically on a flat surface. Position the two large upper wings behind it.
The wings should mirror one another as closely as possible. Their upper curves can angle slightly upward to create a graceful open-wing appearance.
Pin the wings temporarily before sewing. This allows you to evaluate the proportions without permanently attaching anything.
Using the long yarn tails, sew the inner edge of each upper wing securely along the side of the body.
Position the smaller lower wings immediately below them. Slightly overlap the lower and upper wings near the center.
Sew through several body stitches during attachment rather than only catching the outer loops. A secure connection helps the butterfly maintain its shape when displayed.
After attaching all four wings, examine the butterfly from the front and back. Adjust any uneven areas before weaving in the final yarn ends.
For a more dimensional appearance, do not force the wings completely flat. A slight forward or backward curve makes the butterfly look more natural.
You can also add a narrow single crochet edging around the entire wing if you want additional definition.
For the purple design shown in the inspiration, use a variegated lavender yarn containing light violet, lilac, and medium purple tones for the wings. Choose a deeper plum or royal purple for the body.
If you want a stronger lace appearance, use a lighter yarn with a slightly larger hook. If you prefer more structured wings, use mercerized cotton and a slightly smaller hook.
Once assembly is complete, perform a second light blocking. Shape each scallop individually and ensure both sides remain symmetrical.
Allow the project to dry completely before removing the pins.
The finished crochet lace butterfly can be displayed upright, mounted onto fabric, attached to a wreath, incorporated into wall décor, or suspended with transparent thread.
Smaller versions make attractive appliqués for bags, blankets, pillows, hats, and handmade gifts.
Larger versions can become decorative wall pieces. Simply increase the yarn weight and hook size while maintaining the same basic construction principles.
Suggested Finished Measurements
For a medium decorative version, aim for:
- Total wingspan: 8–10 in (20–25 cm)
- Overall height: 6–8 in (15–20 cm)
- Body length: 4½–5½ in (11–14 cm)
- Upper wing: about 4½–5 in (11–13 cm)
- Lower wing: about 3½–4 in (9–10 cm)
- Antennae: 2½–3½ in (6–9 cm)
These dimensions are approximate because handmade crochet naturally changes according to yarn, hook, tension, and blocking.
FAQ – Crochet Butterfly Pattern
Is this Crochet Butterfly Pattern suitable for beginners?
A confident beginner can attempt it, although familiarity with single crochet, double crochet, treble crochet, chains, increases, decreases, and working into chain spaces will make the project easier.
What yarn is best for crochet butterfly wings?
Smooth cotton or cotton-blend yarn is an excellent choice because it clearly displays the lace stitches and scalloped edges.
What hook size should I use?
For DK cotton, approximately 3.0–3.5 mm is a useful starting range. Always match the hook to your yarn and desired firmness.
Do I need to stuff the wings?
No. The wings remain flat and are shaped through the lace pattern and blocking. Only the body and head require stuffing.
How do I keep the wings from curling?
Block them after crocheting. Cotton yarn responds especially well to gentle wet or steam blocking.
Can I make the butterfly smaller?
Yes. Use thinner yarn and a smaller hook. Crochet thread can produce a delicate miniature version.
Can I make a giant butterfly?
Yes. Use worsted, bulky, or even super-bulky yarn with a suitable hook. You may need additional wing support for very large versions.
Can the butterfly be used as an appliqué?
Yes. For an appliqué, omit or flatten the stuffed body and sew the entire butterfly directly onto the desired project.
How can I make both wings identical?
Count every stitch and chain carefully and write down any adjustments made to the first wing before starting the second.
Are safety eyes necessary?
No. Black yarn can be used to embroider the eyes, which is particularly appropriate when making items for children.
How do I create more dramatic scallops?
Increase the number of tall stitches in each outer shell. For example, a shell of 7 dc will generally appear fuller than one containing 5 dc.
Can I use multiple colors?
Absolutely. Try gradient wings, contrasting borders, rainbow sections, or separate colors for the upper and lower wings.
Why are my wings becoming wavy?
Too many increases can create excess fabric. Reduce the number of stitches added in each row or use a slightly smaller hook.
Why are my wings curling inward?
There may be too few increases, your chains may be too tight, or your hook may be too small. Blocking can correct minor curling.
Can I hang the finished butterfly?
Yes. Attach a discreet yarn loop or transparent hanging thread behind the upper body.
How should I care for it?
For decorative butterflies, gentle hand washing in cool water is safest. Reshape the wings and dry them flat.
Conclusion
The Crochet Butterfly Pattern is a wonderful project for practicing decorative lace crochet while creating something elegant and versatile. Its combination of airy wings, scalloped borders, a three-dimensional body, and delicate antennae gives the finished butterfly much more character than a simple flat appliqué.
The most important part of this project is building the wings gradually. Concentrate on creating balanced chain spaces, double crochet groups, treble crochet sections, and shell stitches rather than trying to force the finished shape too early. Once blocked, these stitches naturally open into the beautiful lace structure that makes the butterfly distinctive.
The purple palette shown in the inspiration is particularly effective. Lavender, lilac, violet, and deep purple create enough contrast to highlight both the lace pattern and the dimensional body. The same design can also be adapted to monarch orange and black, pastel spring colors, blues and turquoise, or a rainbow gradient.
Whether used as crochet wall décor, a butterfly appliqué, a handmade ornament, a gift decoration, or a spring crochet project, this Crochet Butterfly Pattern offers plenty of opportunities for personalization. Once you understand the basic wing construction, you can experiment with different scallops, colors, yarn weights, and sizes to create an entire collection of unique handmade butterflies.