
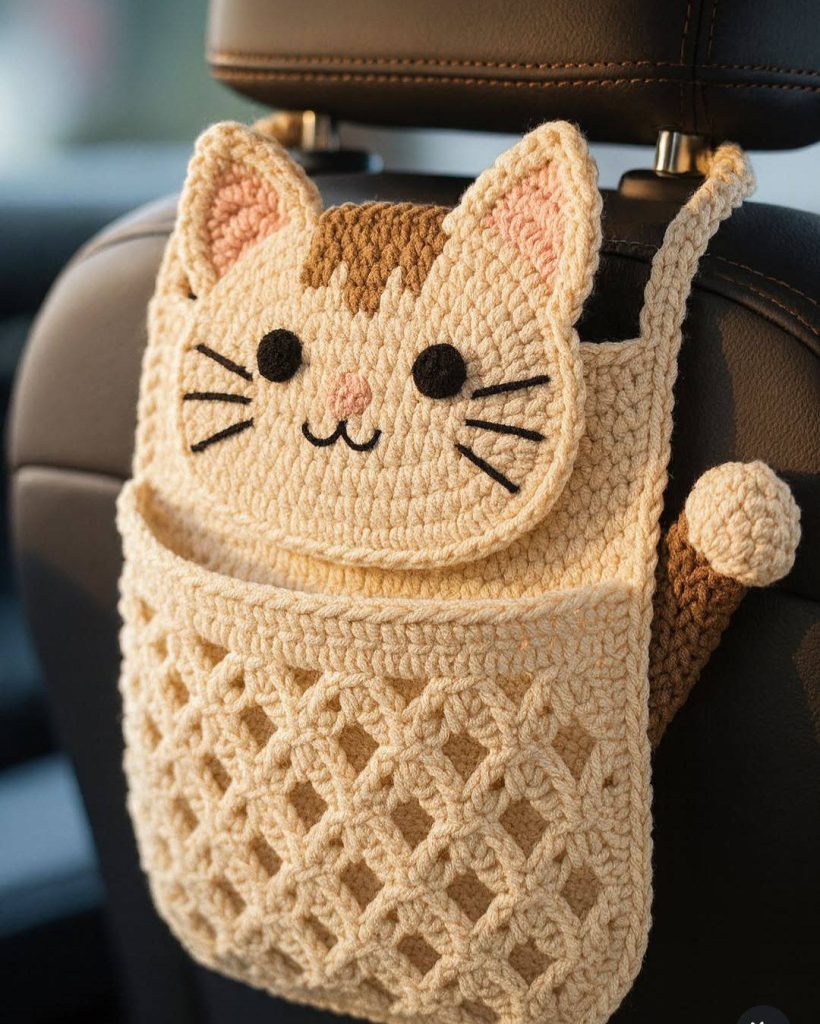
Crochet projects that combine cuteness and functionality are always a win, and the Crochet Cat Car Organizer Pattern is a perfect example of that balance. This adorable handmade organizer adds personality to your car interior while helping you keep small items tidy and accessible. Whether you store sunglasses, charging cables, hand sanitizer, or snacks, this crochet organizer is both charming and useful.
For beginners, this Crochet Pattern is especially appealing because it uses basic stitches, simple shaping, and straightforward construction. You don’t need advanced skills or complex techniques to achieve a professional-looking result. With patience and creativity, even new crocheters can complete this project with confidence.
In this tutorial, you’ll learn everything you need to know to create your own Crochet Cat Car Organizer Pattern from start to finish. We’ll cover materials, step-by-step instructions, customization ideas, and practical tips to ensure your project turns out beautifully. Let’s get started and bring a little handmade joy into your car.
Why Crochet Car Organizers Are Trending
Crochet car accessories have become increasingly popular as more people look for personalized and handmade alternatives to mass-produced items. A Crochet Cat Car Organizer Pattern stands out because it combines decor with everyday usefulness, making it attractive to both crafters and gift buyers.
From an SEO and monetization perspective, Crochet projects like this one perform well because they target multiple high-RPM niches. These include handmade decor, car accessories, pet-themed crafts, and beginner-friendly Crochet Patterns. This makes the project ideal for blogs, Pinterest traffic, and craft-focused audiences.
Additionally, car organizers are practical items that people actively search for year-round. When you add the emotional appeal of a cute cat design and the handmade charm of Crochet, you create a pattern that is both searchable and shareable, increasing engagement and revenue potential.
Materials Needed for the Crochet Cat Car Organizer
Before starting your Crochet Cat Car Organizer Pattern, gathering the right materials will make the process smoother and more enjoyable. Most of the supplies are affordable and easy to find, making this a great beginner project with low upfront cost.
You will need medium-weight yarn, preferably cotton or a cotton-blend yarn. Cotton is ideal because it holds its shape well, resists stretching, and is easy to clean. Choose neutral or pastel colors for a soft look, or bold colors if you want a playful, eye-catching organizer.
In addition to yarn, you’ll need a crochet hook that matches your yarn weight, usually a 4.0 mm to 5.0 mm hook. Other essentials include scissors, a yarn needle for sewing parts together, stitch markers, and optional safety eyes or embroidery floss for the cat’s face. Having everything ready before you start will help you stay focused and relaxed.
Understanding the Structure of the Crochet Pattern
The Crochet Cat Car Organizer Pattern is typically made in several simple sections that are later assembled. These include the main pocket body, the cat-shaped flap, side panels, and straps for attaching the organizer to the car seat or headrest.
The main body is usually worked in rows or rounds using basic stitches such as single crochet and double crochet. This section forms the pocket that holds your items and provides the organizer’s structure. A textured stitch pattern can be added for visual interest and durability.
The cat flap is where creativity shines. This part is shaped to resemble a cat’s head, complete with ears and facial details. Even though it looks intricate, the construction is beginner-friendly and relies on simple increases, decreases, and basic embroidery techniques.
Step-by-Step Crochet Instructions
Start by crocheting the main pocket base. Chain the required number of stitches to match the desired width of your organizer, then work single crochet rows to build height. Maintain even tension to ensure the pocket holds its shape and sits flat against the car seat.
Once the pocket is complete, crochet the side panels and attach them using slip stitches or whip stitch with a yarn needle. After assembling the pocket, move on to the cat flap. Begin with a flat oval or circle, then shape the ears using small triangles or pointed increases. This step brings the character of the project to life.
Finish by crocheting the straps that will secure the organizer to the car. These are usually long chains reinforced with single crochet rows. Attach them firmly to the back of the organizer, and weave in all loose ends carefully for a clean, polished finish.
Adding Facial Details and Finishing Touches
The face is what truly transforms this Crochet Pattern from a simple organizer into an adorable cat accessory. You can use safety eyes, embroidered French knots, or simple stitched circles for the eyes. Embroidery floss or contrasting yarn works well for whiskers and the mouth.
Take your time with facial placement, as small adjustments can greatly affect the expression. Mark positions with stitch markers before sewing to ensure symmetry. Beginners often find embroidery easier than safety eyes, especially when making items intended for children or pets.
After completing the face, lightly block the organizer if needed to improve shape and stitch definition. Blocking is optional but can make a noticeable difference in the final appearance, especially if your stitches feel uneven.
Customization Ideas to Make It Unique
One of the best parts of working with a Crochet Cat Car Organizer Pattern is the ability to customize it endlessly. You can change yarn colors to match your car interior or create different cat breeds using color patterns and facial details.
Consider adding embellishments like bows, buttons, or small crocheted flowers to personalize the design. You can also adjust the pocket size to fit specific items such as water bottles, toys, or travel essentials.
For advanced customization, try experimenting with different stitch patterns on the pocket body. Basketweave, waffle stitch, or simple cable textures can elevate the design while keeping the Crochet Pattern beginner-friendly.
Tips for Beginners to Succeed
If you’re new to Crochet, take your time and focus on consistency rather than speed. This project is forgiving, and minor imperfections often add charm to handmade items. Practice stitches on a small swatch if you feel unsure before starting the main piece.
Using stitch markers can help you keep track of rows and important points, especially when shaping the cat flap. Reading through the entire Crochet Pattern before starting will also help you understand the construction and avoid surprises.
Finally, don’t hesitate to make adjustments as you go. Crochet is flexible, and patterns are guides rather than strict rules. Trust the process and enjoy the creative journey.
Share Your Crochet Cat Car Organizer
Completing a Crochet Cat Car Organizer Pattern is something to be proud of, especially if you’re a beginner. This project showcases how Crochet can be both practical and expressive, turning everyday items into handmade art.
Once your organizer is finished, consider sharing photos on social media, craft groups, or your blog. Handmade projects inspire others and help grow the Crochet community. They also perform well on visual platforms like Pinterest and Instagram.
If you enjoyed this tutorial, share it with fellow crafters and encourage them to try this Crochet Pattern too. Your creativity might be the inspiration someone else needs to pick up a hook and start their own Crochet journey.