
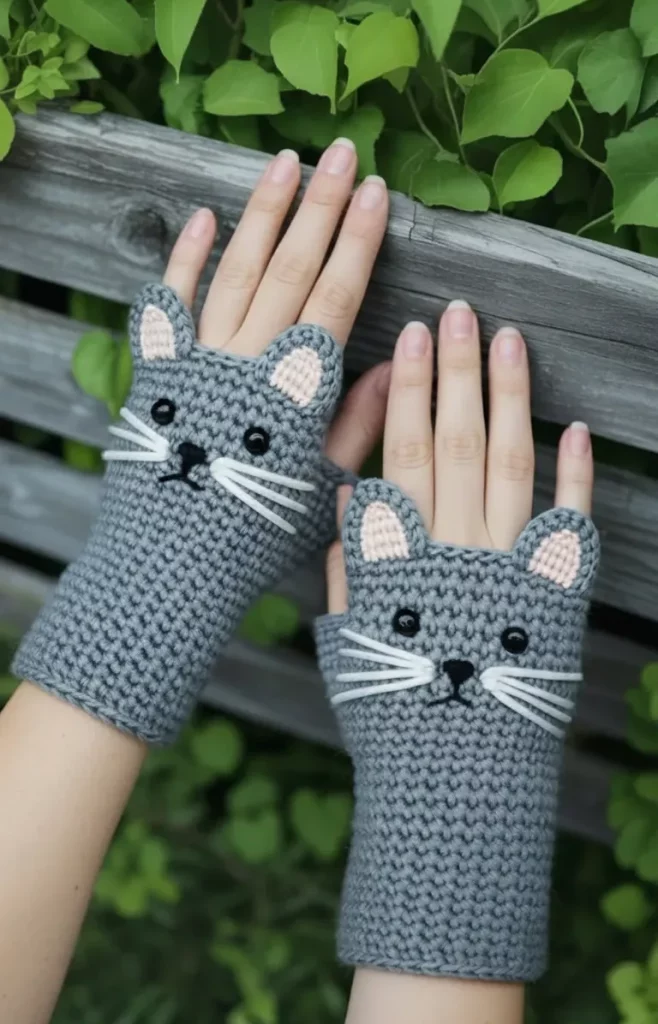
Crochet cat-themed projects have become incredibly popular among crafters, and these adorable Crochet Cat Fingerless Gloves are no exception. They combine practicality, charm, and personality in a way that appeals to all ages. Fingerless gloves are perfect for keeping your hands warm while still allowing free movement for typing, crafting, or using your phone. Adding cute cat details takes a simple accessory and turns it into something irresistibly fun. Whether you are new to crochet or already comfortable with basic stitches, this crochet pattern is accessible, enjoyable, and full of creative possibilities.
One of the best things about crochet fingerless gloves is how quickly they work up. You don’t need to spend days on a single project, and the repetitive rows help beginners gain confidence in counting stitches and forming consistent tension. This tutorial is designed to be clear, friendly, and inspiring, guiding you step by step from start to finish. You’ll learn how to create the glove shape, make the cat ears, and add embroidered details that bring your gloves to life.
By the end of this guide, you will have a beautiful pair of cozy, whimsical cat gloves that you can use, gift, or even sell. Crochet accessories like this are wonderful handmade presents for cat lovers, children, or anyone who enjoys cute fashion. With just a small amount of yarn and a bit of imagination, you can create something that feels both personal and delightful. Let’s begin this creative journey together.
Materials You Will Need
Before you begin the Crochet Cat Fingerless Gloves Tutorial, gather the materials listed below to make the process smooth and enjoyable. You will not need much yarn for this crochet pattern, making it a great project for using leftovers or trying new colors without a major investment. Choose a soft yarn that feels comfortable against the skin, especially around the hands and wrists.
Most crafters prefer worsted-weight yarn for fingerless gloves because it provides warmth without being too bulky. Acrylic, cotton, or wool blends all work well depending on your preference. Color choices are entirely up to you; classic cat colors like black, white, gray, and orange are always cute, but don’t hesitate to try pastel shades or even striped yarn for a playful look. You will also need a matching or slightly smaller hook size to maintain a neat and tight stitch pattern.
In addition to yarn and a hook, you will need scissors, a yarn needle, and possibly a stitch marker if you want help keeping track of your rounds. To add facial details such as whiskers, eyes, or noses, keep a small amount of contrasting yarn or embroidery thread on hand. These tiny touches bring personality to your gloves and make your crochet project truly unique. Once all your materials are ready, you’re set to start crocheting.
Understanding the Glove Construction
These Crochet Cat Fingerless Gloves are built using simple rectangular pieces that are later folded and seamed, making them perfect for beginners. Instead of working in complex rounds or shaping fingers, you will crochet a flat piece that wraps comfortably around the hand. The top and bottom edges naturally create the open spaces needed for the fingers and wrist. This also allows you to customize the size easily as you work.
The crochet pattern is based mainly on single crochet or half-double crochet stitches, depending on the texture you prefer. Both stitches create a dense fabric that feels warm and supportive. If you enjoy a stretchier glove, half-double crochet is a great option because it has a naturally flexible structure. For a firmer glove with crisp stitch definition, single crochet may be the better choice. Either way, the process is simple and beginner-friendly.
Once the rectangle is complete, you’ll seam it in a way that leaves an opening for the thumb. This small detail transforms a basic crocheted rectangle into a functional glove. Afterward, the fun begins with adding the cat ears and embroidered face. These embellishments are what make this crochet pattern so charming, giving each glove a playful look full of character.
Step-by-Step Crochet Tutorial
Begin your glove by making a foundation chain that fits comfortably around your wrist. For most adults, chaining 28–32 stitches works well, but you can adjust this number based on preference and hand size. Once your chain is ready, crochet one row of single crochet stitches, being careful not to twist your chain. Turn your work and continue crocheting rows until the length matches the distance from your wrist to your knuckles. This usually takes about 20–25 rows depending on tension.
When your rectangle reaches the desired length, fold it in half lengthwise. Seam the sides together using slip stitches or a whip stitch, leaving a thumb hole about 1.5 inches long. Try the glove on to check the placement and comfort of the opening. If the thumb hole feels tight or too loose, you can adjust it easily by adding or removing stitches from the seam. Repeat the same steps to make the second glove.
To create the cat ears, crochet two small triangles for each glove. Start with a magic ring, make three single crochets into the ring, and pull tight. For the next row, crochet two single crochets in each stitch to increase the width. Continue adding rows and shaping the triangle until you reach the ear size you prefer. Attach the ears to the top edge of each glove, positioning them slightly off-center for a natural look. Once the ears are secure, embroider the face using contrasting yarn, adding eyes, a nose, and whiskers.
Adding Cat Details and Embellishments
The cat features are what make these Crochet Cat Fingerless Gloves truly special, so take your time designing a face that reflects your style. Some crafters prefer simple minimalist designs with just a nose and whiskers, while others like adding expressive eyes, tiny eyelashes, or even sparkly yarn for playful accents. This is your chance to let your creativity shape the final look of the gloves.
To embroider the face, start with the nose by stitching an upside-down triangle using a few small passes of yarn. Add whiskers by making straight, evenly spaced stitches coming from each side of the nose. For the eyes, you can stitch simple curved lines for a sleepy cat expression or make filled-in round eyes for a cute cartoon style. If you enjoy using safety eyes, those can also be added before you seam the rectangle, but embroidery is often softer and more comfortable for wearable accessories.
Another adorable embellishment option is adding paw prints to the wrists or lower edge of the gloves. These can be crocheted as tiny circles and sewn on, or they can be embroidered using small stitches. You can also add a contrasting color inside the cat ears for extra detail. The more personal touches you include, the more unique your crochet pattern becomes, making your gloves one-of-a-kind.
Customization Ideas for Style and Fit
One of the best parts of working with a crochet pattern like this is how easily customizable it is. You can adapt the gloves to fit any hand size simply by adjusting the number of foundation chains or rows. For a tighter glove, reduce stitches; for a looser or more slouchy fit, add a few extra rows. This flexibility means you can make gloves for children, teens, and adults without needing a separate pattern.
Color combinations also open up endless creative possibilities. You can use variegated yarn for multicolored cat gloves, create stripes to mimic tabby patterns, or combine a solid-colored glove with brightly colored ears for a playful contrast. If you enjoy minimalist styles, neutral tones like beige, gray, and cream give a soft, elegant look. If you want something bold, try neon colors, black-and-pink combinations, or pastel rainbows.
You can also experiment with different stitches to create texture. Ribbed cuffs made with front and back post stitches add stretch and style. Puff stitches can give the gloves a cozy, plush feel. Mixing stitch styles within this simple structure makes the crochet pattern look more advanced while still being easy enough for beginners to master. Don’t hesitate to try variations until you find your favorite version.
Finishing Touches and Care Tips
To finish your Crochet Cat Fingerless Gloves, weave in all loose ends neatly using a yarn needle. Try on the gloves to ensure the seams feel smooth and the thumb opening is comfortable. If any part feels too tight, gently stretch the stitches with your fingers. If you prefer a more fitted look, lightly steam-block the gloves to relax the fibers and shape the edges.
Fingerless gloves made with worsted-weight yarn are usually durable and easy to care for. Most acrylic yarn can be washed in cold water and air-dried without any problems. If you used wool or cotton, check the yarn label for washing instructions to prevent shrinking or damage. Taking good care of your gloves helps maintain their softness and shape, especially around the embellished areas.
If you plan to give these gloves as a handmade gift, consider wrapping them with a ribbon and adding a small tag with care instructions. People love receiving crochet items, especially when they are cute, practical, and filled with personality. Your gloves will undoubtedly bring joy to any cat lover who receives them.
Share Your Crochet Cat Fingerless Gloves
You’ve completed your Crochet Cat Fingerless Gloves using an adorable and beginner-friendly crochet pattern, and now it’s time to celebrate your achievement. Handmade projects like this deserve to be shared with others who appreciate creativity and craftsmanship. Post a photo of your gloves on social media, include them in craft group discussions, or share them with friends and family who love handmade accessories.
If this tutorial helped you learn something new, consider making more pairs in different colors or styles. Each set of gloves becomes faster and easier to make as you gain confidence. Soon, you may find yourself creating an entire collection of themed gloves inspired by cats, dogs, or other animals. Sharing your progress inspires others and builds a warm, supportive crafting community.

Thank you for following this tutorial. I hope it brought you joy, sparked creativity, and encouraged you to explore new crochet techniques. Keep your hook moving, keep experimenting with new ideas, and above all, enjoy every moment of your crochet journey. Happy crocheting!