
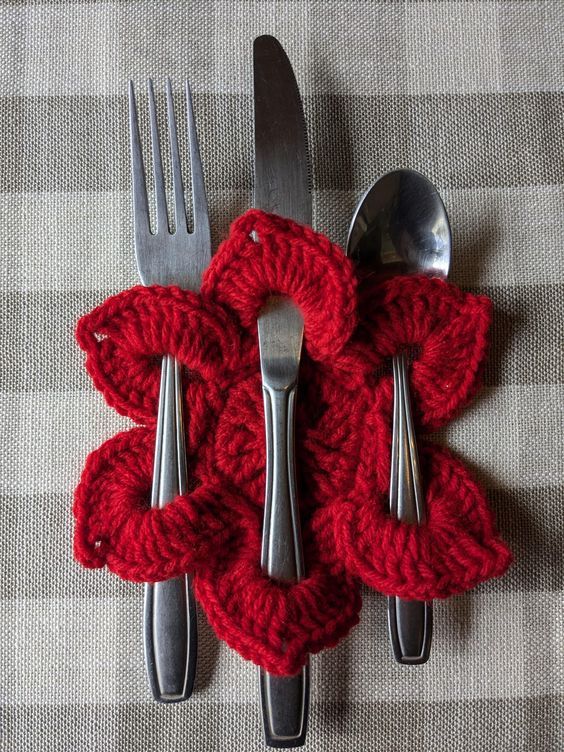
When it comes to hosting a cozy dinner, a touch of handmade charm makes all the difference. Enter the Crochet Cutlery Holder – a practical and decorative addition to your table setting that brings personality, texture, and warmth. Whether you’re planning a rustic brunch, a festive dinner, or even a wedding reception, this simple yet stylish project adds elegance to every place setting.
This free crochet tutorial is designed for crocheters with basic knowledge who are looking to expand their project repertoire. You’ll learn how to craft your own Crochet Cutlery Holder Pattern step-by-step, with helpful tips along the way.
Title Page Separator Site title
Slug
Meta descriptionUse AIInsert variable
SEO analysisEnter a focus keyphrase to calculate the SEO score
Premium SEO analysisPremiumAdd related keyphrasePremiumTrack SEO performanceInternal linking suggestionsPremium
Cornerstone content
Advanced
Insights
LiteSpeed Options
Move upMove downToggle panel: LiteSpeed Options
Use up and down arrow keys to resize the meta box panel.
Why Crochet a Cutlery Holder?
Crocheted cutlery holders are not only functional but also a delightful way to showcase your creativity. They’re reusable, customizable, and perfect for:
- Holiday dinners and events
- Picnics and outdoor gatherings
- Housewarming gifts
- Rustic weddings or baby showers
- Everyday table decor
Adding this handmade touch shows care and thoughtfulness—and they’re just plain adorable!
Perfect for gift-giving or elevating your dining decor!
Materials You’ll Need
Before you get started, make sure you have everything on hand. This project is lightweight and doesn’t require much yarn, making it great for using up leftover skeins!
Supply List:
- Yarn: 100% cotton yarn (worsted weight)
- Approx. 25-30g per holder
- Recommended brands: Lily Sugar’n Cream, Drops Paris, Bernat Handicrafter
- Hook Size: 4.0 mm (G-6) crochet hook
- Scissors
- Tapestry needle (for weaving ends)
- Buttons or ribbon (optional – for closure or decoration)
- Measuring tape
Don’t forget to experiment with color combinations to match your table theme!
Crochet Cutlery Holder Pattern – Step-by-Step Tutorial
Let’s dive into the pattern! This crochet cutlery holder measures approximately 9” x 4” (23 cm x 10 cm) when finished. It fits a standard fork, knife, and spoon comfortably.
Step 1: Foundation Row
- Ch 21 (This will be the width of your holder. Adjust based on preferred size.)
- Row 1: SC in the second chain from hook, SC across. (20 SC total)
- Ch 1, turn.
Step 2: Build the Body
- Rows 2–20: SC in each stitch across. Ch 1, turn at the end of each row.
- You should now have a rectangle shape.
- Optional: For added texture, alternate SC and HDC rows.
Step 3: Create the Pocket Fold
- Fold the rectangle upward by one-third of its height (approx. 6.5 cm or 2.5″). This fold forms the pocket.
- With the pocket held in place, SC around all edges (sides and top), working through both layers on the sides to join them.
- Add 2 SC in each corner to avoid curling.
- Optional: Use a contrasting yarn color for edging.
You’re almost done—look how cute it’s becoming!
Step 4: Add Embellishments
This step is optional, but it adds charm and personality to your holder.
- Button Closure: Sew a button on the back of the top flap and create a loop with a chain stitch to close.
- Ribbon Tie: Thread a ribbon around the edge for decoration.
- Appliqués: Add crocheted flowers, hearts, or initials to personalize.
Step 5: Weave in Ends
- Using a tapestry needle, weave in all loose ends securely.
And voilà! You’ve just made your first Crochet Cutlery Holder.
Variations & Color Combinations
Let your creativity flow! This simple base pattern allows for endless customizations:
Design Variations:
- Boho Vibe: Use variegated yarns and fringe along the edge.
- Classic Elegance: Stick to white or cream tones with pearl buttons.
- Holiday Themed: Use red, green, and gold for Christmas dinners.
Color Combinations:
- Mustard + Cream
- Aqua + Coral
- Sage + Dusty Pink
- Navy + White
Don’t forget to experiment with different stitch patterns too—like moss stitch or granny stripes!
Care & Washing Instructions
Since we’re working with cotton yarn, these holders are durable and easy to clean. Here’s how to care for them:
- Hand wash in lukewarm water with mild soap
- Do not bleach
- Lay flat to dry and reshape if needed
- Iron on low if necessary
These reusable pieces will last for many events with proper care!
Additional Tips for Success
Here are some final thoughts and helpful hints:
- Gauge is not critical, but keep stitches tight enough to hold utensils.
- Block your holder if it curls at the edges.
- Use a stitch marker if you tend to lose track at the edges.
- Create a matching set: napkin rings, placemats, or coasters using the same yarn!
Perfect for making handmade gifts sets for weddings or new home celebrations!
PATTERN HERE
Crochet – Tutorial
FULL PATTERN ACCESS
You will be redirected to another site
Conclusion – Keep Stitching, Keep Smiling
The Crochet Cutlery Holder is more than just a practical item—it’s a canvas for creativity, a way to bring handmade love to the table, and an opportunity to craft something truly unique.
By following this free crochet tutorial, you’ve learned to transform yarn into something functional, thoughtful, and stylish. Whether you gift it or keep it for your own table, this piece is sure to be cherished.
Don’t stop here! Explore other crochet patterns, try matching tableware accessories, or even create seasonal sets.
Which color combo will you try first? Comment or share with fellow crochet lovers!
More Free Crochet Patterns
Looking for more fun and easy patterns? Browse our blog for:
- Crochet Napkin Rings
- Rustic Placemats
- Coaster Sets
- Bread Basket Liners
Make your table a crochet masterpiece—one project at a time.