
The Crochet Holy Family Nativity Scene Pattern is a beautiful and meaningful handmade Christmas project that brings together creativity, tradition, and the comforting charm of crochet. Featuring Mary, Joseph, and Baby Jesus, this delightful crochet nativity scene transforms simple yarn into a heartwarming holiday decoration. With its soft textures, delicate details, and peaceful appearance, the finished design can become a treasured part of your Christmas celebrations.
Whether you enjoy creating handmade decorations or are looking for a thoughtful seasonal gift, this crochet Holy Family pattern offers a wonderful opportunity to make something special. The combination of warm golden tones, soft blue fabric, and gentle cream-colored yarn creates a timeless design that looks lovely in almost any Christmas setting.
One of the most appealing features of this Crochet Holy Family Nativity Scene Pattern is its charming amigurumi construction. Unlike traditional nativity figurines made from ceramic, wood, or resin, these crocheted characters have a soft, welcoming appearance that makes them especially attractive for handmade holiday displays. Mary is represented with a beautiful blue head covering, while Joseph wears a warm golden robe and matching headpiece.
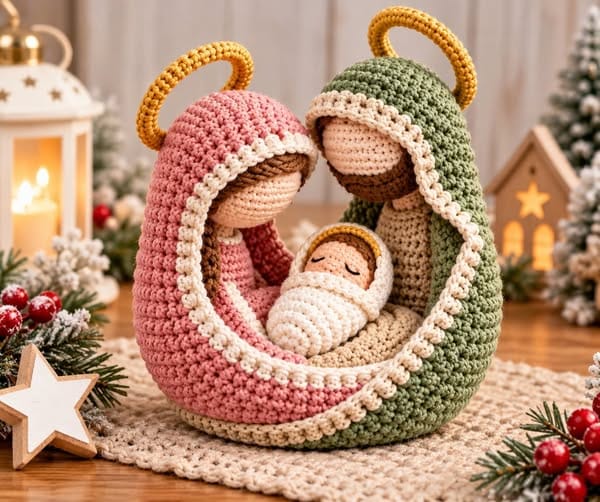
Baby Jesus rests peacefully in the center, wrapped in a delicate cream-colored blanket. The figures are arranged together on a crocheted base, creating a compact and harmonious composition. Small golden halos above Mary and Joseph add a lovely finishing touch, emphasizing the traditional symbolism of the Holy Family while maintaining the simplicity of the handmade design.
Creating this DIY crochet nativity set is also an enjoyable way to develop your crochet skills while working on a project with lasting sentimental value. Although the finished arrangement may appear detailed, it can be constructed using familiar crochet techniques, including single crochet, increases, decreases, working in continuous rounds, and sewing individual pieces together. The pattern is suitable for confident beginners who already understand basic stitches, while intermediate crocheters can enjoy experimenting with colors, yarn textures, and decorative details. In this tutorial, you will learn how to prepare your materials, crochet the individual characters, assemble the nativity arrangement, and give your finished project a professional appearance. The instructions use US crochet terminology and provide a practical, original interpretation of the design shown in the photograph.
Materials and Basic Crochet Techniques for the Holy Family Nativity
Before beginning your Crochet Holy Family Nativity Scene Pattern, gather the necessary materials and choose a comfortable workspace. For a soft, structured result, cotton or cotton-blend yarn is an excellent option because it provides clear stitch definition and helps the figures maintain their shape. You will need light blue yarn for Mary’s veil, golden beige or mustard yarn for the clothing and base, cream yarn for Baby Jesus and the swaddling blanket, peach or light skin-tone yarn for the faces, and dark brown yarn for the hair and beard details. Choose yarns of similar weight to maintain consistent proportions throughout the project. A smooth DK or light worsted-weight yarn works particularly well for this type of Christmas crochet
The essential tools include a 2.5 mm to 3.5 mm crochet hook, depending on your yarn and tension, a tapestry needle, stitch markers, scissors, and polyester fiberfill stuffing. You may also want a few sewing pins to hold the pieces in position before attaching them permanently. For the halos, a short length of flexible craft wire can provide additional structure, although a firmly crocheted tube can also work without wire. If the finished decoration will be handled by children, avoid exposed wire and use securely embroidered facial details instead of detachable embellishments. The completed nativity scene is best treated as a decorative item rather than a toy, especially when it includes structural supports or small attached pieces.
Understanding the basic crochet abbreviations will make the pattern easier to follow. This amigurumi nativity pattern uses the following US crochet terms:
- MR: Magic ring
- ch: Chain
- sc: Single crochet
- sl st: Slip stitch
- hdc: Half double crochet
- dc: Double crochet
- inc: Increase, meaning two single crochet stitches in the same stitch
- dec: Invisible decrease, joining two stitches into one
- BLO: Back loop only
- FLO: Front loop only
- st/sts: Stitch or stitches
- FO: Fasten off
- R: Round
- rep: Repeat
Most of the three-dimensional pieces are worked in continuous spiral rounds, meaning you do not join each round with a slip stitch unless specifically instructed. Place a stitch marker in the first stitch of every round to avoid losing your position. Maintaining an even tension is particularly important when creating amigurumi because loose stitches can allow stuffing to show through the fabric. If you notice visible gaps between stitches, try using a slightly smaller crochet hook. A firm but comfortable tension will help the heads, bodies, and decorative accessories look smooth and well shaped.
For this handmade crochet Christmas nativity, the finished arrangement can measure approximately 16–20 cm tall and 15–18 cm wide, depending on yarn weight, hook size, and individual tension. The instructions below create two stylized adult figures, one small baby, a shared oval base, and decorative coverings. The size is approximate because handmade crochet naturally varies from person to person. If you prefer a miniature ornament, use thinner yarn and a smaller hook. For a larger tabletop display, choose thicker yarn and adjust the hook accordingly. Keep the same yarn weight for all components to preserve the visual balance between Mary, Joseph, and Baby Jesus.
It is helpful to organize the project into separate stages before starting. First, crochet the heads and bodies of Mary and Joseph. Next, make Baby Jesus and the small swaddling blanket. After that, create the clothing, veils, halos, and shared base. Finally, arrange and sew everything together. This approach makes the Crochet Holy Family Nativity Scene Pattern easier to manage because you can check the proportions before permanently joining the pieces. It also allows you to experiment with positioning, ensuring that the finished nativity has the peaceful, close-knit appearance that makes this Christmas design so appealing.
How to Crochet Mary and Joseph Step by Step
Begin with the heads of Mary and Joseph, using the light peach or skin-tone yarn. Both heads follow the same basic rounded construction, which keeps the design balanced and consistent. Start with a magic ring containing six single crochet stitches. Increase gradually to create a smooth spherical shape, then work several rounds without increases before decreasing to close the opening. For each adult head, follow this sequence: R1: 6 sc in MR (6). R2: inc around (12). R3: (1 sc, inc) six times (18). R4: (2 sc, inc) six times (24). R5: (3 sc, inc) six times (30). R6–R10: sc around (30). R11: (3 sc, dec) six times (24). R12: (2 sc, dec) six times (18). Stuff firmly but gently. R13: (1 sc, dec) six times (12). R14: dec around (6). Fasten off and close the opening with a tapestry needle.
The adult bodies are crocheted separately using golden beige yarn, creating the appearance of simple robes. For each body, start with R1: 6 sc in MR (6). R2: inc around (12). R3: (1 sc, inc) six times (18). R4: (2 sc, inc) six times (24). R5: (3 sc, inc) six times (30). R6: sc in BLO around (30). R7–R9: sc around (30). R10: (3 sc, dec) six times (24). R11–R13: sc around (24). R14: (2 sc, dec) six times (18). R15–R16: sc around (18). Stuff the lower portion lightly, keeping the base relatively flat. Fasten off with a long tail, then sew the completed head securely to the upper opening of the body. The result should resemble a small cone-shaped amigurumi figure with a rounded head.
To create Mary’s recognizable appearance, crochet a delicate blue crochet veil that drapes over her head and extends down both sides of her body. Begin with light blue yarn and make a foundation chain of 24 stitches. Starting in the second chain from the hook, work 23 sc, ch 1, and turn. Continue working 23 sc across for approximately 18–22 rows, depending on the desired length. This creates a rectangular fabric that can be gently folded over the head. For a more rounded hood, work a few additional rows across the central section and sew a small seam at the back. Position the veil so that it frames the face while covering the upper sides of the body. Attach it with small, discreet stitches, allowing the lower edges to remain slightly loose for a natural draped appearance.
Joseph’s clothing follows a similar principle, but his head covering uses warm golden or sandy-colored yarn. To create a simple crochet Joseph nativity figure, crochet a rectangular hood using 24 foundation chains and approximately 18 rows of single crochet. You can add a decorative border by working one round of half double crochet around the outer edges. For his beard, use dark brown yarn and crochet a small curved strip: ch 11, sc in the second chain and across (10), ch 1, turn, then work (sc, dec) three times and 1 sc (7). Fasten off and sew the strip beneath the lower half of the face. A few embroidered brown stitches along the upper forehead can suggest hair. Keep the facial details minimal to preserve the gentle, faceless amigurumi style seen in the inspiration photograph.
The golden halos are an important decorative element of this Crochet Holy Family Nativity Scene Pattern. To create a simple halo, crochet a narrow tube with mustard-yellow yarn. Make a magic ring with four single crochet stitches, then work four single crochet stitches in continuous rounds until the tube measures approximately 14–17 cm long. Lightly stuff the tube with a thin strand of yarn or leave it unstuffed if the stitches are firm enough. Join the ends together to form a circular ring. For a more stable shape, you may insert a carefully covered flexible support before closing the tube. Position the halo behind the head, slightly above the hood, and sew it securely to the head covering. Repeat for the second adult figure, adjusting the angle to create a balanced arrangement.
Once Mary and Joseph are complete, examine the proportions and adjust the coverings before moving on. The heads should sit naturally above the bodies, with the hoods gently framing the faces rather than hiding them completely. Mary’s blue covering can be slightly longer than Joseph’s golden hood to create visual contrast. If the edges curl, lightly shape them with your fingers or use gentle steam blocking suitable for your yarn fiber. Avoid pressing directly on stuffed pieces. This stage is also an excellent opportunity to add subtle decorative stitching along the robe edges, although keeping the garments simple often produces the most elegant result for a mini crochet nativity scene.
Crocheting Baby Jesus, the Swaddling Blanket, and the Nativity Base
Baby Jesus is the central element of the Crochet Holy Family Nativity Scene Pattern, and his smaller proportions help create the peaceful composition. Begin with peach-colored yarn and make a small rounded head. Work R1: 6 sc in MR (6). R2: inc around (12). R3: (1 sc, inc) six times (18). R4–R6: sc around (18). R7: (1 sc, dec) six times (12). Add a small amount of stuffing. R8: dec around (6). Fasten off and close the opening. The finished head should be noticeably smaller than the adult heads. If desired, embroider two tiny closed eyes using brown embroidery thread. Keep the stitches simple and symmetrical to create a calm, sleeping expression.
For the baby’s body, use cream or white yarn to create a small elongated shape. Start with R1: 6 sc in MR (6). R2: inc around (12). R3–R8: sc around (12). R9: (2 sc, dec) three times (9). Lightly stuff the body, then fasten off, leaving a long sewing tail. Attach the baby’s head to the narrower end of the body, checking that the head is centered. The body does not need arms or legs because it will be wrapped inside the blanket. This simplified construction makes the crochet Baby Jesus pattern approachable even for crafters who have limited experience assembling amigurumi figures.
The swaddling blanket is made separately using soft cream yarn. Chain 18, then work 17 single crochet stitches starting in the second chain from the hook. Chain one and turn, continuing for approximately 14 rows to create a small rectangular blanket. If you prefer a slightly softer texture, use half double crochet stitches instead of single crochet. Place the baby’s body diagonally across the blanket, fold the lower corner upward, and gently wrap the sides around the figure. Secure the overlapping sections with a few small stitches at the back. Leave the face exposed and make sure the blanket fits snugly without distorting the baby’s shape. A simple cream hood can be created with a short semicircular crocheted piece attached behind the head.
The shared nativity base provides stability and helps the three characters look like one complete crochet Christmas centerpiece. Begin with mustard or golden yarn and create an oval foundation. Chain 17. Starting in the second chain from the hook, work 15 sc, 3 sc in the last chain, then continue along the opposite side of the foundation chain with 14 sc and 2 sc in the final chain (34 stitches). In the next round, work 15 sc, 3 inc, 14 sc, and 2 inc (39 stitches). For the following round, work 15 sc, (1 sc, inc) three times, 14 sc, and (1 sc, inc) twice (44 stitches). Continue increasing around the curved ends as needed until the oval is large enough to accommodate the figures. Work one round in BLO, followed by two or three rounds without increases, to form a shallow raised edge.
To make the arrangement more closely resemble the photograph, position Mary on one side of the oval base and Joseph on the opposite side, leaving a comfortable space in the center for Baby Jesus. The adult figures should lean slightly inward, creating a protective and harmonious composition. Place the baby horizontally between them, with the face tilted gently upward. Use sewing pins to test the arrangement before stitching anything permanently. Once satisfied, sew the lower edges of the adult bodies to the base, making several secure passes through the fabric. Attach Baby Jesus to the central area with small stitches that remain hidden beneath the blanket. The handmade nativity display should feel stable and balanced when placed on a flat surface.
For additional visual depth, crochet a low curved border around the front of the base using the same golden yarn. You can also extend Mary’s blue covering slightly forward, allowing it to overlap the front edge and echo the cozy, enclosed appearance of the inspiration image. If desired, add a small padded oval insert beneath the figures to create a softer foundation. Keep decorative additions restrained so that the Holy Family remains the focus. The combination of a golden base, blue veil, cream blanket, and warm neutral clothing gives the finished Crochet Holy Family Nativity Scene Pattern a cohesive appearance that feels both traditional and contemporary.
Assembly, Finishing Details, and Creative Christmas Decorating Ideas
The final assembly is where your Crochet Holy Family Nativity Scene Pattern begins to take on its full character. Start by checking that every yarn tail has been woven in securely and that the figures are attached firmly to the base. Examine the arrangement from the front, back, and sides to make sure the heads are positioned naturally. Mary’s veil should frame her face, while Joseph’s hood and beard should remain clearly visible. Baby Jesus should rest comfortably between the two adult figures without appearing crowded. Small adjustments can make a noticeable difference, especially when working with compact amigurumi designs. Take your time during this stage, as careful assembly often determines how polished the finished decoration will look.
One of the easiest ways to improve the appearance of your crochet nativity ornament is to pay attention to the finishing stitches. Use a tapestry needle to hide yarn tails inside the stuffed bodies or beneath the clothing. When sewing the head coverings, choose thread or yarn that closely matches the fabric color so the attachment stitches blend into the design. If the halos appear uneven, gently reshape them into smooth circles and reinforce the attachment points. Avoid pulling the yarn too tightly, as this can create visible dents in the fabric. A soft brush can help remove loose fibers, while gentle hand shaping can improve the overall silhouette.
Color selection offers many opportunities to personalize this DIY Holy Family crochet pattern. The classic combination of blue, gold, cream, and brown creates a warm Christmas atmosphere, but you can also experiment with ivory, dusty rose, sage green, or soft gray. A cream-colored robe for Joseph can produce a more neutral design, while a deeper royal blue veil gives Mary a traditional appearance. For a rustic farmhouse Christmas theme, consider using natural cotton yarn in muted earthy shades. If you prefer a more festive style, add a narrow border of metallic-look yarn around the halos or base. Whatever palette you choose, keeping the colors coordinated will help maintain the peaceful character of the nativity arrangement.
The finished crochet Christmas nativity scene can be displayed in several beautiful ways throughout the holiday season. Place it on a mantelpiece surrounded by evergreen branches, pinecones, and warm LED fairy lights. It can also become the centerpiece of a small Christmas table arrangement or a meaningful decoration on a bookshelf. For a minimalist setting, display the Holy Family on a simple wooden tray with a few natural accents. The soft crochet texture contrasts beautifully with wood, ceramic, and greenery. If you plan to use lights, choose cool-running LED decorations and keep them from becoming tangled in the yarn. Avoid placing the piece near candles, open flames, or direct heat.
This handmade crochet nativity set also makes a thoughtful Christmas gift for someone who appreciates traditional decorations and handcrafted keepsakes. Because every piece is made by hand, the finished project carries a personal quality that mass-produced ornaments often lack. You can create the nativity in the recipient’s favorite colors or include a small handmade gift tag describing the materials and care instructions. If you are making several sets, consider preparing the heads, bodies, and blankets in batches to save time. Working on similar pieces together can help maintain consistent tension and proportions, making the assembly process more efficient.
Proper storage will help preserve your Crochet Holy Family Nativity Scene Pattern for many Christmas seasons. After the holidays, gently remove dust and check that all decorative elements remain securely attached. Store the nativity in a clean, dry container, preferably wrapped in acid-free tissue paper or a soft cotton cloth. Avoid compressing the figures beneath heavy decorations, as this may flatten the stuffing or distort the halos. If cleaning becomes necessary, carefully spot-clean with a damp cloth and mild detergent suitable for the yarn. Allow the piece to air-dry completely before storing it. With thoughtful care, your crocheted Holy Family can remain a cherished part of your Christmas traditions for years.
Frequently Asked Questions About the Crochet Holy Family Nativity Scene Pattern
Is the Crochet Holy Family Nativity Scene Pattern suitable for beginners?
Yes, this pattern can be completed by confident beginners who understand basic crochet techniques. The main stitches are single crochet, increases, decreases, and chains. The most challenging parts are shaping the head coverings, creating the halos, and assembling the figures. Beginners may find it helpful to complete one adult figure before starting the second.
What is the best yarn for a crochet nativity scene?
Cotton and cotton-blend yarns are excellent choices because they provide clear stitch definition and help the figures maintain their shape. Acrylic yarn can also work well, especially if you prefer a softer texture or a more affordable material. For consistent results, use the same yarn weight throughout the project.
How much yarn do I need to make the Holy Family?
For a small tabletop nativity set, approximately 120–180 grams of yarn in total is a reasonable starting estimate. The exact amount depends on the yarn thickness, stitch tension, and finished dimensions. Golden beige and blue will generally be used more heavily than the skin-tone and dark brown colors.
How long does it take to crochet the complete nativity scene?
The project may take approximately 8–14 hours, depending on your crochet experience and the level of detail you choose. Beginners may need additional time for sewing and adjusting the head coverings. Experienced crocheters can often complete the main figures more quickly.
Can I make the nativity scene without using a magic ring?
Yes. If you are uncomfortable working with a magic ring, you can chain two and work the required number of single crochet stitches into the second chain from the hook. This alternative works for the heads, bodies, and other small rounded pieces.
How can I make the crochet halos stand upright?
You can create firmer halos by using tight stitches, a slightly smaller crochet hook, and a narrow crocheted tube. For decorative pieces intended only for adult display, a covered flexible support may help maintain the circular shape. Always secure the support completely and avoid sharp or exposed ends.
Can I change the size of the Crochet Holy Family Nativity Scene Pattern?
Absolutely. Using thinner yarn and a smaller hook will create a miniature version, while thicker yarn and a larger hook will produce a bigger display. Remember that changing yarn weight also affects the size of the base, clothing, and halos. Keep the materials consistent so the figures remain proportional.
Do I need to use safety eyes for the amigurumi figures?
No. The design works beautifully with simple, faceless heads, which gives it a peaceful and traditional appearance. If you prefer facial details, small embroidered eyes are a suitable alternative. Embroidery is especially useful when you want to avoid hard plastic components.
Can I wash a finished crochet nativity set?
Gentle spot-cleaning is usually the safest option, particularly when the nativity includes sewn decorations, stuffing, or structural supports. Check the yarn manufacturer’s care recommendations before washing. If the piece contains wire, rigid supports, or delicate embellishments, avoid machine washing.
Can I make this pattern without sewing the pieces together?
The individual pieces are designed to be sewn together, so some assembly is necessary. However, you can reduce the amount of sewing by crocheting certain sections continuously or attaching clothing directly to the bodies. These modifications require some experience adjusting amigurumi patterns.
What can I do if my crochet nativity figures do not stand properly?
Check that the bases of the bodies are flat and that the stuffing is evenly distributed. You can also add a slightly wider crocheted foundation or sew the figures more firmly to the shared oval base. Positioning the figures closer together can improve stability and create a more balanced composition.
Is this crochet nativity pattern appropriate for Christmas gifts?
Yes. A handmade nativity set can be a meaningful seasonal gift for family members, friends, and people who appreciate religious Christmas decorations. Consider presenting it in a sturdy gift box with a short care note. If the set contains small or rigid components, label it clearly as a decorative item rather than a children’s toy.
Can I sell finished nativity sets made from this tutorial?
You can generally sell items you personally create from these original instructions, subject to applicable laws and any other materials or designs you incorporate. When preparing items for sale, pay attention to product safety, accurate descriptions, and the quality of the finished construction.
How can I make my crochet nativity scene look more professional?
Use consistent stitch tension, avoid overstuffing the heads, and take time to align the figures before sewing. Choose a harmonious color palette and carefully hide all loose yarn ends. Small details, such as symmetrical halos and neatly finished clothing edges, can greatly improve the final appearance.
Can I add more characters to the crochet nativity scene?
Yes. Once you are comfortable with the basic construction, you can create additional figures such as shepherds, angels, or the Three Wise Men. The adult body and head instructions can serve as a starting point, while different clothing colors and accessories help distinguish the characters. You may need to enlarge the base or create a separate display area for additional figures.
Conclusion
The Crochet Holy Family Nativity Scene Pattern is a rewarding Christmas project that combines traditional symbolism with the warmth and creativity of handmade crochet. Throughout this tutorial, you have learned how to choose suitable materials, understand the essential crochet abbreviations, create the amigurumi figures of Mary and Joseph, crochet Baby Jesus, make the swaddling blanket, construct the shared base, and assemble the finished nativity arrangement. You have also explored ways to personalize the colors, improve the finishing details, and care for your handmade decoration so it can be enjoyed year after year.
What makes this crochet nativity scene pattern especially meaningful is the opportunity to create a Christmas decoration with your own hands. Every stitch contributes to a small work of art that reflects patience, care, and personal creativity. Whether you display it in your home, give it as a thoughtful gift, or make it part of a larger handmade Christmas collection, the finished Holy Family can become a beautiful reminder of the joy of traditional crafts.
If you decide to make this Crochet Holy Family Nativity Scene Pattern, I would love to hear about your experience. Please leave your honest opinion in the comments and share any suggestions, creative changes, or helpful tips you discovered while working on the project. Your feedback and ideas can inspire other crochet enthusiasts and help make future handmade Christmas projects even more enjoyable.