
Nothing says summer quite like a light and airy handmade top. Whether you’re heading to the beach, lounging in the garden, or meeting friends for a sunny picnic, a crochet lacy summer top is the perfect garment to keep you cool and stylish. This project is ideal for beginners who are ready to explore a more decorative crochet pattern without diving into anything too complex.
The lacy design brings a touch of elegance while still keeping things playful and relaxed. This crochet pattern focuses on basic stitches with repeating rows, so once you get the hang of the motif, it’s smooth sailing all the way. Plus, you’ll get the satisfaction of wearing something crafted by your own hands—a true conversation starter!
In this tutorial, we’ll guide you step-by-step through creating your own crochet lacy summer top, starting with what you need and ending with custom ideas and inspiration. Let’s grab our hooks and get started!
Materials You’ll Need
Before diving into the stitches, let’s gather everything necessary. You won’t need much, which makes this a fantastic stash-busting project or a good reason to treat yourself to a new skein or two of cotton yarn.
Materials List:
- Lightweight cotton yarn (2-3 skeins depending on size)
- Crochet hook size 3.5mm (E) or size needed for gauge
- Stitch markers
- Tapestry needle
- Measuring tape
- Scissors
When choosing yarn, go for 100% cotton or a cotton blend. Cotton is breathable, soft against the skin, and holds its shape well. If you prefer a bit more drape, consider a cotton-bamboo or cotton-acrylic blend for a slightly silkier finish.
You can choose any solid or variegated color. Lighter shades like white, cream, blush, or pastel blue give that breezy summer vibe, while deeper tones like coral or teal create a bold, beach-ready look. Be creative with your palette—this is your masterpiece!
Sizing and Gauge Information
This crochet lacy summer top is written in a size-flexible format, meaning you can easily adapt it to fit your body shape and preferred style. Whether you like a fitted crop or a relaxed tunic, the steps below will help you get your perfect fit.
To check your gauge:
- 4-inch square should equal approximately 18 double crochets x 8 rows (in the lacy pattern)
- Always create a small swatch to ensure the sizing will work with your yarn and hook combo
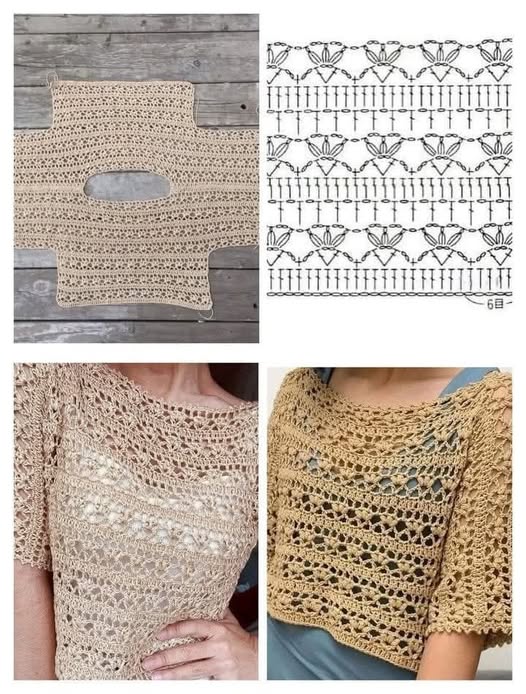
Measure your bust and desired top length before you begin. The construction is two rectangular panels (front and back) seamed together at the sides and shoulders. You can widen or lengthen them to adjust the fit.
Don’t stress about perfection here. Crochet garments are flexible and forgiving. As long as your two panels are roughly the same size, you’ll be good to go!
Step-by-Step Instructions: The Body Panels
We’ll start by creating two identical panels. Each panel forms half of your lacy top. This part uses a combination of chains and double crochets in an easy-to-remember repeat.
Step-by-Step:
- Foundation Row: Chain a multiple of 6 + 2 (this will be the width of your panel).
- Row 1: DC into the 4th chain from the hook, ch 2, skip 2 chains, DC in next chain; repeat across. Turn.
- Row 2: Ch 3 (counts as DC), ch 2, DC in next DC (skipping chain spaces); repeat across. Turn.
Repeat Row 2 until you reach the desired length of your top. This stitch pattern creates an airy openwork effect that’s both elegant and breathable—perfect for summer wear.
Once both panels are completed, block them gently to open up the lacy pattern. Simply wet them lightly, lay flat, and pin them to your desired dimensions.
Assembly: Seaming and Shaping
Now it’s time to bring your top to life. Lay your panels on a flat surface, right sides facing inward. Use a tapestry needle and matching yarn or stitch with a slip stitch seam.
Seaming Tips:
- Shoulders: Seam across the top, leaving 7-8 inches open for the neckline.
- Sides: Seam up both sides, leaving 6-8 inches from the top unseamed for armholes.
Try your top on inside out before fastening the seams permanently. Adjust the neckline and armhole sizes if needed. You can also shape the top slightly by adding or removing rows before seaming.
This part of the process is exciting—watching your two flat pieces transform into a wearable crochet top is truly rewarding!
Edging and Finishing Touches
To give your crochet lacy summer top a polished look, add a simple edging around the neckline and armholes. This also helps the garment maintain its shape and gives it a professional finish.
Neckline & Armhole Edging:
- Join yarn at any edge.
- Work one round of single crochet evenly around.
- For a decorative finish, add a round of picot stitch: (sc in next stitch, ch 3, slip stitch in first ch, skip 1 stitch) repeat around.
Weave in all loose ends using your tapestry needle. Give your finished top one last block if needed to smooth the edges and fully open up the lace design.
Voilà! You now have a stylish, handmade summer piece that’s comfortable, breathable, and utterly unique.
Customization Ideas
One of the best things about this crochet pattern is how easily it can be customized to reflect your personal style. You can keep it minimal or dress it up with creative flair.
Here are a few fun ideas:
- Crochet Straps: Add delicate spaghetti straps or halter ties instead of shoulder seams.
- Color Blocking: Alternate yarn colors every few rows for a striped effect.
- Fringe or Tassels: Add to the bottom hem for a playful boho look.
If you’re confident in shaping, you can also taper the sides inward to create a more fitted silhouette or add a drawstring waist for versatility. Your top can be as simple or as detailed as you wish.
With just a few small tweaks, this pattern transforms from beachwear to streetwear or even evening chic.
PATTERN HERE
Crochet – Tutorial
FULL PATTERN ACCESS
You will be redirected to another site
Share Your Crochet Creations!
There’s nothing more fulfilling than finishing a project and sharing it with the community. Whether you’re gifting it to a friend, wearing it out, or snapping a selfie for your Instagram feed, your handmade top is something to be proud of.
Crochet is more than a hobby—it’s a community full of encouragement, creativity, and inspiration. So don’t be shy—share your skills, celebrate your progress, and inspire someone else to start crocheting today!
Happy crocheting—and enjoy every stitch of your beautiful new summer top!