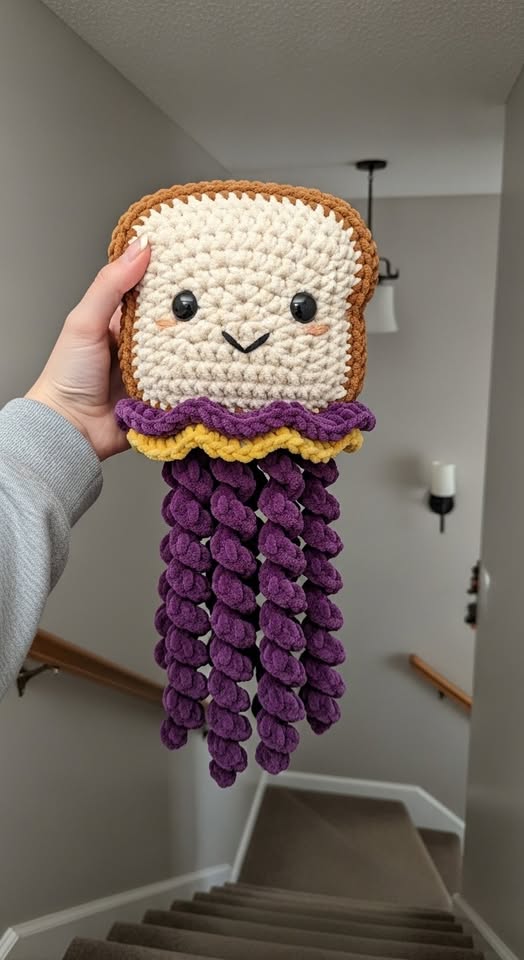
If you love fun, quirky crochet projects that bring smiles instantly, this Crochet Peanut Jellyfish is the perfect piece to try. Combining the charm of a peanut butter and jelly sandwich with the playful shape of a jellyfish, this project is both adorable and beginner-friendly. Whether you are just starting your crochet journey or looking for a relaxing weekend craft, this crochet pattern is a delightful choice.
This tutorial will guide you step by step, helping you create your very own soft, squishy jellyfish plush. With simple stitches, clear instructions, and helpful tips, you will feel confident from start to finish. Plus, there are plenty of ways to customize your creation to make it uniquely yours.
Let’s dive into this cozy and creative crochet adventure!
Why You’ll Love This Crochet Pattern
One of the best things about this crochet pattern is how approachable it is for beginners. You don’t need advanced skills or complicated techniques to complete this project. Basic stitches like single crochet, increases, and decreases are all you need to know. This makes it a perfect project if you are still building your confidence with crochet.
Another reason to love this project is how quickly it comes together. Using bulky or plush yarn means your jellyfish grows fast, which is incredibly satisfying. In just a few hours, you can go from a ball of yarn to a finished, huggable piece. It’s a great option if you enjoy instant gratification in your crochet projects.
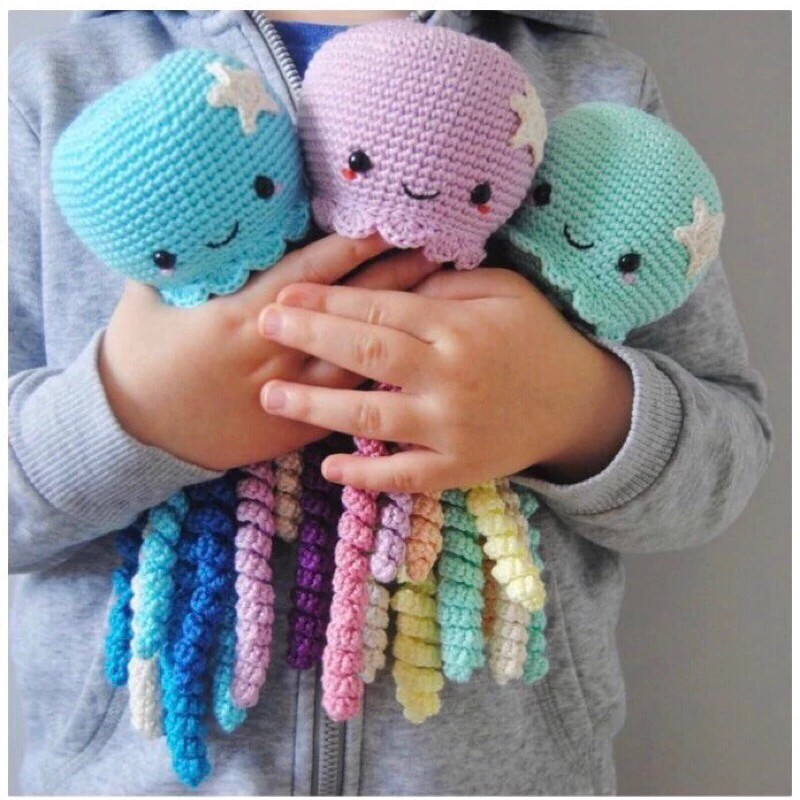
Finally, this peanut jellyfish is simply adorable. Its soft texture, cute face, and wavy tentacles make it a wonderful gift for kids, friends, or even yourself. It’s also a fun item to sell if you have a crochet business or social media page focused on handmade creations.
Materials You Will Need
Before starting your crochet pattern, it’s important to gather all the necessary materials. Having everything ready will make the process smoother and more enjoyable. The good news is that this project uses simple, easy-to-find supplies.
You will need chunky or plush yarn in several colors. A light beige or cream color works well for the “bread” part, while purple and yellow can represent the “jelly” layers. For the tentacles, a thicker yarn in a bold color like purple creates that soft, curly effect. You can also experiment with different color combinations to match your personal style.
Other materials include a crochet hook (usually 4.5 mm to 6 mm depending on your yarn), safety eyes, stuffing (polyfill), a yarn needle, and scissors. Stitch markers can also be helpful for keeping track of your rounds, especially if you’re new to crochet.
Understanding the Basic Stitches
If you are a beginner, don’t worry—this crochet pattern uses only basic stitches. The most important one is the single crochet (sc), which forms the foundation of the entire project. You will also use increases (two single crochets in one stitch) to expand your work and decreases (sc2tog) to shape it.
Working in the round is another key technique in this project. Instead of turning your work, you will crochet continuously in a spiral. This helps create a smooth, seamless look for your jellyfish body. Using a stitch marker will help you keep track of where each round begins.
Lastly, you will use simple chain stitches for the tentacles. These chains will naturally curl when worked with plush yarn, creating that signature jellyfish look. It’s a fun and satisfying step that really brings your project to life.
Step-by-Step Instructions
Start by creating a magic ring with your cream-colored yarn. Work 6 single crochets into the ring, then pull it tight. In the next round, increase in each stitch to get 12 stitches. Continue increasing evenly in each round until your circle reaches the desired size for the jellyfish top.
Once the top is wide enough, crochet several rounds without increasing. This builds the height of the jellyfish head. When you’re happy with the size, begin decreasing gradually to close the shape. Before closing completely, insert the safety eyes and add stuffing to give it a soft, plush feel.
After finishing the main body, create a second flat piece in the same size to represent the “sandwich” back. Attach both pieces together using single crochet, leaving a small opening if needed for additional stuffing. Add a round of contrasting color (purple and yellow) around the edge to create the jelly effect.
Making the Tentacles
The tentacles are one of the most fun parts of this crochet pattern. To create them, attach your yarn to the bottom of the jellyfish. Chain a length of about 20 to 40 stitches, depending on how long you want the tentacles.
Once you have your chain, work 2 or 3 single crochets into each chain stitch. This will naturally cause the strand to curl into a spiral. Repeat this process multiple times around the base to create a full, fluffy set of tentacles.
You can vary the lengths and colors of the tentacles to make your jellyfish more dynamic. Mixing different shades or even textures of yarn adds a playful and unique touch to your finished piece.
Adding the Cute Face
A big part of the charm of this crochet project is the adorable face. Position the safety eyes evenly on the front of the jellyfish, typically a few rows above the center. Make sure they are aligned before securing them in place.
For the mouth, use black yarn to embroider a simple “V” or smile shape. Keep it minimal for a cute and clean look. You can also add small blush details using pink yarn or fabric-safe markers to give your jellyfish extra personality.
Take your time with this step, as the face really brings your creation to life. Small adjustments can make a big difference in the final expression.
Beginner-Friendly Tips
If you’re new to crochet, one of the most important tips is to keep your tension consistent. Try not to crochet too tightly, especially when using plush yarn, as it can make stitching more difficult. Relax your hands and enjoy the process.
Another helpful tip is to count your stitches regularly. This ensures your shape stays even and prevents mistakes from building up over time. Using a stitch marker can make this much easier, especially when working in continuous rounds.
Finally, don’t be afraid to make mistakes. Crochet is a learning process, and every project helps you improve. If something doesn’t look right, you can always unravel a few stitches and try again.
Customization Ideas
One of the best parts of any crochet pattern is the ability to customize it. You can change the colors to match different themes, like pastel tones for a soft aesthetic or bright colors for a playful vibe. The “peanut butter and jelly” concept can also be adapted with different color combinations.
You can also experiment with different yarn textures. Velvet or chenille yarn gives a super soft, plush finish, while cotton yarn creates a more structured look. Each option brings a different feel to your project.
Another fun idea is to add accessories. Tiny bows, hats, or even embroidered details can make your jellyfish stand out. You can even turn it into a keychain or bag charm by adding a loop at the top.
Final Thoughts and Share Your Creation
This Crochet Peanut Jellyfish is more than just a fun project—it’s a wonderful way to practice your skills and express your creativity. With its simple steps and charming design, it’s perfect for beginners who want to create something unique and adorable.
As you work through this crochet pattern, remember to enjoy each step. Crochet is not just about the finished product, but also about the relaxing and rewarding process of making something with your own hands.
When you finish your jellyfish, don’t forget to share it! Post your creation on social media, show it to friends, or even gift it to someone special. Your handmade piece might inspire others to start their own crochet journey.