
Amigurumi has taken the crafting world by storm, especially among those passionate about crochet. One of the most impressive and adorable amigurumi projects is the Realistic Cat Amigurumi. This detailed piece is more than just a toy—it’s a lifelike representation of our favorite furry companions, perfect for cat lovers and crochet enthusiasts alike.
Creating a realistic cat using yarn and hooks might sound challenging, but with the right guidance, it becomes a fun and rewarding experience. In this tutorial, we’ll walk you through how to make a Realistic Cat Amigurumi using a Free Pattern. Whether you’re a beginner or seasoned crafter, this guide is designed to help you succeed.
From material selection to finishing touches, this blog post covers every detail. You’ll learn helpful tips, creative variations, and professional techniques to ensure your cat turns out lifelike and lovable. Let’s dive into one of the most detailed and captivating crochet patterns available!
Why Choose a Realistic Cat Amigurumi?
While traditional amigurumi often features simple and cartoon-like characters, realistic designs offer a unique challenge and a stunning final result. Making a realistic cat allows you to explore advanced techniques like shaping, color blending, and detailed embroidery.
Unlike simple projects, a realistic cat amigurumi captures the charm and personality of real pets. You can base your creation on your own cat or invent a whole new feline friend. These types of crochet patterns are perfect gifts, keepsakes, or even memorials.
Realism in crochet isn’t just about aesthetics; it’s a way to push your skills and creativity. As you follow this pattern, you’ll gain confidence in shaping, stuffing, and stitching techniques that can be used in future advanced projects.
Materials Needed to Make a Realistic Cat Amigurumi
Before starting, gather all necessary materials. You’ll need worsted weight or DK weight yarn in realistic cat colors such as white, gray, black, ginger, or calico. You will also need a 2.5 mm to 3.5 mm crochet hook, fiberfill stuffing, stitch markers, and safety eyes or realistic glass eyes.
To bring more realism to your cat, you may want to use a pet slicker brush to gently fuzz the yarn once the body is finished. This gives your amigurumi a fluffy, fur-like texture. Embroidery thread can also be used for whiskers, nose details, and subtle shading.
Other helpful tools include a yarn needle for sewing parts together, fabric glue for attaching small details, and wire if you plan to make a poseable version. Having everything ready helps your crochet experience go smoothly from start to finish.
Understanding the Structure of the Pattern
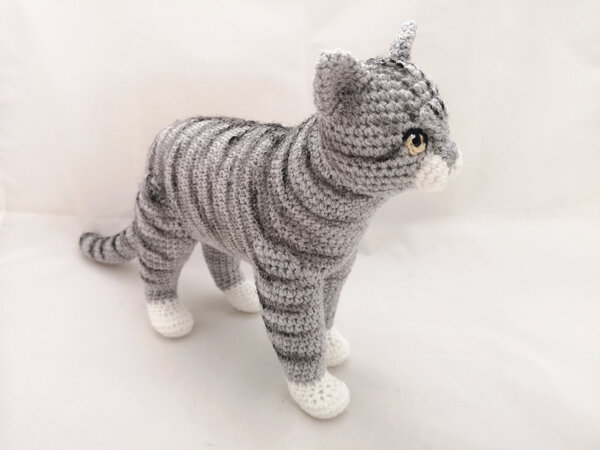
The Realistic Cat Amigurumi Free Pattern is typically divided into several key parts: head, body, legs, tail, ears, and face details. Each part is crocheted separately and then sewn together to form the full figure.
Start with the head, as it is the most expressive part of the cat. Shaping the head requires increases and decreases to achieve the right proportions. The eyes, nose, and mouth are added before the head is attached to the body for easier access.
The legs and tail help create a balanced, lifelike pose. You’ll be following detailed instructions that often involve counting stitches precisely. Assembling the cat is like piecing together a soft sculpture—a rewarding challenge for any crochet artist.
Step-by-Step: How to Crochet the Head
Begin the head with a magic ring and work in continuous rounds. The first few rows will increase to form a rounded base. Then, you’ll work several even rounds to create the full shape of the skull, followed by gentle decreases to form the snout and chin.
Attach the safety eyes or sew in realistic glass eyes between the even rounds, typically around rows 10–12. Positioning the eyes correctly gives your cat its expressive look. Use pink or black yarn to embroider a nose and a small mouth underneath it.
Stuff the head firmly with fiberfill, shaping it as you go. The right amount of stuffing helps maintain form without causing gaps in the crochet stitches. Once complete, set the head aside for later assembly with the body.
Crafting the Cat’s Body and Limbs
The body is worked from the bottom up, starting with a magic ring and increasing into a flat base before working upward. The shape tapers slightly at the neck for a more natural form. Use color changes subtly to add shading or simulate fur patterns.
For the legs, you’ll crochet four identical pieces—two front and two hind legs. The back legs may be slightly thicker or shaped differently depending on the pattern. Each leg is stuffed and sewn securely to the body, ensuring stability.
The tail is a fun and expressive part of your amigurumi. It can be curved or straight, stuffed or unstuffed, and even wired for poseability. Don’t forget to use stitch markers to keep your rows consistent as you follow this detailed crochet pattern.
Adding the Ears, Eyes, and Finishing Touches
Crochet the ears separately and fold them slightly to create a realistic angle. Use whipstitch or invisible stitch techniques to attach them securely to the head. Be mindful of symmetry—uneven ears can throw off the realism.
To enhance the face, use soft embroidery thread or fine yarn to add whiskers, eyelids, or eyebrows. Small details like these elevate your project from cute to breathtakingly real. A little blush with yarn pastels can also help add depth to the cheeks and nose.
Once all parts are sewn together, brush the entire figure gently with a pet brush to create a fuzzy texture that mimics fur. This final step turns your crochet project into a truly lifelike representation of a cat.
Tips for Realism and Customization
One of the best things about crochet patterns like this one is how customizable they are. Use a photo of a real cat as reference to replicate its markings and color pattern. You can even add a collar or a small bell for extra personality.
For added realism, consider using variegated yarn or blending two yarn colors while crocheting. This technique mimics the natural shading and texture of cat fur. You can also embroider little paw pads under the feet using a soft yarn.
If you’re feeling extra creative, try making a series of cats in different breeds—Siamese, Persian, Tabby, or Tuxedo—using the same pattern but adjusting the colors and features. Your handmade collection will be a standout among crochet enthusiasts.
Displaying or Gifting Your Cat Amigurumi
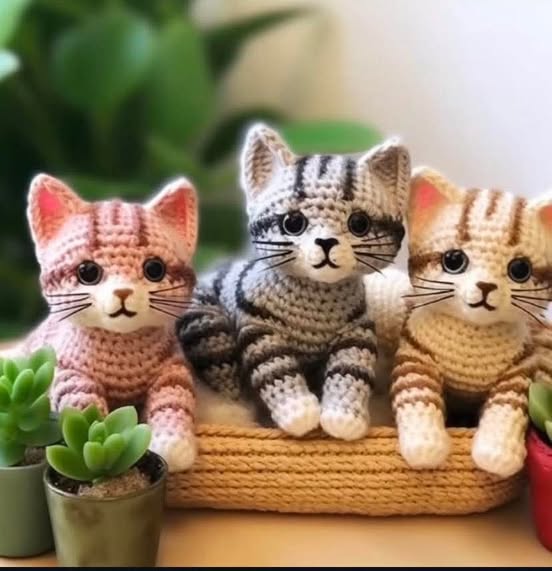
Your finished Realistic Cat Amigurumi can be displayed proudly on shelves, desks, or even gifted to someone special. Place it in a cozy basket, on a blanket, or near a framed photo for an adorable effect.
These amigurumi cats make thoughtful presents for birthdays, holidays, or memorials for lost pets. They’re often cherished as keepsakes because of the love and detail poured into them. Personalize the cat’s appearance for the recipient to make it truly special.
You can even sell your work online through Etsy or local craft fairs. Realistic crochet patterns like this one are highly popular and can attract serious attention from buyers looking for something heartfelt and handmade.
Where to Find the Free Pattern
You can find the Realistic Cat Amigurumi Free Pattern on various trusted websites like Ravelry, Pinterest, or specialized crochet blogs. Many of these include photo tutorials and downloadable PDFs to help you follow along with ease.
Before choosing a pattern, read reviews or comments from other users to ensure clarity and accuracy. Some creators even offer video walkthroughs, which are incredibly helpful if you’re more of a visual learner.
Always credit the original pattern designer if you share your work online or sell it. Supporting independent creators helps grow the crochet community and encourages more beautiful, realistic designs in the future.
Final Thoughts
Making a Realistic Cat Amigurumi using a Free Pattern is both a technical and emotional journey. The attention to detail, the creativity involved, and the final lifelike result are deeply rewarding for any crochet artist.
PATTERN HERE
Crochet – Tutorial
FULL PATTERN ACCESS
You will be redirected to another site
As you complete each step, you’re not just following a pattern—you’re creating a soft sculpture full of character and charm. The end product is something to be proud of, whether it’s for yourself or someone you love.
We hope this tutorial inspires you to explore more advanced crochet patterns and challenge your skills. With time, patience, and passion, you’ll be amazed at what your hands can create.