
Looking to create something small, fun, and full of personality? This Crochet Rooster Keychain is the perfect project for both beginner and experienced crafters. With its charming design and bright colors, this keychain makes a great gift or personal accessory that adds a handmade touch to your daily essentials. Follow this crochet pattern to make your very own rooster companion!
Materials You’ll Need
Before we dive into the crochet pattern, let’s go over everything you’ll need to complete this project. These materials are easy to find at any craft store or online, and you may already have most of them at home if you’re a regular crocheter.
- Yarn: Small amounts of cotton or acrylic yarn in red, white, yellow, orange, and black
- Hook: 2.5mm or 3mm crochet hook (depending on how tight you want your stitches)
- Keychain ring or clasp
- Stuffing: Polyester fiberfill or yarn scraps
- Tapestry needle for sewing pieces together
- Stitch marker (optional, but helpful for beginners)
- Scissors
Make sure you choose yarn that holds shape well for small amigurumi-style projects. Cotton yarn is ideal as it provides structure and durability for items that will be handled often.
Starting with the Rooster’s Body
The main part of the crochet pattern begins with the rooster’s body. This section is worked in the round using single crochet stitches. You’ll need to know how to create a magic ring and work increases.
- Round 1: Using white yarn, start with a magic ring. Work 6 single crochet (sc) stitches into the ring.
- Round 2: Increase in each stitch around – 12 sc.
- Round 3–6: Work 1 sc in each stitch around – 12 sc.
- Round 7: Decrease every second stitch – 6 sc. Stuff lightly with fiberfill.
- Round 8: Decrease until the hole is closed. Fasten off and weave in the end.
This creates the egg-like base of the rooster. Keep your stitches tight so that the stuffing doesn’t show through. The shape should be a little oval, giving your rooster a plump and cute look.
Creating the Rooster’s Head and Comb
The rooster’s head is a continuation of the body, but you can make it separately and attach it. The comb, a distinctive feature of the rooster, adds character and flair to the design.
- Head:
- Repeat the same pattern as the body, but make it slightly smaller (e.g., only 5 rounds instead of 6 before decreasing).
- Attach to the top of the body using a tapestry needle and matching yarn.
- Comb (in red):
- Chain 4, skip the first chain, and work [1 sc, 1 half-double crochet (hdc), 1 sc] across.
- Fasten off and leave a tail for sewing.
- Make 2–3 of these small arcs and sew them on top of the head to create the comb.
This gives the rooster a lively personality and makes the project more recognizable. You can even experiment with different styles for the comb – longer, shorter, or a different texture for a creative twist on the crochet pattern.
Adding Wings, Beak, and Tail Feathers
With the body and head in place, it’s time to give your rooster more personality. These elements are made from simple shapes and stitches, yet they complete the whole look perfectly.
- Wings (in white or a different color for contrast):
- Make a small oval: Chain 4, sc in second chain from hook, hdc in next, sc in last.
- Fasten off and make two. Sew to the sides of the body.
- Beak (in yellow):
- Chain 3, sc in second chain, and fasten off.
- Sew below the comb, centered on the face.
- Tail Feathers (in red, orange, and yellow):
- Chain 6–10, then slip stitch back down the chain.
- Repeat to create 3 strands, then sew them together and attach at the back of the body.
Each of these parts gives the rooster its bold and playful character. Don’t worry about perfection – part of the charm of crochet is in its handmade uniqueness!
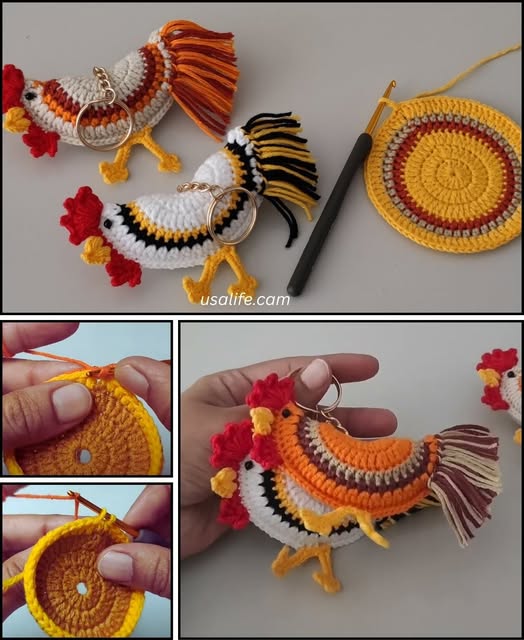
Attaching the Keychain and Final Touches
Once your rooster is fully assembled, it’s time to turn it into a usable keychain. This is a quick and simple step that transforms your creation into a functional accessory.
- Attach the keychain ring:
- Using a strong thread or matching yarn, sew the keychain ring to the top of the rooster’s head or the back of the comb.
- Reinforce the stitch to ensure it holds up over time.
- Add eyes:
- Use safety eyes or black yarn to stitch small eyes just above the beak.
- If using yarn, make a French knot or tiny embroidered circle.
- Final shaping:
- Gently mold the rooster with your fingers to adjust the shape.
- Trim any excess threads and make sure all pieces are firmly attached.
This last part brings everything together. Your handmade crochet rooster keychain is now complete and ready to accompany your keys, bags, or be gifted to a friend!
Customization Ideas
One of the best parts of working with any crochet pattern is the ability to make it your own. The rooster keychain lends itself perfectly to playful color combinations and personal touches.
- Color Variations:
- Try different body colors like green, blue, or even rainbow.
- Use variegated yarns for a speckled effect.
- Seasonal Roosters:
- Make holiday versions – red and green for Christmas, pastel for Easter, or orange and black for Halloween.
- Add accessories like a mini Santa hat or heart wings.
- Name Tag or Initials:
- Crochet a tiny tag with initials or sew on a mini felt letter for personalization.
- Great for gifts, party favors, or schoolbag IDs.
With a bit of creativity, you can turn this simple crochet project into a fun series of collectible rooster keychains!
Share Your Crochet Rooster Keychain with the World!
Now that you’ve completed your very own Crochet Rooster Keychain, it’s time to show it off! Handmade items are meant to be shared and celebrated, and your work can inspire others to pick up a hook and try this crochet pattern themselves.
Take a photo and post it on Instagram or Pinterest using hashtags like #CrochetRoosterKeychain or #MyCrochetPattern. Join crochet communities on Facebook or Reddit to connect with fellow crafters and swap ideas.
Whether it’s your first project or your hundredth, each piece you create tells a story of time, care, and creativity. Happy crocheting, and don’t forget to spread the love by sharing your feathered friend with others!