
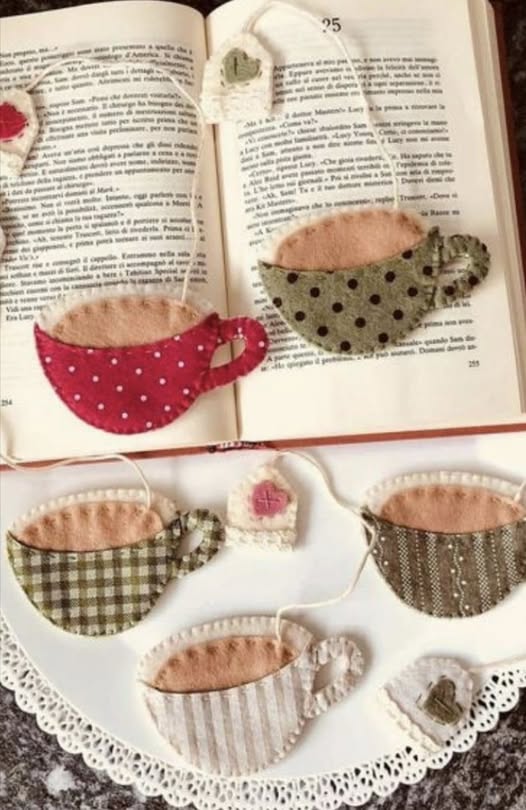
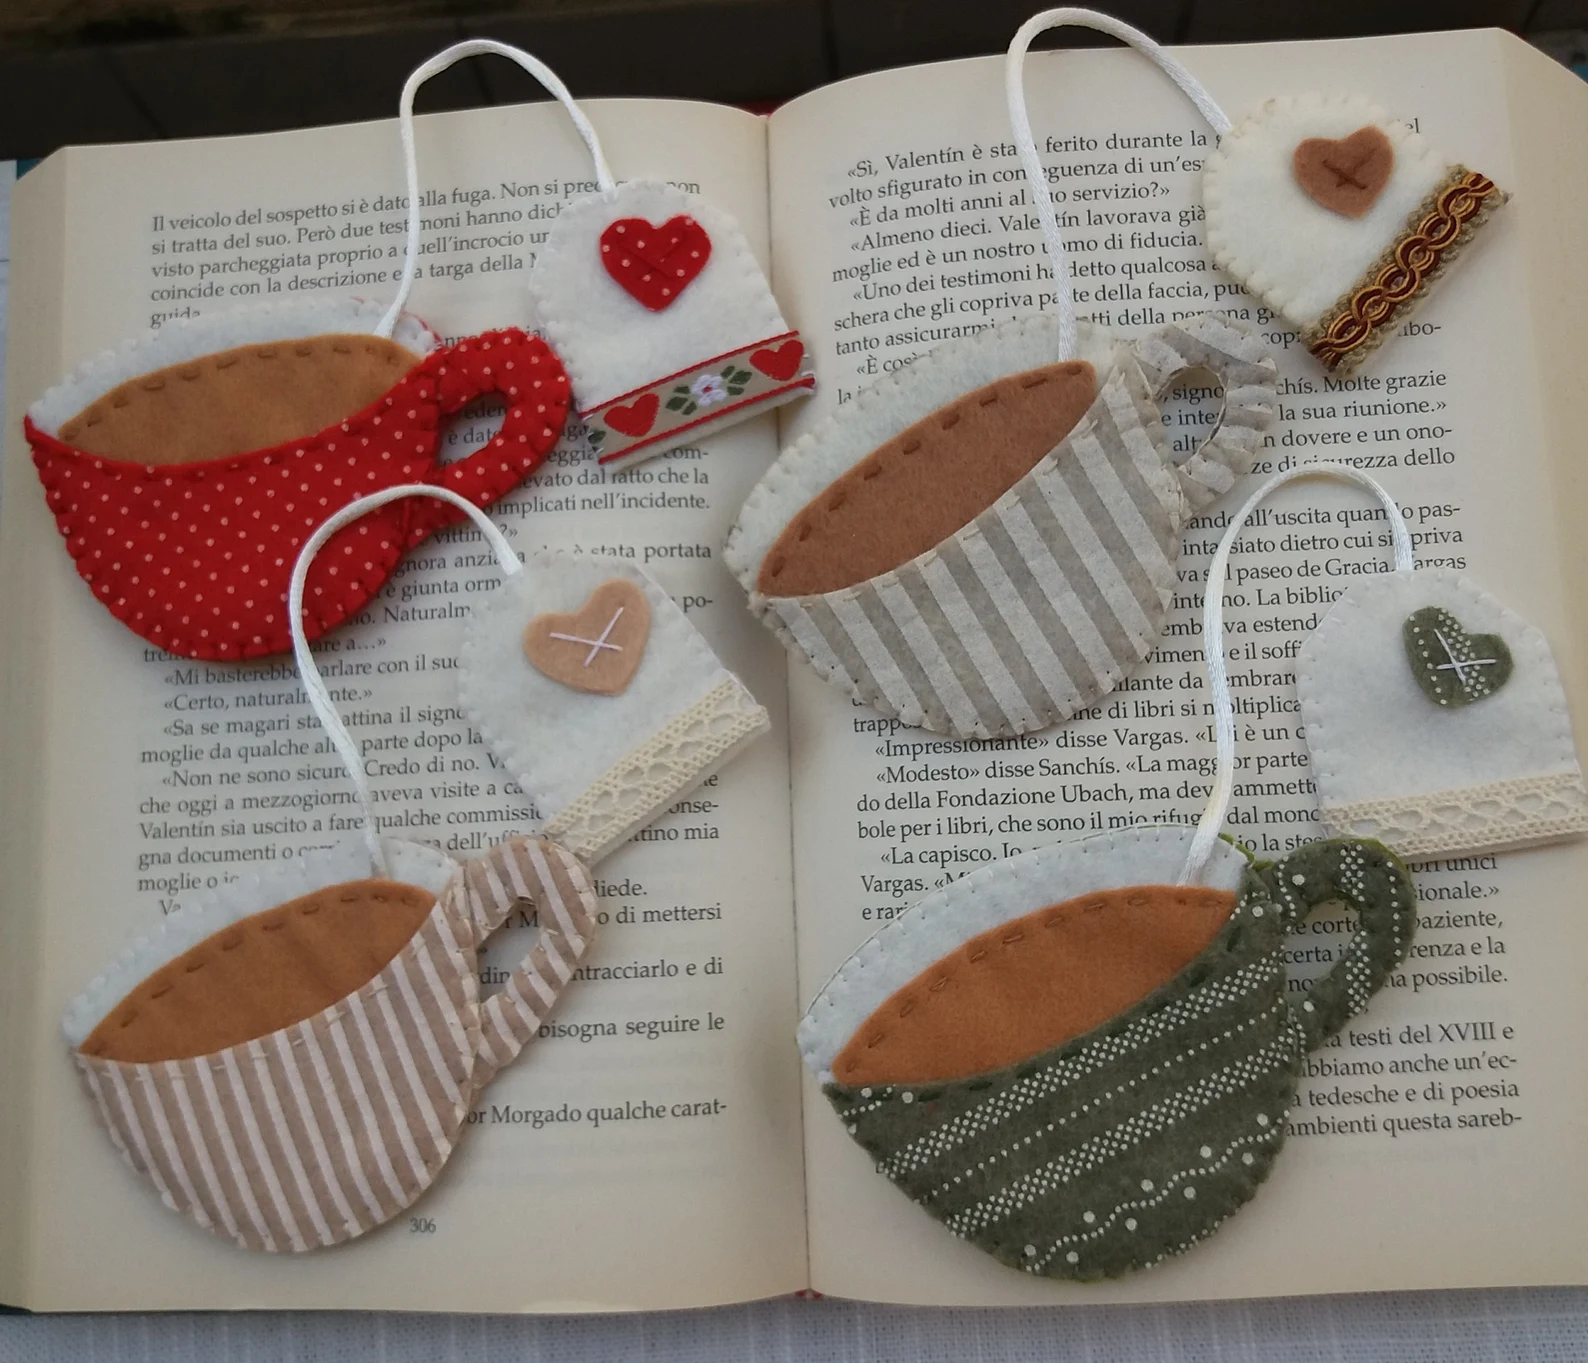
Do you love reading and sewing equally? If so, you’re in for a delightful treat. A handmade bookmark is not only a practical tool to keep track of your page, but it’s also a small piece of art that adds personality to your favorite books. Today, we’ll explore a Cup-Shaped Felt Bookmark – Pattern that’s perfect for beginners. This project combines simple felt work with a cozy quilting pattern vibe, making it fun, creative, and completely customizable.
Whether you’re just starting out with needle and thread or you’ve been exploring the world of sewing and quilting for years, this tutorial is designed to guide you through every step. From gathering materials to stitching, decorating, and adding your personal flair, you’ll finish with a bookmark that’s not only useful but also gift-worthy. And the best part? You don’t need advanced quilting skills—just a love for crafting and the willingness to try.
In the sections below, we’ll break down everything you need: a full materials list, a clear step-by-step guide, creative customization ideas, and even tips for giving your bookmark a quilting pattern look. So grab your felt, scissors, and some thread, and let’s get stitching!
Materials You’ll Need
Before diving into the process, let’s gather everything required to create this adorable cup-shaped felt bookmark. Felt is an excellent material because it’s inexpensive, easy to cut, and doesn’t fray. Combined with some simple stitches, it will give your project a clean and professional look.
Here’s what you’ll want to have on hand:
- Sheets of felt in your chosen colors (one for the cup, one for accents)
- Embroidery thread or quilting thread
- Sewing needle
- Scissors (sharp fabric scissors work best)
- Fabric glue (optional for beginners)
- A small piece of ribbon or elastic (for the bookmark tail)
- Paper and pencil for drafting your cup template
- Pins or clips to hold pieces together
Many of these items may already be in your sewing box, especially if you’ve dabbled in quilting. The key is to keep your materials simple and accessible. Because felt comes in a variety of colors, you can pick shades that match your personal style or even design your bookmark to resemble your favorite coffee or tea mug.
Creating the Cup Template
The first step in this tutorial is making your cup-shaped pattern. Think of it as drafting a mini quilting pattern—simple lines and shapes that come together to create something charming. Don’t worry if drawing isn’t your strong suit; the design can be as basic as a rounded rectangle with a small handle.
To start, take a piece of paper and sketch the outline of a cup. Keep the size small—around 3 to 4 inches wide is perfect for a bookmark. Add a little handle shape to the side. Once you’re happy with your sketch, cut it out. This will serve as your template for cutting the felt.
If you prefer, you can search for free printable cup outlines online and trace them. What matters most is that the shape is recognizable and simple enough to cut from felt. Think of it like a quilting pattern block—basic but full of charm once stitched.
Cutting the Felt Pieces
Once your paper template is ready, it’s time to cut the felt. Place the template over your chosen felt sheet and trace around it lightly with a fabric-safe pen or chalk. You’ll need two identical cup shapes: one for the front and one for the back.
Next, if you want to add extra details—like a contrasting band, a saucer line, or steam swirls—you can cut small accent pieces from felt scraps. This step feels a lot like piecing a quilt together; small pieces make the design more dynamic. Even if you’re not working with fabric scraps, you can create layers that mimic a quilting pattern effect.
Take your time with cutting. Felt can shift, so hold your template firmly in place or use pins. Sharp scissors will give you clean edges, which is important for the neat look of your finished bookmark. Once done, you should have a little felt “sandwich” ready to be stitched.
Stitching the Cup
Now comes the fun part—stitching your cup-shaped felt pieces together. Place the two cup cutouts on top of each other, with any decorative accents already positioned on the front. You can secure them with pins or even dab a little fabric glue to hold accents before sewing.
Using embroidery thread or quilting thread, begin stitching around the edge of the cup. A blanket stitch works beautifully here, giving your bookmark a hand-finished look. If you’re new to stitching, a simple running stitch will also do the job. The goal is to keep the two felt layers together securely.
As you sew, don’t forget to attach the ribbon or elastic piece at the bottom of the cup. This will dangle out of your book and act as the functional “tail” of your bookmark. Secure it firmly between the felt layers before closing the final stitches. This step ensures your bookmark will last through many reading sessions.
Adding Quilting Pattern Details
To make your felt bookmark extra special, consider adding quilting-inspired details. While you’re not quilting in the traditional sense, you can use stitching lines to mimic the look of a quilt block. For example, sew diagonal lines across the cup shape to create a patchwork effect.
Another idea is to use felt scraps in different colors or prints to piece together the cup, just like a mini quilt block. This gives your bookmark a unique, handcrafted look and allows you to experiment with patterns. Think of it as combining felt crafting with quilting patterns—a fun fusion of two beloved crafts.
This step isn’t required, but it adds depth and personality. Even simple straight stitches across the cup can transform a plain felt piece into something eye-catching and creative. If you enjoy quilting, you’ll appreciate this chance to bring that passion into a small, easy project.
Creative Personalization Ideas
One of the joys of handmade crafts is personalization. With this cup-shaped felt bookmark, the possibilities are endless. You can create a set of bookmarks that look like a coffee shop menu: cappuccino, latte, tea, or even hot chocolate with marshmallows. Simply switch up your felt colors and embroidery details.
You can also embroider small messages or initials onto the cup. A tiny heart, a smiley face, or a favorite quote makes the bookmark extra meaningful. These details are like the unique quilting patterns that make every quilt stand out—no two bookmarks need to look the same.
If you’re making bookmarks as gifts, consider the recipient’s favorite drink or book genre. A tea lover might appreciate a pastel teacup design, while a mystery reader might enjoy a darker, moody color palette. Your imagination is the only limit here!
Step-by-Step Summary
Let’s quickly recap the full process so you can follow along easily:
- Gather all your materials: felt, thread, scissors, ribbon, and template.
- Draw and cut a cup-shaped template on paper.
- Trace and cut two felt cup shapes plus any accent pieces.
- Layer the felt pieces together and prepare your ribbon or elastic.
- Stitch the pieces with blanket or running stitch, securing the ribbon at the bottom.
- Add decorative stitching or quilting pattern effects for extra charm.
- Personalize with embroidery, colors, or embellishments.
Following these steps ensures you’ll have a neat, functional, and beautiful bookmark. Beginners will find the process simple, while more experienced crafters can expand on the design with quilting details and advanced embroidery.
Wrapping Up – Share Your Cup-Shaped Felt Bookmark
Making a Cup-Shaped Felt Bookmark – Pattern is a creative way to combine your love for sewing, quilting patterns, and reading. The result is a bookmark that’s both practical and decorative, a little piece of handmade joy that will brighten your reading sessions.
This project is also a perfect introduction to stitching for beginners. It doesn’t require complicated tools or advanced quilting techniques, yet it leaves plenty of room for creativity and personalization. Plus, because it’s quick to make, you can create a whole collection for yourself or to give away as thoughtful handmade gifts.
Now it’s your turn! Grab your felt, thread, and imagination, and start making your own bookmarks. And don’t forget to share your finished creations—whether with friends, in quilting groups, or on social media. Let’s inspire more people to bring the warmth of handmade crafts into everyday life, one stitch at a time.