
Creating a quilt is always an exciting journey, and the Dancing Ribbons Quilt is a fantastic project for quilters of all levels. Its playful curves and elegant ribbons create a unique design that is both modern and timeless. This tutorial will guide you through every step of the process, from gathering materials to adding your final stitches. Whether you are an experienced quilter or just starting, you’ll find this pattern easy to follow and endlessly customizable.
The Dancing Ribbons quilt pattern is perfect for bright fabrics, allowing you to create a quilt full of movement and personality. The flowing ribbon effect adds a sense of fun, making it a wonderful option for gifts, home décor, or personal use. By the end of this guide, you’ll not only have a beautiful quilt but also gain confidence in working with curves and color combinations.
Let’s dive into the materials you’ll need, the preparation steps, and the full process for completing this project. Ready to get started? Let’s make your Dancing Ribbons Quilt come to life!
Materials You Will Need
Before you begin, gather all the essential supplies. Working with the right tools ensures that your quilting experience is smooth and enjoyable. Here’s a detailed list to help you get organized and start your creative journey.
- Fabric for ribbons: Choose at least five different colors or prints (fat quarters work perfectly).
- Background fabric: Solid or subtle print fabric for contrast.
- Backing fabric: Enough to cover the quilt’s back dimensions.
- Batting: High-quality cotton or polyester batting for a soft finish.
- Thread: Matching or contrasting colors for quilting.
- Cutting tools: Rotary cutter, self-healing mat, and acrylic ruler.
- Templates: Curved ruler or a paper template for ribbon shapes.
- Sewing machine: With a ¼-inch foot for accurate seams.
- Pins or clips: To hold pieces in place during assembly.
- Iron and ironing board: For pressing seams.
Having everything prepared in advance saves time and keeps your workflow organized. Once you have all your supplies ready, it’s time to start cutting and arranging your fabrics for the beautiful ribbon effect.
Preparing Your Fabrics
Preparation is key to achieving a clean and professional-looking quilt. Start by washing and pressing all your fabrics to prevent any shrinking or distortion later. Pressing ensures that your fabric lays flat, making cutting and sewing much easier.
Next, use your template or curved ruler to cut the ribbon shapes. These gentle curves are what give the quilt its dynamic, flowing look. Precision is important here, so take your time and make sure each piece matches the template accurately. For a balanced design, cut an equal number of ribbons in each color.
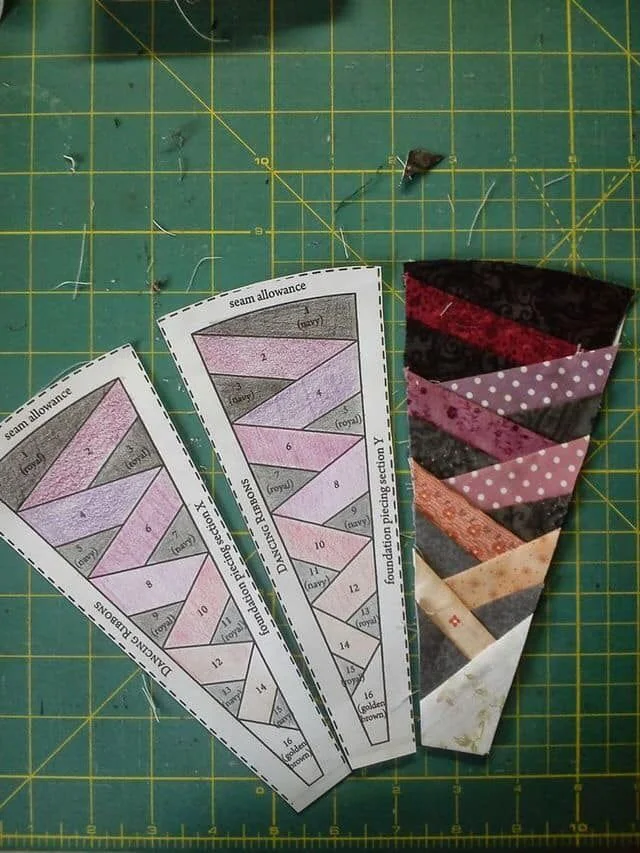
Finally, lay out your pieces on a large surface or design wall. Experiment with the placement of your ribbons against the background fabric. The beauty of this quilt pattern is that you can create unique arrangements every time, so don’t hesitate to play around until you find a layout that you love.
Step-by-Step Assembly Instructions
Now that everything is prepared, let’s start sewing your Dancing Ribbons Quilt. These steps will guide you through creating the ribbon effect and assembling the quilt top.
- Attach the ribbons to the background: Take one ribbon piece and align it with a section of the background fabric. Use pins or clips to hold the curve in place, easing the fabric gently along the edge.
- Sew along the curve: Using a ¼-inch seam allowance, stitch the ribbon to the background. Go slowly and carefully to maintain smooth curves. Press the seam toward the ribbon side.
- Repeat the process: Continue adding ribbons in alternating colors, working across the quilt top. Adjust the angles slightly for a dynamic and dancing effect.
Once all the ribbons are attached, square up the quilt top by trimming any uneven edges. The result should be a beautiful flowing pattern that looks intricate but is surprisingly simple to achieve.
Quilting and Finishing Touches
After assembling the quilt top, it’s time to add batting and backing. Create a quilt sandwich by layering the backing fabric (right side down), batting, and quilt top (right side up). Smooth out any wrinkles and secure the layers with pins or basting spray.
When it comes to quilting, choose a design that complements the flowing ribbons. Free-motion quilting works beautifully here, especially with gentle swirls or loops that echo the ribbon curves. Alternatively, you can opt for straight-line quilting for a modern touch. Use matching or contrasting thread to make the ribbons pop.
Finally, finish your quilt with a binding in a coordinating fabric. Machine stitch or hand sew the binding for a neat edge. Give your quilt a final press, and your Dancing Ribbons Quilt is ready to impress!
Creative Personalization Ideas
One of the best things about this quilt pattern is its versatility. You can make the design completely your own by experimenting with color palettes and textures. Here are a few ideas to inspire you:
- Bold and Bright: Use vibrant solids for ribbons against a dark background for a striking effect.
- Soft and Subtle: Choose pastels and light neutrals for a gentle, elegant look.
- Scrappy Style: Mix different fabric scraps for a fun and eclectic quilt full of personality.
You can also play with the scale of the ribbons—make them wider for a bolder look or narrower for a delicate design. Adding a border in a coordinating color can also frame the ribbons beautifully.
Share Your Dancing Ribbons Quilt!
Congratulations! You’ve completed your Dancing Ribbons Quilt, a gorgeous piece full of movement and creativity. This project is perfect for beginners who want to try something new and for experienced quilters looking for a fresh, modern design.
We’d love to see your finished quilts! Share your project on social media using the hashtag #DancingRibbonsQuilt and inspire other quilters to join in. Quilting is all about creativity and community, so let’s celebrate your success together. Happy quilting!