
Quilting is an art that allows crafters to explore endless patterns and designs. One of the most visually striking designs is the Diamond and Trapezoid Cloth Block 3D. This pattern creates an optical illusion of depth, making it a favorite among quilting enthusiasts. In this tutorial, we will guide you through the process of making a Diamond and Trapezoid Cloth Block 3D quilt, complete with measurements, fabric cuts, and assembly instructions.
Understanding the Diamond and Trapezoid Quilt Block
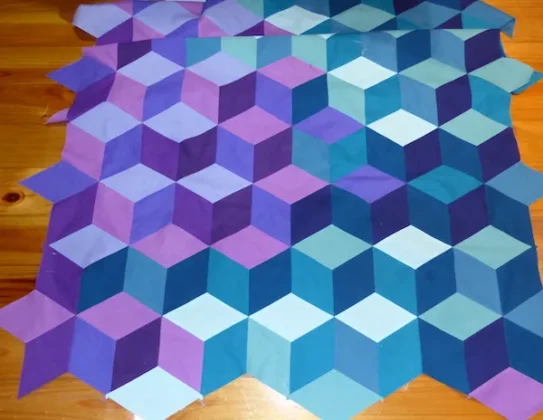
The Diamond and Trapezoid Cloth Block 3D is a geometric quilt pattern that gives an illusion of a three-dimensional structure. It is achieved by carefully arranging different fabric cuts with contrasting colors and values.
Using a combination of quilting techniques such as precise cutting, accurate piecing, and mindful fabric selection, quilters can create a dynamic and engaging pattern. The interplay of colors adds to the 3D illusion, making it visually appealing.
This pattern is ideal for intermediate and advanced quilters looking for a challenge. However, beginners can also attempt it by following precise guidelines and practicing patience with fabric alignment.
Materials and Fabric Selection
To achieve a stunning Diamond and Trapezoid Cloth Block 3D quilt, selecting the right fabric colors is essential. The trick lies in choosing three shades: a dark, a medium, and a light tone.
Fabric A (Dark Tone): 1 yard
Fabric B (Medium Tone): 1 yard
Fabric C (Light Tone): 1 yard
Rotary Cutter and Quilting Ruler
Sewing Machine and Coordinating Thread
Using high-quality cotton fabrics is recommended for better durability and easier handling. Pre-wash and press the fabrics to avoid shrinkage or distortion during the quilting process.
Cutting the Fabric Pieces
The success of this pattern depends on precise fabric cuts. Below are the required dimensions:
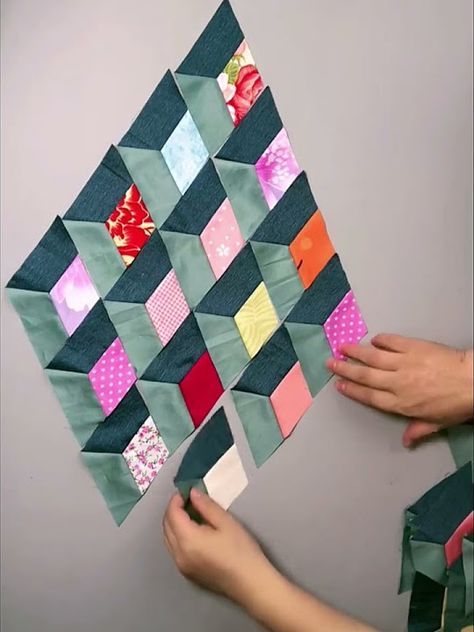
Diamonds: Cut 3.5″ x 6.5″ rectangles and trim them into 60-degree diamonds
Trapezoids: Cut 3.5″ x 5″ trapezoid pieces
Background Squares: Cut 3.5″ x 3.5″ squares
Using a rotary cutter and a quilting ruler, mark and cut each shape carefully. Be sure to maintain accuracy, as even a small deviation can disrupt the 3D effect of the quilt block.
Arranging the Quilt Block
To create the 3D illusion, place the pieces in a strategic manner. Arrange the diamonds and trapezoids with alternating colors to establish depth.
Start by laying the diamond pieces first, ensuring that each block has the darkest fabric on one side, the medium shade in the middle, and the lightest on the opposite side. This contrast creates the visual 3D effect.
The trapezoids should be aligned alongside the diamond shapes. The background squares will fill the gaps, maintaining uniformity and balance in the quilt block.
Sewing the Quilt Block
Now that the pieces are in place, it’s time to sew them together. Begin by piecing the trapezoids to the diamonds, ensuring seams are aligned correctly.
Step 1: Sew the trapezoid pieces to the diamonds using a 1/4-inch seam allowance. Press the seams open.
Step 2: Join the background squares to the trapezoid-diamond units. Press the seams in one direction to reduce bulk.
Step 3: Assemble the completed units into rows, aligning corners carefully to maintain the pattern’s structure.
Use pins or clips to hold pieces together before sewing, reducing the chances of misalignment. Take your time to ensure accuracy.
Pressing and Finishing
Pressing is a crucial step to ensure a professional-looking quilt block. Use a hot iron to press seams open or to the side, depending on bulk distribution.
Avoid stretching the fabric while pressing, as this can distort the shapes and affect the final appearance. If needed, use starch to stabilize the fabric.
Once the blocks are assembled and pressed, they are ready to be incorporated into a larger quilt pattern, whether as a standalone design or a repeating motif.
Assembling the Full Quilt
To create a full quilt using the Diamond and Trapezoid Cloth Block 3D pattern, repeat the blocks and join them together in rows.
Each block should align seamlessly with adjacent blocks to maintain the optical illusion. Consider adding sashing between blocks for a distinct layout.
For borders, choose a complementary color that enhances the 3D effect. A solid-colored border can provide a clean and finished look to the entire quilt.
Quilting and Binding
Once the quilt top is complete, layer it with batting and a backing fabric. Secure it with quilting pins or basting spray.
Choose a quilting pattern that enhances the design, such as straight-line quilting following the diamond edges or free-motion quilting for added texture. Stitch-in-the-ditch techniques can also work well for maintaining a crisp look.
Finally, bind the quilt with a coordinating fabric, sewing carefully around the edges to ensure a durable and polished finish.
Conclusion
The Diamond and Trapezoid Cloth Block 3D quilt is a beautiful and engaging pattern that challenges quilters to work with geometric shapes and color contrasts. With careful fabric selection, precise cutting, and meticulous piecing, you can achieve a striking three-dimensional effect.
By following this step-by-step tutorial, you can create a stunning quilt that showcases the beauty of quilt patterns and the endless possibilities within the quilting world. Whether you are making a wall hanging, bedspread, or lap quilt, this pattern will add a modern and artistic touch to your quilting projects.
Happy quilting!