
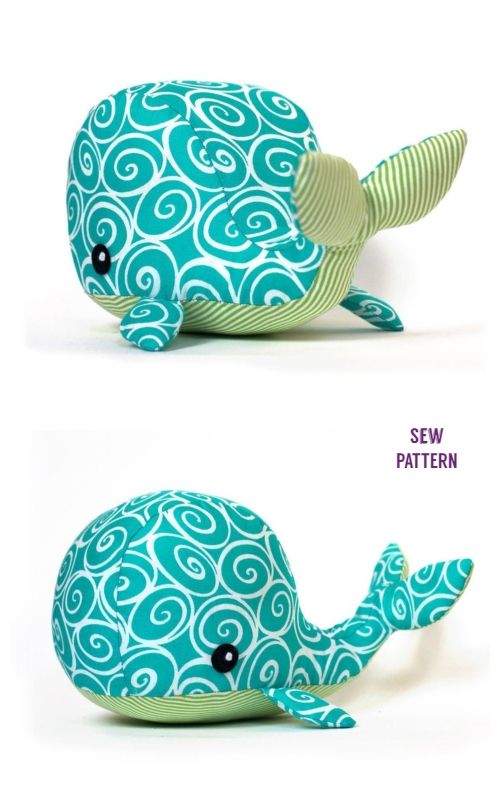
Creating a fabric whale is a delightful and fun sewing project that can add charm to your home décor or become a cute handmade gift. Whether you’re an experienced quilter or just starting, this tutorial will guide you through every step of making your own adorable whale using a simple quilt pattern approach. With a few basic sewing supplies, some creativity, and a touch of patience, you can craft a beautiful piece that reflects your personality.
In this tutorial, we’ll cover everything from gathering your materials to stitching your whale together. You’ll also find ideas for customizing your whale with unique fabrics and embellishments. So, grab your tools and let’s dive into the wonderful world of fabric crafting!
Why Make a DIY Fabric Whale?
Fabric whales are a fantastic way to practice sewing skills while creating something useful and beautiful. They’re perfect as decorative pieces for nurseries, ocean-themed rooms, or even as a playful throw pillow for your living room. Plus, they make thoughtful, handmade gifts for birthdays, baby showers, or any special occasion.
Another reason to love this project is its versatility. You can create a whale using scraps from other projects, making it a great eco-friendly option for reducing fabric waste. Incorporating quilt techniques into the design adds extra texture and charm, giving your whale a unique, handcrafted feel that mass-produced items simply can’t match.
Finally, making a fabric whale is an excellent way to learn the basics of using a quilt pattern in a three-dimensional project. It’s an easy introduction to cutting, layering, and stitching fabric pieces, which are essential skills in the quilting world. If you’ve ever wanted to explore quilting, this is a fun place to start!
Materials You’ll Need
Before you start, gather the following materials:
- Fabric: Cotton fabric works best for this project. You’ll need two main pieces (for the body) and smaller scraps for details like the fins and tail.
- Quilt batting: A small piece to add softness and structure.
- Sewing machine and thread: Matching or contrasting thread, depending on your design.
- Pins or fabric clips: To hold pieces together while sewing.
- Scissors or rotary cutter: For accurate cutting.
- Stuffing: Polyester fiberfill or fabric scraps for filling the whale.
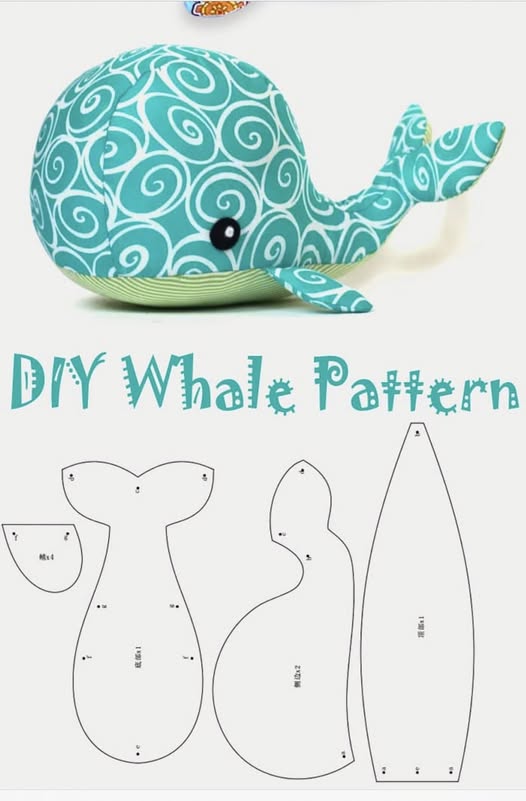
- Whale pattern template: You can draw your own or download a free printable template online.
- Optional: Buttons, embroidery floss, or felt for eyes and embellishments.
Having these materials ready before you begin will make the process smooth and enjoyable. Keep in mind that fabric whales don’t require large fabric pieces, so this is an ideal scrap-busting project.
Step-by-Step Instructions
Step 1: Prepare Your Pattern
Start by printing or drawing your whale pattern template. Cut out the pattern pieces and place them on your chosen fabric. Remember to fold the fabric if needed to create mirrored pieces for the whale’s body. Pin the pattern securely and cut along the lines. Repeat for the fins and tail.
Step 2: Add Batting and Layering
To give your whale a soft, quilted texture, cut quilt batting slightly smaller than each body piece. Layer the batting between the fabric layers if you want extra thickness. This step adds a quilt-like feel, making your whale more plush and durable.
Step 3: Assemble the Whale
With right sides together, pin the two main body pieces. Insert the fins and tail between the layers, making sure they face inward. Sew around the edge, leaving a small opening for turning and stuffing. After sewing, turn the whale right side out and gently push out the seams.
Step 4: Stuff and Close
Fill the whale with stuffing until it feels firm but soft. Use a ladder stitch or an invisible hand stitch to close the opening neatly. Your whale is almost ready to swim into your décor!
Adding Quilt Pattern Details
Incorporating quilt techniques can make your fabric whale even more special. Before assembling the body, consider sewing fabric scraps together in a patchwork style to create a mini quilt for each side of the whale. Use bright colors, geometric designs, or even leftover quilt blocks from previous projects.
Another option is to add decorative quilting stitches on the whale’s body. Use your sewing machine’s free-motion quilting feature or simple straight stitches to create waves, spirals, or other ocean-inspired patterns. These small details elevate your whale from simple to stunning.
Using a quilt pattern in this project is an excellent way to experiment with fabric combinations and textures. Plus, it allows you to reuse smaller fabric pieces that might otherwise go to waste, making your whale eco-friendly and unique.
Ideas for Customization
The best part of DIY projects is making them your own. Here are some creative ideas for customizing your fabric whale:
- Color Themes: Use pastel fabrics for a baby gift, bright prints for a playful look, or denim for a rustic vibe.
- Personalization: Embroider a name or initials on the whale for a personalized touch.
- Add Accessories: Sew on buttons for eyes, or create a tiny fabric bow or sailor hat for extra charm.
You can also experiment with size. Scale the pattern up to create a large floor pillow or shrink it down for a keychain or mobile décor. The possibilities are endless when you let your imagination guide the process.
Tips for Success
- Choose the Right Fabric: Lightweight cotton is easiest to sew and gives a neat finish.
- Take Your Time: Precision in cutting and sewing will make your whale look professional.
- Practice Quilting Techniques: Even simple quilt stitches can make your whale more interesting and textured.
Remember, the beauty of handmade projects lies in their uniqueness. Don’t worry about imperfections—they add character and charm!
Share Your Whale with Us!
Congratulations! You’ve just created a beautiful DIY fabric whale using a quilt pattern. This project is perfect for beginners and seasoned crafters alike, offering endless opportunities for creativity and personalization. Whether it becomes a gift, a decorative piece, or part of your quilting journey, your handmade whale is sure to bring joy.
We’d love to see your finished project! Share a photo of your fabric whale on social media or in your favorite quilting group. Tag it with #FabricWhaleDIY so others can admire your work and get inspired. Happy crafting, and may your quilting adventures continue to grow!