
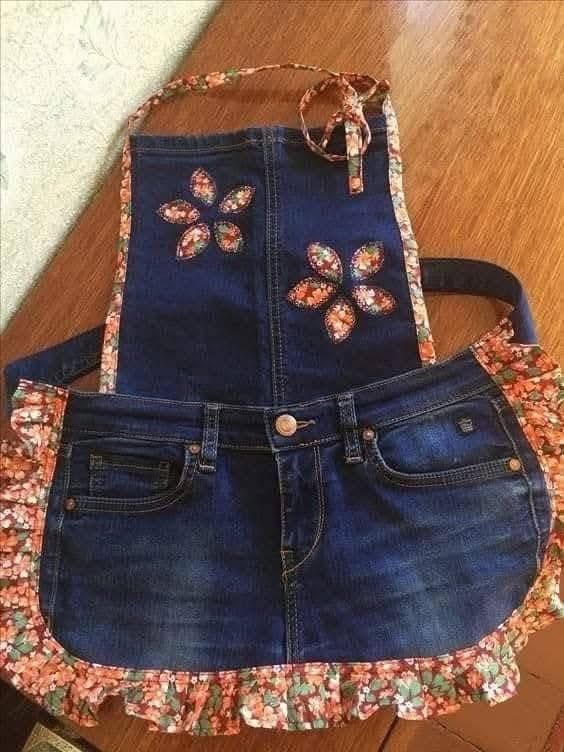
If you’ve been looking for a fun and practical sewing project, this Jeans Apron Tutorial is just what you need. It’s cute, it’s creative, and it’s a great way to recycle old denim while adding a personal touch to your kitchen or craft room. The combination of denim, gingham, and lace gives it a charming farmhouse style that’s hard to resist. Whether you’re new to sewing or have years of experience, this project is simple enough for anyone to enjoy.
This tutorial will walk you through every step—from cutting your fabric to stitching the final ruffles—so you can create your own apron using a simple sewing pattern. Grab your scissors, some scrap fabric, and your favorite trims, and let’s get started!
Materials You’ll Need
Before diving into the step-by-step instructions, let’s go over the materials. Most of these are items you might already have in your sewing corner, and if not, they’re easy to find at any craft or fabric store.
Materials:
- Old jeans or denim fabric
- Gingham cotton fabric (for pockets, hearts, and ruffles)
- Lining fabric (optional)
- Lace trim or bias tape for decoration
- Scissors or rotary cutter
- Pins or clips
- Sewing machine and matching thread
- Measuring tape or ruler
- Iron and ironing board
You can also add some extra charm with buttons, small bows, or embroidery. This is the kind of sewing project that lets you be as creative as you like, so don’t be afraid to experiment with color combinations and textures!
Cutting the Fabric
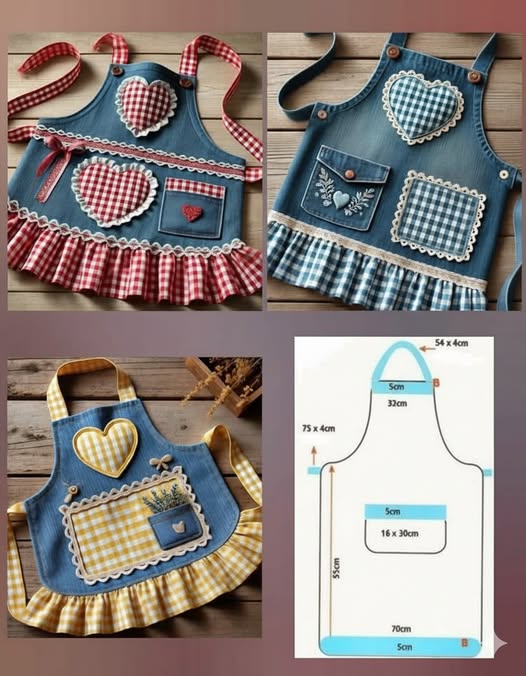
The base of your apron comes from denim—preferably from a pair of jeans that you no longer wear. Denim is strong, durable, and perfect for aprons. Use the diagram for guidance: the apron body measures approximately 75 cm long by 70 cm wide, with curved sides for comfort.
- Cut the apron body following the pattern measurements: 70 cm at the bottom width and 75 cm from top to bottom.
- Cut the neck strap at about 54 cm x 4 cm and the waist ties at 75 cm x 4 cm each.
- Cut the pocket piece from your gingham fabric (16 x 30 cm), and fold it in half before sewing to create a clean edge.
If you’re using jeans, you can reuse seams or hems from the original garment for added strength and style. Iron each piece flat before assembling—it makes your sewing much easier and more precise.
Assembling the Apron Base
Now that your pieces are cut, it’s time to put everything together. This part is straightforward and great practice for beginners who want to learn the basics of apron construction.
- Hem the edges: Fold and press all edges of your denim base by about 1 cm, then sew to prevent fraying.
- Attach the straps: Pin and sew the neck and waist straps to the top and sides of the apron, reinforcing them with a few extra stitches.
- Add the pocket: Place your gingham pocket on the front of the apron, around the midsection, and sew along three sides—leaving the top open.
The pocket is not just decorative—it’s also practical for holding utensils, brushes, or even your phone while you’re cooking or crafting. Make sure to backstitch the corners for durability.
Adding the Ruffles
The ruffled edge is what gives this jeans apron its adorable, cottage-style look. It’s an optional detail, but once you try it, you’ll see how much charm it adds!
- Cut the ruffle fabric from your gingham cotton, about 10–12 cm wide and long enough to go across the bottom of the apron (around 120–130 cm).
- Gather the fabric: Sew a long basting stitch along one edge and gently pull the thread to create gathers.
- Attach the ruffle: Pin it along the bottom edge of the apron, right sides together, and sew it in place. Once it’s attached, topstitch to secure the seam and press it flat.
If you prefer a simpler look, you can skip the ruffle or replace it with lace trim or bias tape for a clean finish. But if you love that playful, vintage vibe, the ruffles are a must!
Decorating the Apron
Now comes the fun part—personalizing your apron! The examples above show cute heart-shaped appliqués, lace edges, and small decorative pockets. These are easy to add and make your apron truly one of a kind.
- Heart appliqués: Cut heart shapes from gingham or floral fabric and sew them onto the chest area. You can use a zigzag stitch or blanket stitch for a pretty finish.
- Lace trim: Add lace or bias tape along the pocket and ruffle seams for a feminine touch.
- Mini pocket and bow: Create a tiny pocket from denim and add a bow or embroidered detail.
For those who love embroidery, a few simple stitches (like flowers, leaves, or initials) can make your apron even more special. Hand-sewn details always add warmth and personality to any sewing project.
Finishing Touches
Once all your decorative elements are attached, it’s time for the final touches. These last steps will make your apron look neat and professional.
- Iron the entire piece carefully to smooth out wrinkles and set the seams.
- Check the straps: Try on the apron to make sure the neck and waist ties fit comfortably. Adjust if needed.
- Reinforce seams that will take more tension, such as where the straps meet the body.
Your apron is now complete! Whether you used bold red gingham, soft yellow, or cool blue tones, the result is always cheerful and full of character. The combination of denim and cotton makes it durable enough for everyday use while still being stylish.
Creative Customization Ideas
The beauty of this sewing pattern is its flexibility. Once you master the basic design, you can customize it endlessly. Here are some ideas to inspire your next version:
- Use colored denim or patterned cotton for a modern twist.
- Add embroidery with your name, a favorite quote, or small flowers.
- Create themed aprons—for gardening, crafting, or baking.
- Mix fabrics like linen, canvas, or old shirts to give your apron a unique look.
- Make matching sets for family or friends using different color schemes.
Because the apron is built from scrap fabric and repurposed materials, it’s also an eco-friendly sewing project—perfect for anyone who loves sustainable fashion.
Why You’ll Love This Project
Sewing your own jeans apron is satisfying for so many reasons. It’s easy, inexpensive, and gives you something useful and beautiful at the end. Even if you’re a beginner, this project teaches key sewing skills: hemming, gathering, attaching straps, and decorative stitching.
You’ll also feel proud every time you wear it. There’s something special about putting on an apron you made with your own hands—a little reminder of creativity and care that brightens your daily routines.
And if you gift it to someone, you’ll be giving a handmade treasure filled with warmth and love. Homemade gifts are always appreciated, and a handmade apron is both practical and heartfelt.
Share Your Creation!
Now that you’ve completed your Jeans Apron, it’s time to show it off! Take a few photos and share them with your sewing friends or post them on social media. Don’t forget to tag your favorite sewing groups and creators to spread inspiration.
If you’re looking for more ideas, there are many step-by-step videos on YouTube that demonstrate similar apron tutorials—perfect for visual learners who want to follow along while sewing.
So, grab your old jeans and colorful fabric scraps, and start stitching! You’ll love the result—a cozy, creative, and functional apron that reflects your personal style.
Happy sewing!