
Whether you’re packing for a weekend getaway or just need a practical and pretty pouch for your essentials, a DIY Padded Travel Bag is the perfect sewing project for all skill levels. In this tutorial, we’ll guide you through a step-by-step process to create your own cozy, quilted travel bag using an easy quilt pattern. Not only is this a functional piece, but it also adds a touch of handmade charm to your travel gear. Let’s dive in!
Why Make Your Own Padded Travel Bag?
Creating your own padded travel bag gives you the freedom to choose your favorite colors, fabrics, and quilt patterns. Store-bought bags may be convenient, but they often lack the personal touch and soft padding that protect your items. A handmade quilted bag can be custom-sized and styled, making it a one-of-a-kind creation.
Another great reason to make your own is the opportunity to practice basic quilting techniques. Even if you’re a beginner, this project introduces you to working with batting, using a simple quilt pattern, and adding structure to fabric. You’ll end up with a beautiful, functional piece and grow your sewing skills along the way.
Lastly, it’s a great way to use up fabric scraps or charm packs you’ve been saving. Personalizing the design, color, and size lets you match your new travel bag with your suitcase, backpack, or purse – and makes a thoughtful handmade gift for friends or family who love to travel.
Materials You’ll Need
To get started, gather the following supplies. Most of these can be found at your local fabric or craft store:
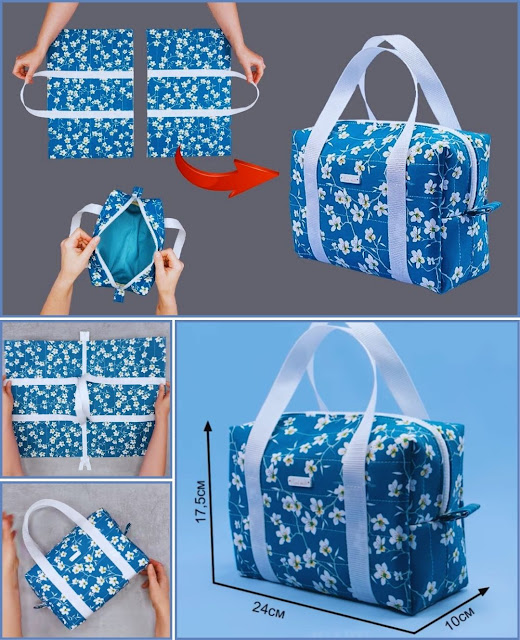
- Main fabric (cotton or canvas): two pieces 12″ x 16″
- Lining fabric: two pieces 12″ x 16″
- Batting or foam stabilizer (for padding): two pieces 12″ x 16″
- Zipper: 14″–16″ (nylon coil or metal)
- Bias tape or fabric for binding
- Thread (coordinating or contrasting)
- Sewing machine with a walking foot (optional but helpful for quilting)
- Pins or clips, fabric scissors, rotary cutter, and ruler
Feel free to adjust the size of the fabric pieces if you want a smaller or larger bag. The measurements above will yield a medium-sized padded travel pouch, perfect for toiletries or gadgets.
Step-by-Step: Assembling the Quilted Panels
- Make the Quilt Sandwich:
Layer your main fabric (right side up), batting or foam, and lining fabric (right side down) to form a quilt sandwich. You should have two of these, one for the front and one for the back of your bag. Use pins or clips to secure the layers together. - Choose a Quilt Pattern:
Keep it simple with diagonal lines, crosshatch, or echo quilting. Use a fabric marker to draw your quilt pattern directly onto the top fabric. This is your chance to be creative! If you’re new to quilting, straight lines spaced 1″ apart is a beginner-friendly approach that still looks professional. - Start Quilting:
Sew along the lines you marked, beginning in the center and working outward to avoid puckering. The quilting process bonds your layers and adds a beautiful texture. This is also where you’ll see your quilt pattern come to life! Repeat the same steps for both panels.
Sewing the Bag Body
- Trim the Panels:
After quilting, your layers may have shifted a bit. Use a rotary cutter and ruler to trim both quilted panels so they’re even and square. - Attach the Zipper:
Place the zipper face-down along the top edge of one quilted panel. Lay the lining fabric on top, aligning all edges. Sew using a zipper foot, then fold the fabric back and press. Repeat for the other panel. When done, your zipper should run smoothly with clean edges. - Sew the Bag Together:
Open the zipper halfway (don’t skip this!). Place the quilted panels right sides together and sew around the edges, leaving a small opening if needed. Use a 1/4″ seam allowance. You can round the corners or box them out for a more structured shape.
Binding and Finishing Touches
- Add Binding:
Turn the bag inside out and use bias tape or fabric strips to bind the raw seams on the inside. This gives a neat, professional look and strengthens the bag. You can use a contrasting color to add a pop of style or match it with your main fabric. - Box the Corners (Optional):
If you want your bag to stand up on its own, pinch each corner into a triangle and sew across about 1.5″ from the point. Trim the excess and bind the seams. This adds dimension and stability. - Final Touches:
Turn your bag right side out, push out the corners, and admire your work! You can add a fabric pull tab to the zipper or a handle to the side for convenience. Press your finished bag with a warm iron if needed.
Personalization Ideas
There are so many ways to customize your padded travel bag. Play with different quilt fabrics, add embroidery, or even patchwork designs. Here are a few fun ideas:
- Use themed quilt fabrics like florals, travel motifs, or holiday prints.
- Monogram your bag with a sewn or iron-on initial.
- Add an inside pocket for extra organization.
- Create a matching set with different sizes for makeup, cords, and travel documents.
- Try decorative quilting like free-motion patterns or hand stitching for texture.
These personal touches make each padded travel bag unique and give you more chances to explore the creative side of quilting.
Why This Project Is Perfect for Quilters
This padded travel bag isn’t just a bag—it’s a mini quilt in disguise! It’s an excellent project for those who love quilting but want to try something other than a blanket. You’ll get to apply a quilt pattern, work with batting, and finish off with sewing techniques that are rewarding and beginner-friendly.
Plus, it’s a small, manageable project that you can finish in an afternoon. That instant gratification is perfect if you’re building confidence or trying out a new quilting technique. With each new bag you make, you’ll get more comfortable choosing quilt fabrics, trying new patterns, and improving your sewing skills.
Whether you’re new to quilting or a seasoned quilter looking for a fun, quick project, this padded travel bag brings together form and function in the best way.
Share Your Creation!
We’d love to see your take on this DIY Padded Travel Bag! Share your finished project online using the hashtag #QuiltTravelBag or tag your photos with your favorite quilting groups. It’s inspiring to see how others use their favorite quilt patterns and fabrics in creative ways.
Have you added pockets, embroidery, or made a whole travel set? Share your story and inspire someone else to start sewing. Quilting is not just about making things—it’s about connecting with others and building a community of creativity.
Happy quilting—and happy travels!