
Are you tired of your toiletries getting lost in your suitcase or cluttering up your bathroom counter? A DIY toiletry cube is a fun and functional project that solves that problem beautifully. Whether you’re an experienced crafter or a complete beginner, this tutorial will guide you through creating a quilted toiletry cube with a professional finish and personal flair. Not only will you learn some useful sewing techniques, but you’ll also explore how to apply a quilt pattern to give your organizer a unique look.
Let’s dive into this inspiring and practical DIY project!
Materials You’ll Need
Before you begin, gather all your supplies so you can work smoothly from start to finish. This cube is fully customizable, but here’s a list of standard materials to guide you:
- Outer Fabric (cotton or canvas) – 1 fat quarter
- Lining Fabric – 1 fat quarter
- Batting or Fusible Fleece – 1 fat quarter
- Zipper – 12-inch nylon or plastic zipper
- Matching Thread
- Fabric Scissors or Rotary Cutter
- Quilting Ruler and Cutting Mat
- Pins or Fabric Clips
- Sewing Machine
- Optional: Handle strap fabric, interfacing, and embellishments
If you’re using a quilt or leftover quilt pattern scraps, this is a perfect upcycling project! Incorporating quilted panels adds both style and structure.
Cutting the Fabric Pieces
Carefully cutting your fabric is one of the most important steps. Here’s how to break it down:
- Main Panels (Outer Fabric, Lining & Batting)
- Cut 2 squares: 9″ x 9″
- Cut 4 rectangles: 9″ x 4″
- You’ll need this set in outer fabric, lining, and batting.
- Zipper Panel
- Cut 2 strips: 9″ x 2″ from outer fabric
- Cut 2 strips: 9″ x 2″ from lining
- Cut 2 strips: 9″ x 2″ from batting
- Optional Handle
- Cut 1 strip: 2″ x 10″ from outer fabric and batting
Using a quilt pattern to cut the outer fabric adds color and design variation. Choose a vibrant or minimalist quilt look depending on your personal style.
Quilting the Panels
Quilting adds stability and beauty to your toiletry cube. Let’s make it unique!
- Layer Each Panel: Sandwich the batting between the outer fabric and lining, wrong sides facing the batting. Pin or clip in place.
- Quilt Your Design: Use a walking foot on your sewing machine and stitch simple straight lines, grids, or even free-motion patterns. Follow a quilt pattern or create your own design.
- Trim Excess: After quilting, trim all layers to make sure the edges are perfectly aligned and the panels maintain their original dimensions.
This step is not just for structure—it turns your toiletry cube into a mini quilt project that’s fun and rewarding to sew!
Attaching the Zipper
Let’s zip this project into shape! Here’s how to install the zipper like a pro:
- Layering: Place one outer zipper strip right side up, zipper face down, and one lining strip right side down on top. Pin together along the top edge and sew.
- Press and Topstitch: Open up the layers, press the fabric away from the zipper, and topstitch close to the edge. Repeat for the other side of the zipper with the remaining strips.
- Quilt the Zipper Panel: Add batting to the zipper panel and topstitch some lines following your chosen quilt pattern for a cohesive look.
Make sure your zipper moves smoothly and aligns with your cube dimensions. This step really brings the toiletry cube together.
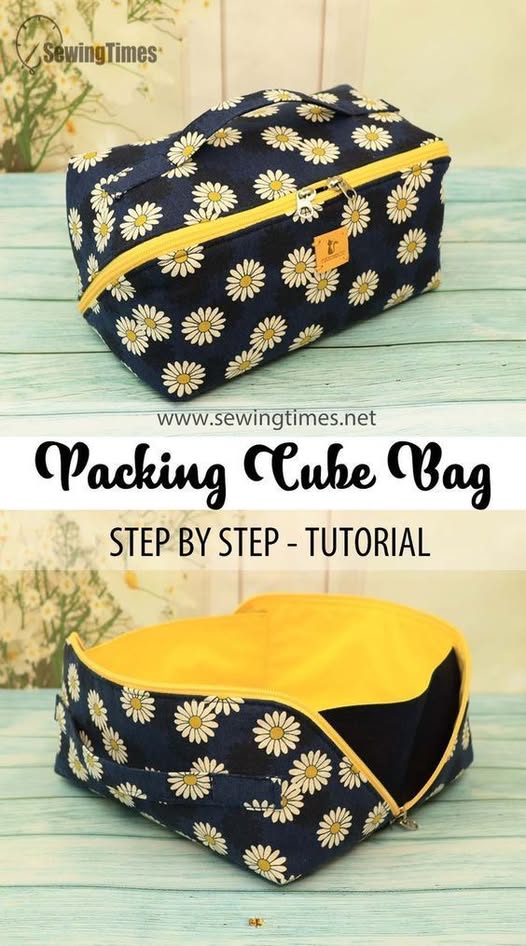
Assembling the Cube
It’s time to turn all your flat pieces into a beautiful 3D organizer!
- Join the Sides: Start by attaching the four quilted side panels to the zipper panel. Sew them right sides together, aligning edges and creating a long strip.
- Form the Tube: Join the ends of the strip to make a loop, ensuring the zipper is centered across the top.
- Attach the Base and Top: Pin the top and bottom quilted squares to the loop you just made. Use a ¼” seam allowance and go slow around the corners.
Your toiletry cube is now taking shape! The quilted structure adds padding and style that’s much more appealing than store-bought versions.
Adding a Handle and Finishing Touches
If you’d like to make your cube extra handy, add a side handle or wrist strap.
- Create the Handle: Fold the fabric strip in half lengthwise, then fold raw edges to the center and stitch. Topstitch for a neat look. You can also quilt this strap using your leftover quilt scraps.
- Attach Handle: Before sewing the final panel, sandwich the handle end into a side seam and secure it with backstitching.
- Final Stitching: Go over your seams and corners, trimming any excess threads. Turn the cube right side out through the zipper and gently push out corners.
Voilà! You now have a practical and beautiful toiletry cube with a handcrafted, quilted finish.
Personalization Ideas
Here’s where the fun really begins—make it yours!
- Use Coordinating Fabrics: Mix florals, solids, and quilt pattern prints for a modern patchwork look.
- Embroider a Name Tag: Add your initials or name for a personalized touch—perfect for gifts.
- Add Interior Pockets: Sew in mesh or fabric compartments inside to hold brushes, bottles, and small items.
Whether you’re inspired by bold color combos or vintage quilt blocks, this project is a wonderful way to express your creativity.
Share Your DIY Toiletry Cube!
Now that you’ve completed your DIY toiletry cube, we want to see your creation! 📸
Post your finished project on Instagram, Pinterest, or your favorite crafting group using the hashtag #ToiletryCubeQuilt. Whether you followed a traditional quilt pattern or improvised your own, your cube is sure to inspire others.
Let this be the beginning of many more quilted, handmade pieces in your life. It’s not just about making something useful—it’s about enjoying the process and sharing the joy of crafting with others.