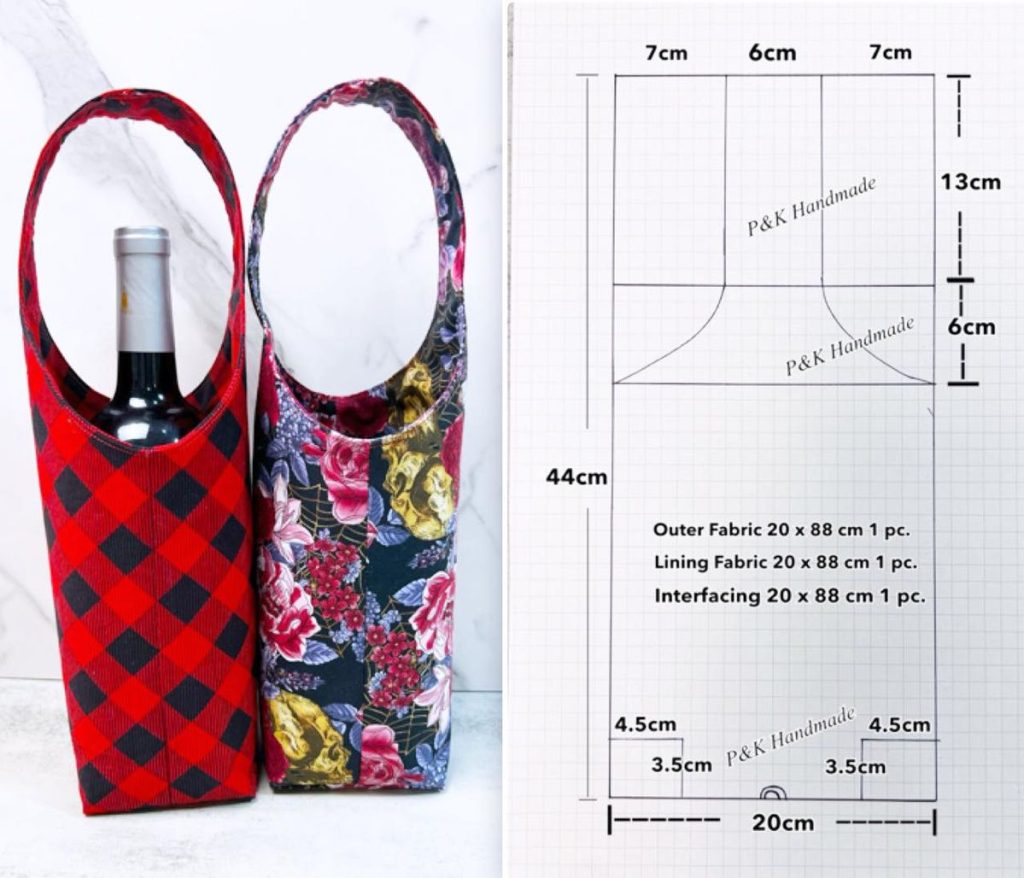
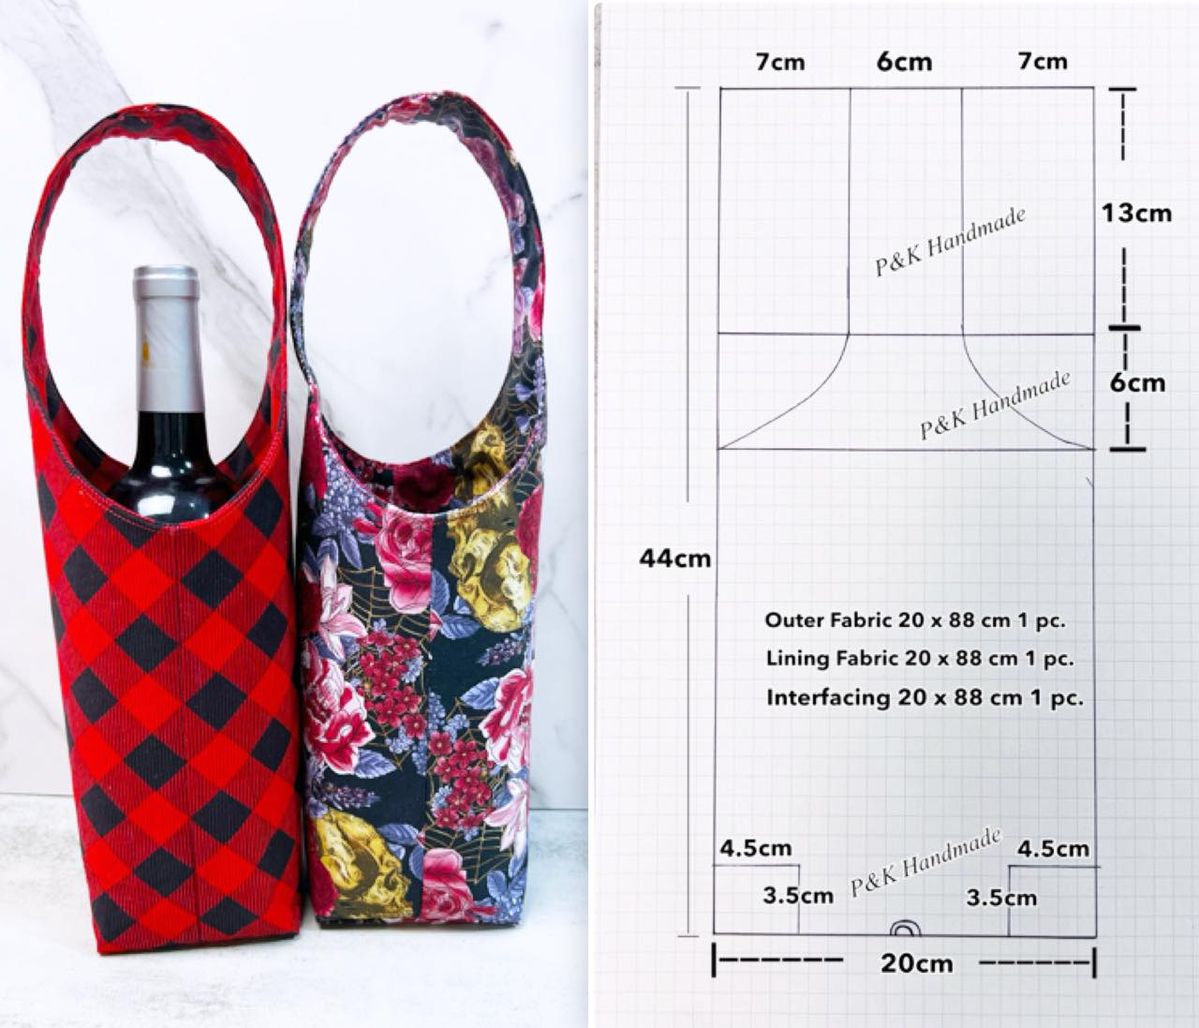
If you are looking for a creative, budget-friendly, and practical sewing project, making a wine bag carrier is a perfect choice. Not only is it an excellent way to transport wine bottles safely, but it also makes a thoughtful handmade gift for family and friends. This DIY wine bag sewing tutorial will walk you through everything you need to know, from materials to step-by-step sewing instructions, along with customization ideas to make your project unique. Even if you’re a beginner, you’ll find this project simple, enjoyable, and inspiring.
Throughout this guide, we’ll also touch on how techniques from quilting and even a quilt pattern can add a stylish and personalized touch to your wine bag. Whether you prefer a simple fabric design or want to transform this into a mini quilting project, the result will be beautiful and functional.
Let’s dive into this tutorial and create a stylish wine bag carrier that you’ll be proud to use or gift.
Materials You Will Need
Before we begin the step-by-step instructions, let’s gather all the necessary materials. The good news is that this project requires only basic sewing supplies, and you can even use fabric scraps left over from previous projects.
You will need:
- Fabric: Two different cotton fabrics (one for the exterior and one for the lining). Quilting cotton works perfectly for this project.
- Batting or interfacing: To give your bag extra padding and structure, just like you would with a quilt.
- Thread: Matching or contrasting, depending on your design.
- Sewing machine: Although you could hand-sew, a machine makes the process quicker.
- Scissors or rotary cutter: For accurate fabric cutting.
- Pins or clips: To hold your fabric in place.
- Measuring tape or quilting ruler: For precise measurements.
- Iron and ironing board: For pressing seams.
Optional materials for personalization include embroidery thread, decorative buttons, or fabric paint. If you enjoy working with a quilt pattern, you can create patchwork panels for the exterior of your bag.
Cutting the Fabric
Accurate cutting is one of the most important steps in sewing, and this wine bag is no exception. Precise cuts ensure your bag comes together neatly and looks polished.
Here are the measurements you’ll need:
- Exterior fabric: Cut one piece measuring 14” x 17” (this will form the main body of the bag).
- Lining fabric: Cut one piece measuring 14” x 17”.
- Batting or interfacing: Cut one piece measuring 14” x 17”.
- Handles: Cut two strips of fabric measuring 3” x 12”. You can also use webbing or ribbon if you prefer.
If you want to give your bag a quilted appearance, you can cut several smaller pieces of fabric (for example, 5” x 5” squares) and sew them together into a patchwork panel, following a quilt pattern of your choice. Once complete, trim the patchwork panel to the 14” x 17” measurement.
This step gives you flexibility: you can keep it simple with a solid fabric or add extra creativity with a patchwork design inspired by your favorite quilt.
Sewing the Main Bag Body
Now that your fabric pieces are ready, it’s time to sew the main body of the wine bag. This is where your project starts to take shape.
- Layering: Place the batting on the bottom, then the exterior fabric (right side up), and finally the lining fabric (right side down). Pin the layers together along the edges.
- Sewing: Stitch along both long sides and the bottom with a ½” seam allowance, leaving the top open. Be sure to backstitch at the beginning and end for durability.
- Turning: Turn the bag right side out and press it flat with an iron. The batting will now be sandwiched between the fabrics, giving your bag structure and a quilt-like softness.
If you chose a patchwork or quilt pattern for the exterior, this is where the bag will truly shine. The seams will showcase your creativity and make the wine bag look like a miniature quilt project.
Creating the Boxed Corners
To give your wine bag depth and allow it to hold a bottle securely, we need to create boxed corners at the bottom. This step adds volume and functionality.
- With the bag inside out, pinch one bottom corner so that the side seam and bottom seam align.
- Measure about 2” from the point and mark a line across.
- Sew along this line and trim off the excess fabric, leaving a ½” seam allowance.
- Repeat on the other corner.
When you turn the bag right side out again, you’ll see that the bottom has a flat base. This ensures the bottle sits upright and stable inside the carrier. This method is often used in tote bags and even in quilted projects, making it a versatile sewing technique.

Sewing the Handles
The handles not only make your bag practical but also provide another chance to add a creative touch. You can make them from fabric, ribbon, or even repurposed straps.
- Take each 3” x 12” strip of fabric and fold it lengthwise, right sides together. Sew along the long edge with a ¼” seam allowance.
- Turn the strip right side out and press it flat. For extra durability, topstitch along both edges.
- Pin the handles to the top edge of the bag, about 3” from each side seam. Ensure they are not twisted.
- Stitch securely in place by sewing a square or an X-box for reinforcement.
Handles are another place where quilting fabric shines. Many sewists like to coordinate the handles with the main body by using leftover strips from a quilt project. This adds harmony and personality to your design.
Adding Decorative Touches
Once the basic bag is assembled, you can have fun with customization. Personalization makes your wine bag stand out and transforms it into a thoughtful handmade gift.
- Patchwork panels: As mentioned earlier, you can use a quilt pattern to design the exterior, turning your bag into a mini quilt project.
- Embroidery: Stitch initials, small motifs, or floral designs for a personal touch.
- Appliqué: Add shapes such as grapes, wine glasses, or festive patterns.
- Fabric paint or stamps: Decorate the bag with artistic designs or seasonal themes.
These creative ideas let you adapt the wine bag for different occasions—birthdays, weddings, holidays, or hostess gifts. Just like quilting, the possibilities for personalization are endless.
Tips for Beginners
If you are new to sewing, don’t worry—this project is very beginner-friendly. Here are a few helpful tips to make the process smoother and more enjoyable.
- Practice straight seams: Even stitches are key for a polished look. Take your time and guide the fabric gently.
- Use quilting cotton: This fabric is easy to work with, sturdy, and comes in endless prints and colors.
- Press as you go: Ironing after each step keeps seams flat and helps your project come together neatly.
- Start simple: If quilting feels overwhelming, begin with a single fabric piece and try patchwork for your next bag.
Remember, the beauty of DIY projects lies in the process, not just the final product. Each bag you sew will improve your skills and reflect your creativity.
Wrapping Up and Sharing Your Project
Congratulations! You’ve just completed your DIY wine bag sewing tutorial. Whether you kept the design simple or incorporated a quilt pattern for a patchwork look, you now have a stylish and reusable wine carrier. It’s a project that combines practicality with creativity, making it a wonderful addition to your handmade collection.
These wine bags are not only functional but also eco-friendly alternatives to disposable gift bags. They are a heartfelt way to present a bottle of wine and are sure to impress anyone who receives them.
Now it’s your turn to share your creation! Post your finished bag on social media, gift one to a friend, or even start a small handmade business selling quilt-inspired bottle carriers. Every bag tells a story of creativity and care, and yours is ready to inspire others.
Final Word: Sewing a wine bag is a rewarding project that blends simplicity with endless opportunities for creativity. Just like a quilt, it carries warmth, beauty, and personality. So grab your fabric, follow this tutorial, and start stitching today!

