
Zipper pouches are one of the most versatile and fun sewing projects you can make. Whether you need a little bag for makeup, pencils, or travel essentials, a zipper pouch is always useful. The best part? They are beginner-friendly and a great way to practice your sewing skills without feeling overwhelmed. This tutorial will guide you step by step, from choosing your fabric to sewing the final stitch.
In this DIY zipper pouch sewing tutorial, you’ll not only learn how to make a basic pouch but also discover creative ways to personalize it. With just a few simple materials and a reliable sewing pattern, you’ll be surprised at how quickly you can complete this project. Let’s get started on your handmade pouch that’s both stylish and practical.
If you’ve never worked with zippers before, don’t worry. This is the perfect project to build your confidence. By the end of this guide, you’ll not only have a cute pouch but also the satisfaction of mastering a new sewing technique. Ready to sew? Grab your materials, and let’s dive in.
Materials You’ll Need
Before starting any sewing project, it’s important to gather everything in one place. For this DIY zipper pouch, you don’t need a lot of fancy supplies. Most of the items may already be in your sewing kit, and the rest are inexpensive and easy to find. Having the right materials makes the sewing process much smoother.
Here’s what you’ll need:
- Cotton fabric (two pieces for the outer fabric and two pieces for the lining)
- One zipper (7–9 inches works great for a medium pouch)
- Sewing machine and thread
- Fabric scissors or rotary cutter
- Pins or sewing clips
- Measuring tape or ruler
- Iron and ironing board
Choosing fabric is one of the most fun steps. Quilting cotton works perfectly because it’s easy to sew and comes in endless patterns. You can also use denim, canvas, or even recycled fabric for a sturdier pouch. Pick a zipper that complements or contrasts with your fabric for an extra pop of style.
Cutting the Fabric Pieces
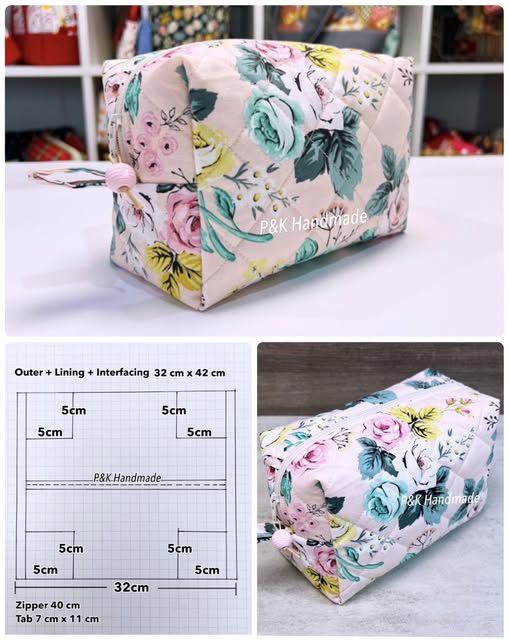
Now that you have your materials, it’s time to cut your fabric. Accurate cutting ensures your pouch looks neat and professional. For a simple medium-sized pouch, cut two rectangles of outer fabric and two rectangles of lining fabric, each measuring about 9 inches wide by 6 inches tall.
If you want a sturdier pouch, you can also cut fusible interfacing to the same size and iron it onto the wrong side of your outer fabric pieces. This adds structure and makes the pouch more durable. It’s optional but highly recommended, especially if you’ll be using the pouch often.
Take your time during this step. A clean, straight cut makes sewing much easier later on. If you’re using a directional fabric (like stripes or prints with an obvious top and bottom), make sure both pieces are cut the same way so your design lines up.
Sewing the Zipper
Sewing a zipper may feel intimidating, but once you try it, you’ll see how simple it really is. Place one piece of outer fabric right side up, then lay the zipper face down along the top edge. On top of that, place one lining piece right side down, creating a sandwich with the zipper in the middle. Pin or clip everything in place.
Using your sewing machine with a zipper foot, sew along the edge of the fabric and zipper. Sew slowly to keep the line straight. Once finished, flip the fabrics right side out and press with an iron. Repeat the process with the other side of the zipper, attaching the remaining outer and lining pieces.
When both sides are sewn, open the fabric and press again. You should now have a flat panel with a zipper running across the middle. Don’t worry if it looks a bit messy—pressing helps create a crisp edge and makes the pouch look neat.
Sewing the Pouch Together
Once the zipper is in place, it’s time to assemble the pouch. First, unzip the zipper halfway—this is very important because it will allow you to turn the pouch right side out later. Next, fold the pouch so the two outer fabrics are facing each other and the two lining pieces are together. Pin or clip around the edges.
Sew around the entire perimeter, leaving a 2–3 inch gap at the bottom of the lining. This opening will be used to turn the pouch right side out. Be sure to backstitch at the beginning and end to secure your seams. Trim any excess zipper tape sticking out of the sides.
After sewing, carefully turn the pouch through the opening in the lining. Use a blunt tool, like the end of a pencil, to push out the corners for a crisp finish. Then, sew the opening in the lining closed by hand or with a quick straight stitch on your machine. Push the lining inside, give it one final press, and admire your completed pouch!
Ideas for Personalization
One of the joys of sewing is the ability to make each project uniquely yours. With a simple sewing pattern, you can easily adapt this pouch to reflect your personal style. From fabric choices to decorative touches, the possibilities are endless.
Consider adding embellishments like lace, ribbons, or fabric appliqués to the front of your pouch. You can also experiment with patchwork or quilting to give it more texture and color. If you want to add function, sew in a small wrist strap or keyring loop for convenience.
Another fun idea is to play with different sizes. Make a tiny zipper pouch for coins or a larger one for tablets and notebooks. Once you’ve mastered the basic sewing technique, scaling the pattern up or down becomes second nature.
Tips for Beginners
If this is your first time following a sewing pattern, don’t feel discouraged if it takes a little practice. Sewing, like any craft, gets easier with experience. Start by sewing slowly and carefully, focusing on accuracy rather than speed. With each pouch you make, your stitches will become neater and your confidence will grow.
Don’t be afraid to make mistakes—they’re part of the learning process. If your zipper isn’t perfectly straight or your corners look a little rounded, remember that handmade items are meant to have character. Every project is a step forward in your sewing journey.
Lastly, remember to enjoy the process. Sewing should feel creative and relaxing, not stressful. Take your time, put on some music or a podcast, and celebrate every step along the way.
Share Your Creations
Now that you’ve learned how to make a DIY zipper pouch, it’s your turn to get creative. Experiment with fabrics, colors, and patterns, and soon you’ll have a collection of pouches for every need. They also make thoughtful handmade gifts for friends and family, perfect for birthdays, holidays, or just because.
I’d love to see your finished zipper pouches! Share your creations on social media or with your sewing group, and don’t be shy about showing off your progress. Your work could inspire someone else to pick up a needle and thread.
Sewing is more than just making things—it’s about expressing yourself, learning new skills, and finding joy in creating something with your own hands. So grab your sewing pattern, gather your materials, and start stitching your very own zipper pouch today!