
A handmade crochet dog coat is the perfect way to keep your furry friend warm and stylish during chilly days. This simple and cozy crochet dog sweater pattern is beginner-friendly, easy to customize, and works beautifully for small to medium-sized dogs.
The textured stitches create a soft and stretchy fabric, while the button strap keeps the coat secure and comfortable. Whether you are making it for your own pet or as a thoughtful handmade gift, this project is practical, adorable, and quick to finish.
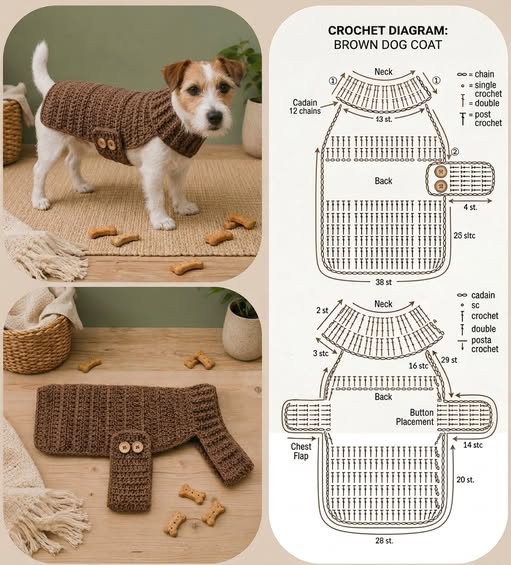
Materials Needed
- Medium weight cotton yarn or acrylic yarn (Category 4)
- Crochet hook size 5 mm (H-8)
- Yarn needle
- Scissors
- 2 wooden or plastic buttons
- Stitch markers
- Measuring tape
Finished Size
This sample fits a small dog approximately:
- Back length: 14 inches (35 cm)
- Chest circumference: 18 inches (46 cm)
You can easily adjust the size by adding or reducing rows and stitches.
Crochet Abbreviations
- ch = chain
- sc = single crochet
- hdc = half double crochet
- sl st = slip stitch
- st = stitch
- blo = back loop only
- rep = repeat
Notes
- The coat is worked in separate sections and joined together.
- Ribbing is created using back loop only stitches.
- Measure your dog before starting for the best fit.
Step 1 – Make the Collar
The collar is crocheted first.
Instructions
- Chain 10.
- Row 1: Starting in the 2nd chain from hook, make 1 sc in each stitch across. Turn.
- Row 2: Ch 1, sc in blo across. Turn.
- Repeat Row 2 until the collar fits comfortably around your dog’s neck.
Do not fasten off.
Step 2 – Create the Body Panel
Now you will work directly from the collar to create the body section.
Instructions
- Along one long side of the collar, evenly crochet hdc stitches across.
- Ch 1 and turn.
- Continue working hdc rows until the body reaches the base of the tail.
The rectangle should comfortably cover your dog’s back.
Tip
Try the coat on your dog while working to check the fit.
Step 3 – Shape the Chest Section
The chest strap wraps underneath the dog.
Instructions
- Attach yarn near the front lower edge of the coat.
- Chain 2 and work hdc rows back and forth.
- Continue until the strap fits comfortably under the chest.
Fasten off and weave in ends.
Step 4 – Add the Belly Strap
The belly strap holds the coat securely in place.
Instructions
- Attach yarn on the opposite side.
- Chain 2.
- Work hdc rows until the strap overlaps the chest section.
Fasten off.
Step 5 – Make the Button Holes
Instructions
- Sew two buttons onto the chest strap.
- On the opposite strap, create buttonholes by chaining 2 and skipping 2 stitches.
- Test the fit before securing the buttons permanently.
Step 6 – Add Ribbed Edges
To create the cozy sweater effect:
- Attach yarn around the neck opening.
- Work sc stitches evenly around.
- Continue several rounds in blo for stretchy ribbing.
You can also add ribbing around the leg openings if desired.
Step 7 – Finishing Touches
- Weave in all loose yarn ends.
- Lightly steam block if needed.
- Try the sweater on your dog and adjust the straps if necessary.
Customization Ideas
- Add stripes using multiple yarn colors
- Sew on decorative buttons
- Add a small pocket
- Include a leash opening on the back
- Personalize with your dog’s name
Care Instructions
- Hand wash in cold water
- Lay flat to dry
- Avoid high heat drying
Final Thoughts
This Dog Coat Crochet Pattern is simple, stylish, and practical for everyday wear. The textured stitches and soft ribbed collar give the sweater a modern handmade look while keeping your pet warm and comfortable.
Once you finish one, you may want to make several in different colors for every season. Happy crocheting!
