Creating your own kitchen accessories is one of the most rewarding ways to explore the world of Quilt projects. This Double-End Quilted Pot Holder Mitt is not only practical, but also a charming handmade addition to your home. With its long shape and two mitt ends, it allows you to safely handle hot dishes with both hands—perfect for baking lovers.
This tutorial is designed especially for beginners who want to try a simple Quilt pattern while creating something useful and beautiful. You don’t need advanced skills—just a bit of patience, basic sewing knowledge, and a love for handmade crafts.
Let’s dive into this cozy and creative project together!
Why You’ll Love This Quilt Pattern
This Quilt pattern is ideal for beginners because it combines simple shapes with functional design. Unlike complex quilting projects, this one focuses on straight seams, gentle curves, and layering techniques that are easy to follow.
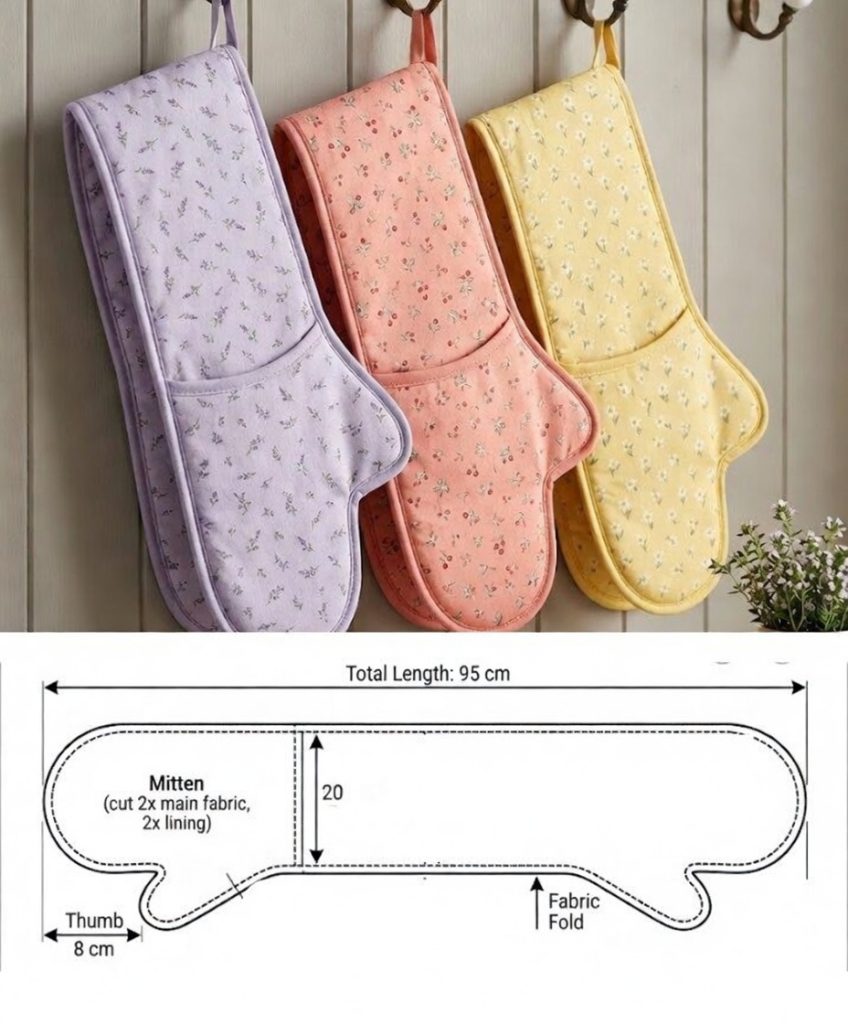
Another great advantage is how customizable it is. You can choose soft florals, modern prints, or even seasonal fabrics to match your kitchen decor. It’s also a fantastic gift idea—imagine giving someone a handmade quilted mitt that you created yourself!
Finally, this project is quick to complete. In just a few hours, you can go from fabric pieces to a finished, usable item. That makes it perfect if you’re looking for a satisfying sewing experience without a long commitment.
Materials You’ll Need
Before starting your Quilt project, gather all your materials. Having everything ready will make the process smoother and more enjoyable.
You will need cotton fabric for the outer layer, cotton fabric for the lining, insulated batting or regular quilt batting, bias tape or fabric strips for binding, thread, a sewing machine, fabric scissors, pins or clips, measuring tape, and fabric marker or chalk.
Choosing high-quality cotton fabric is important because it handles heat better and is easier to quilt. If you want extra protection, using thermal batting is highly recommended.
Understanding the Shape and Pattern
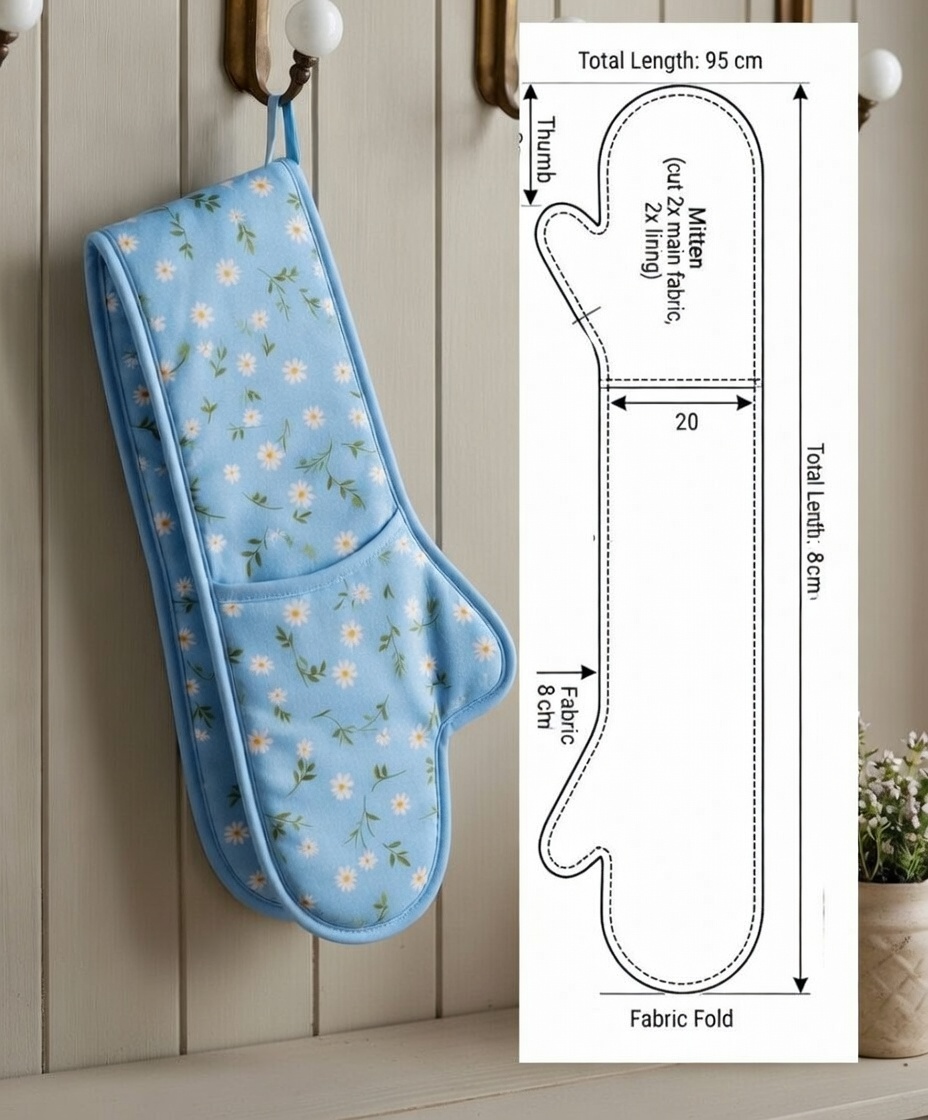
This Double-End Quilted Pot Holder Mitt has a unique elongated shape with two rounded ends and thumb curves on each side. The total length is approximately 95 cm, making it long enough to protect both hands simultaneously.
The Quilt pattern consists of two outer fabric pieces, two lining pieces, and two batting layers. Each layer plays an important role in both comfort and safety.
The thumb sections are designed to give flexibility and grip, which makes handling hot trays much easier. The center section connects both mitt ends and keeps everything stable.
Step 1: Cutting Your Fabric
Start by placing your pattern on the fabric and cutting two pieces from the main fabric, two from the lining fabric, and two from the batting.
Make sure all pieces are aligned properly. If your fabric has a directional print, pay attention to orientation so both sides look consistent.
Take your time during this step. Clean and precise cutting is key to a professional-looking Quilt result.
Step 2: Quilting the Layers
Now it’s time to create that beautiful quilted texture. Place your fabric sandwich with the batting in the middle.
You can quilt using simple straight lines, diagonal lines, or even a grid pattern. Beginners often find straight lines the easiest to manage.
Start sewing from the center and work outward. This helps prevent wrinkles and keeps the layers smooth while improving durability.
Step 3: Sewing the Mitt Shape
With your quilted pieces ready, place the two pieces right sides together and sew around the edges, leaving the hand openings.
Be careful around the thumb curves and sew slowly for better control. This is one of the most important parts of the project.
Clip the curves gently and turn the mitt right side out. Press it carefully to give it a clean and neat finish.
Step 4: Binding the Edges
To finish your Quilt pattern, bind the edges using bias tape or fabric strips.
Attach the binding around the openings and outer edges. Fold it over and stitch it in place for a polished look.
This step adds durability and gives your project that professional handmade finish.
Step 5: Adding a Hanging Loop
A hanging loop is a simple but useful addition to your mitt.
Cut a small strip of fabric, fold it, and sew it securely. Attach it to the center so the mitt can be easily hung in your kitchen.
This detail makes your project even more functional and visually appealing.
Creative Customization Ideas
One of the best parts of working with a Quilt pattern is the ability to personalize your project.
You can use different fabrics on each side, add decorative stitching, include patchwork details, or choose seasonal prints.
Adding embroidery or small labels can also give your mitt a unique and personal touch.
Tips for Beginners
If you’re new to Quilt projects, start with simple fabrics that are easy to handle.
Practice sewing curves on scrap fabric before working on your final piece. This will help you gain confidence.
Take your time and enjoy the process. Every project is a chance to learn and improve your skills.
Final Thoughts
This Double-End Quilted Pot Holder Mitt is a perfect beginner-friendly Quilt project that combines beauty and practicality.
By following this tutorial, you’ll create something useful while learning essential quilting techniques. It’s a great way to build confidence and explore your creativity.
Now it’s your turn to try this Quilt pattern. Choose your favorite fabrics and make something truly special.
And when you finish, don’t forget to share your creation with others. Your handmade project deserves to be seen and appreciated!