
The Double Sawtooth Star Block is a stunning and versatile addition to any quilt. With its layered star design and vibrant symmetry, it offers a dynamic visual impact without being overly complex. Whether you’re just starting your quilting journey or looking to expand your quilt pattern repertoire, this tutorial will walk you through every step of the process in a clear, accessible way. Let’s explore how you can create your very own Double Sawtooth Star Block with ease and creativity!
What is a Double Sawtooth Star Block?
The Double Sawtooth Star Block is a traditional quilt block design featuring a smaller star nested inside a larger star. This gives the illusion of depth and movement, making it a favorite among quilters. The outer star is formed using flying geese units, while the inner star is composed of another, smaller set of flying geese—layered for a beautiful, two-level star.
This quilt pattern is ideal for those who have tried simpler blocks and want to try something a little more involved. Though it looks intricate, the process is quite manageable when broken into steps. And because it’s block-based, it can easily be multiplied into a full-size quilt or incorporated into a sampler quilt.
One of the reasons this pattern remains a staple in the quilting world is its adaptability. You can make it modern with bold solids or keep it classic with florals or reproduction fabrics. It’s the kind of quilt block that reflects the personality and creativity of the maker.
Materials You’ll Need
Before diving into the step-by-step instructions, gather the following supplies. You’ll only need basic quilting materials, so if you’ve made a quilt before, you’re probably ready to go.
Fabric:
- Background fabric (light tone): ½ yard
- Outer star fabric (medium or dark tone): ⅓ yard
- Inner star fabric (contrasting or accent color): ¼ yard
Tools:
- Rotary cutter and cutting mat
- Quilting ruler
- Iron and ironing board
- Sewing machine with ¼” foot
- Thread (neutral color works best)
- Pins or clips
These materials will make a 12.5″ x 12.5″ unfinished quilt block. Adjust fabric amounts accordingly if you’re planning to create an entire quilt using this pattern.
Cutting the Fabric
Accurate cutting is essential to achieving sharp star points and well-aligned seams. Here are the cuts you’ll need for one block:
For the Inner Star (accent fabric):
- 1 square 2.5″ x 2.5″ (center)
- 4 rectangles 1.5″ x 2.5″
- 8 squares 1.5″ x 1.5″
For the Outer Star (medium fabric):
- 4 rectangles 2.5″ x 4.5″
- 8 squares 2.5″ x 2.5″
For Background (light fabric):
- 4 squares 1.5″ x 1.5″
- 8 squares 2.5″ x 2.5″
- 4 squares 4.5″ x 4.5″
Always double-check your measurements before cutting. Use your rotary cutter and ruler to keep the edges clean and straight. Label each set of pieces if needed to keep them organized.
Making the Inner Flying Geese Units
Begin with the inner star. We’ll use the stitch-and-flip method to make the flying geese units.
- Place a 1.5″ square (background fabric) right sides together on the corner of a 1.5″ x 2.5″ rectangle (accent fabric). Draw a diagonal line across the square. Sew directly on the line, trim ¼” away from the seam, and press open.
- Repeat on the opposite corner with another 1.5″ square. You now have a flying geese unit.
- Make four inner flying geese units using the steps above.
These smaller geese will form the points of your inner star. Take your time and make sure the points are neat and symmetrical. Press seams carefully to keep everything flat and even.
Assembling the Inner Star
Now it’s time to sew the four inner flying geese units into the star block.
- Arrange your inner flying geese around the 2.5″ center square. The geese should point inward toward the center.
- Sew a flying geese unit to the left and right of the center square to form the middle row.
- For the top and bottom rows, sew a 1.5″ square of background fabric to each side of two flying geese units. Then attach these rows above and below the center row.
You now have the completed inner star, measuring 4.5″ square. This will soon be the center of your larger Double Sawtooth Star Block. Take a moment to admire your progress!
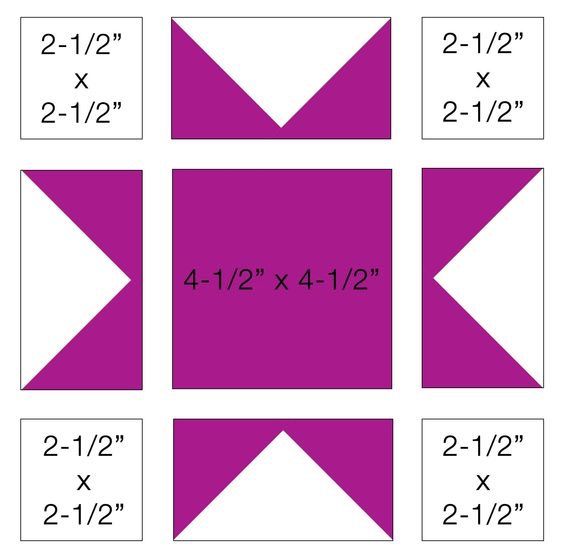
Making the Outer Flying Geese Units
Next, let’s build the larger star surrounding the inner one.
- Take a 2.5″ x 4.5″ rectangle (medium fabric). Place a 2.5″ square (background fabric) on one corner, right sides together. Draw a diagonal line, sew on it, trim ¼” from the seam, and press open.
- Repeat with another 2.5″ background square on the opposite corner. You’ve completed one flying geese unit.
- Make four outer flying geese units in total.
These will create the outer star points. Using different fabric from the inner star adds dimension and contrast, giving the double star effect its signature look.
Assembling the Double Sawtooth Star Block
Now we bring everything together to form the full block.
- Place the inner star block at the center.
- Add one outer flying geese unit to each side of the inner star, matching the points outward.
- Sew 4.5″ background squares to the ends of the top and bottom outer flying geese units to create the top and bottom rows.
- Sew the top row, middle row, and bottom row together carefully, pressing seams open or to the side as needed.
You’ve now completed the Double Sawtooth Star Block! It should measure 12.5″ square unfinished. With seam allowances, it’ll finish at 12″ square once added to your quilt.
Ideas for Personalization
The Double Sawtooth Star Block is ideal for customization. You can change the look dramatically just by switching fabrics or colors. Try these ideas:
- Use solids for a modern, minimalist look.
- Try batiks or hand-dyed fabrics for a watercolor-like effect.
- Make each star a different color for a rainbow quilt layout.
You can also experiment with block size by scaling up your measurements. Or, alternate Double Sawtooth Star Blocks with plain squares, log cabins, or other traditional quilt blocks to create visual interest in a full quilt.
Final Thoughts and Share Your Work!
Creating a Double Sawtooth Star Block is a fun, rewarding project that’s accessible even to beginner quilters. It’s a perfect blend of traditional design and creative possibility. With just a few basic tools and some fabric scraps, you can create a starry masterpiece that adds charm to any quilt.
Now it’s your turn to shine! Try making a set of these blocks and turning them into a wall hanging, table runner, or full quilt top. Whether you’re making a gift or something special for yourself, this quilt pattern is sure to impress.

We’d love to see your Double Sawtooth Star Blocks! Share your finished blocks or quilts on social media and tag your photos with #DoubleSawtoothStarQuilt so others in the quilting community can be inspired by your work. Happy quilting!