
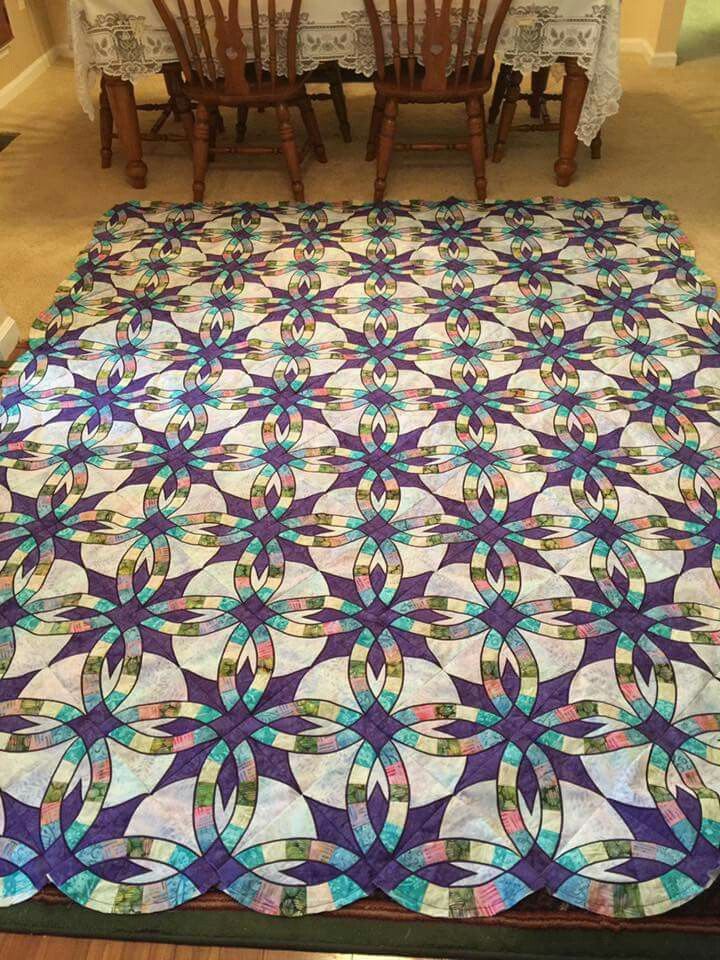
The Double Wedding Ring Quilt is one of the most iconic and beloved designs in the quilting world. With its graceful interlocking rings and timeless symbolism, this Quilting pattern is often chosen for weddings, anniversaries, or heirloom gifts meant to be cherished for generations. Although it looks intricate, beginners can absolutely take on this project with patience, preparation, and a willingness to learn new techniques. In this tutorial, you’ll learn how to create a stunning Double Wedding Ring Quilt from start to finish using simple, beginner-friendly steps.
This guide breaks the entire process into clear stages so you can follow along confidently. Whether you are making a small wall quilt or a full-sized bed quilt, the principles remain the same—you’ll be sewing curved pieces, joining arcs, and forming the blocks that create the signature interlocking rings. Throughout the article, you will also find helpful tips to keep your Quilt neat and manageable. By the end, you’ll have everything you need to bring this beautiful Quilting pattern to life.
Even if this is your first time tackling curved seams or working with templates, don’t worry! The key is to move slowly, enjoy the process, and celebrate each ring you complete. Quilting is meant to be relaxing, expressive, and personal, and the Double Wedding Ring Quilt offers the perfect blend of technique and creativity. Let’s begin your journey into creating a truly unforgettable handmade piece.
Materials You’ll Need
To start your Double Wedding Ring Quilt, gather all your materials in advance. Working with curved seams requires precision, so it helps to have everything organized before cutting. Choose high-quality 100% cotton fabric, as it handles curves beautifully and provides long-lasting results. You’ll want a mix of prints and solids that complement each other and highlight the ring design.
You will also need a set of templates specifically designed for the Double Wedding Ring Quilting pattern. These templates typically include pieces for the arcs, melons, and centers, all of which fit together perfectly once cut. You can buy acrylic templates or print paper ones, but if using paper, remember to trace carefully and cut slowly for accuracy. Good cutting tools, like a rotary cutter, cutting mat, and sharp scissors, will make the process faster and cleaner.
Other essential supplies include pins or clips for holding curved seams, a sewing machine with a ¼-inch presser foot, and iron/ironing board for pressing seams. For finishing the Quilt, you’ll need batting, backing fabric, and binding fabric. If you want extra stability while sewing curves, a fabric glue pen or spray starch can also be helpful. With all your materials ready, you’re prepared to jump into the cutting stage.
Cutting the pieces for a Double Wedding Ring Quilt is an enjoyable part of the process because the shapes are unique and curved. Begin by pressing your fabrics to remove wrinkles and ensure precise cuts. Lay each piece flat on your cutting mat and use your templates to trace the shapes. Keep your hand steady and take your time, especially with curved lines, since accuracy will help your Quilt come together smoothly later.
As you cut, organize your pieces by type—arcs, centers, and melons. This will save time later when assembling the rings and blocks. You can experiment with color placement by arranging your cut pieces on a table or design board. Many quilters prefer using a mix of light and dark tones in the arcs to create depth and visual movement. Others choose a gradient effect or alternate colors for a more modern twist on the traditional Quilting pattern.
Once all your pieces are cut, double-check that you have the correct number for the size of Quilt you’re making. For beginners, starting with a small project, like a table runner or wall hanging, is a great way to practice before tackling a larger Quilt. When all the curves and segments are neatly organized, you’re ready to begin the fun part—assembling the arcs that form the beautiful double rings.
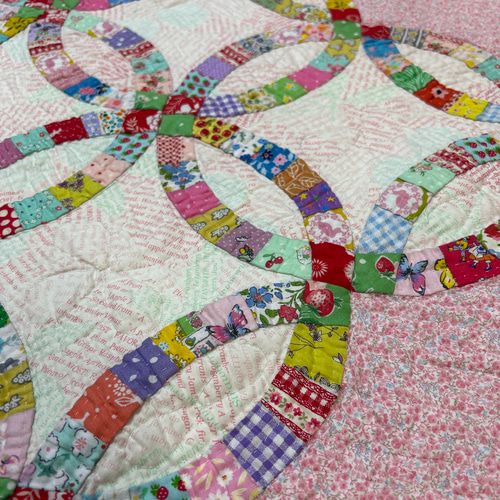
The arcs are the most recognizable element of the Double Wedding Ring pattern, and assembling them is a satisfying process. Begin by laying out the small segments that make up each arc, arranging them in the color pattern you prefer. Sew each segment together using a ¼-inch seam allowance, pressing the seams as you go to keep everything flat and neatly aligned. Pressing is crucial here, as it helps the arcs maintain a smooth, curved shape.
After assembling the small segments, join the two halves to complete the arc. You’ll notice the curve becoming more pronounced as the pieces come together, giving the Quilt its signature ring shape. If you’re new to curved seams, pin generously or use sewing clips to keep the pieces from shifting. Slow, steady stitching will give you clean results, and it’s perfectly normal to go back and adjust a seam if something doesn’t line up as expected.
Repeat this process until you have enough arcs for your entire Quilt. The number of arcs needed depends on your final Quilt size, and making them in batches can speed up the process. This step is a wonderful opportunity to play with color combinations, experiment with fabric scraps, and make your Quilt truly unique. With all the arcs completed, you’re ready to attach them to the melons and center pieces.
Joining the Arcs to the Melons
Once your arcs are complete, it’s time to start attaching them to the melon-shaped pieces. These curved seams may feel challenging at first, but with patience and careful alignment, you’ll master them quickly. Begin by finding the center point on both the arc and the melon. Pin or clip these center points together, then pin the ends, and finally add a few extra pins along the curve to prevent shifting.
Sew slowly along the curved edge, guiding the fabric gently and avoiding stretching. Many quilters find it helpful to lift the presser foot slightly when adjusting curves, allowing the fabric to settle naturally into place. After sewing, press the seam toward the melon piece or in the direction that feels smoothest. This step ensures your Quilt lies flat and showcases the graceful curve of the rings.
Repeat this process for the remaining arcs and melons until you have a full set of units. Seeing the rings begin to take shape is one of the most rewarding moments in the Double Wedding Ring Quilting pattern. Each completed unit brings you one step closer to creating the impressive interlocking design that makes this Quilt so special.
Assembling the Full Quilt Top
Now that your arcs and melons are joined, it’s time to assemble the Quilt top. Begin by laying out your pieces on a large flat surface, arranging the rings in the pattern you’ve chosen. Take a moment to step back and view your layout from a distance—this helps you catch any color imbalances or placement mistakes before sewing. Once you’re happy with your layout, start joining the units together row by row.
As you sew the units, pay close attention to how the curves align with the center pieces. The seams should meet smoothly, creating clean, continuous ring shapes across the Quilt. Press each seam as you go to help the Quilt top lie flat and maintain a professional appearance. The assembly process can take some time, especially for larger Quilts, but it’s also incredibly satisfying as the design emerges piece by piece.
When all the rows are complete, attach them to form the finished Quilt top. This stage brings everything together and transforms your individual units into a unified, stunning Double Wedding Ring Quilt. Take a moment to admire your work—you’ve just completed one of the most legendary and meaningful Quilting patterns in the craft.
Quilting and Binding
With your Quilt top assembled, the next step is quilting. First, create your Quilt sandwich by layering the backing fabric on the bottom, batting in the middle, and the Quilt top on top. Smooth out any wrinkles and baste the layers using pins, spray adhesive, or temporary stitching. Proper basting is important because it prevents shifting as you quilt the layers together.
You can quilt your Double Wedding Ring by hand or machine. Many quilters enjoy echo quilting around the curves of the rings to enhance the design. Stitch-in-the-ditch is another popular technique that allows the rings to remain the focal point. If you’re new to machine quilting, start with slow, gentle curves and practice on scrap fabric before quilting the entire piece. Once the quilting is complete, trim the edges to prepare for binding.
Binding a Double Wedding Ring Quilt often involves curved edges. You can use bias binding, which stretches easily around curves, making it the best option for this Quilting pattern. Attach the binding carefully, taking your time around the curves to ensure a smooth finish. Once the binding is secured, your Quilt is complete—a true labor of love worthy of being passed down through generations.
Ideas for Customization
One of the joys of making a Double Wedding Ring Quilt is the endless room for creativity. You can personalize your Quilt by choosing color schemes that match a wedding theme, anniversary milestone, or home décor style. Traditional designs often use pastel palettes or soft romantic tones, while modern quilters may prefer bold, contrasting colors for a fresh take on the classic pattern.
You can also play with fabric prints, textures, and even fussy-cut designs that give each ring character. Adding embroidered initials, wedding dates, or small motifs in the center pieces creates a meaningful keepsake. If you’re making this Quilt as a gift, consider including a personalized Quilt label on the back with a heartfelt message.
Another fun customization option is experimenting with the layout. Some quilters choose to create incomplete rings along the Quilt’s edges for a contemporary look, while others overlap rings intentionally for dramatic movement. The Double Wedding Ring Quilting pattern is versatile and adapts beautifully to your personal style, making every Quilt unique and truly special.
Final Thoughts – Share Your Masterpiece
Creating a Double Wedding Ring Quilt is a rewarding journey that combines patience, creativity, and passion for the craft. Whether you’re a beginner tackling curved seams for the first time or an experienced quilter adding another heirloom to your collection, this Quilting pattern offers a lifelong memory in the making. Each ring symbolizes connection, harmony, and love, making your finished Quilt more than just a project—it becomes a meaningful treasure.
Now that you’ve completed your Quilt, take a moment to celebrate your accomplishment. Photograph your finished piece, display it proudly, or gift it to someone special. Handmade Quilts carry stories, emotions, and traditions, and the Double Wedding Ring design captures all of these beautifully. You’ve created something truly timeless with your own hands.
If you enjoyed this tutorial, feel free to share your project online or with your quilting community. Seeing how others interpret the Double Wedding Ring Quilt inspires creativity and encourages new quilters to join the craft. Spread the love, enjoy the process, and keep quilting—your next masterpiece is already waiting for you.