
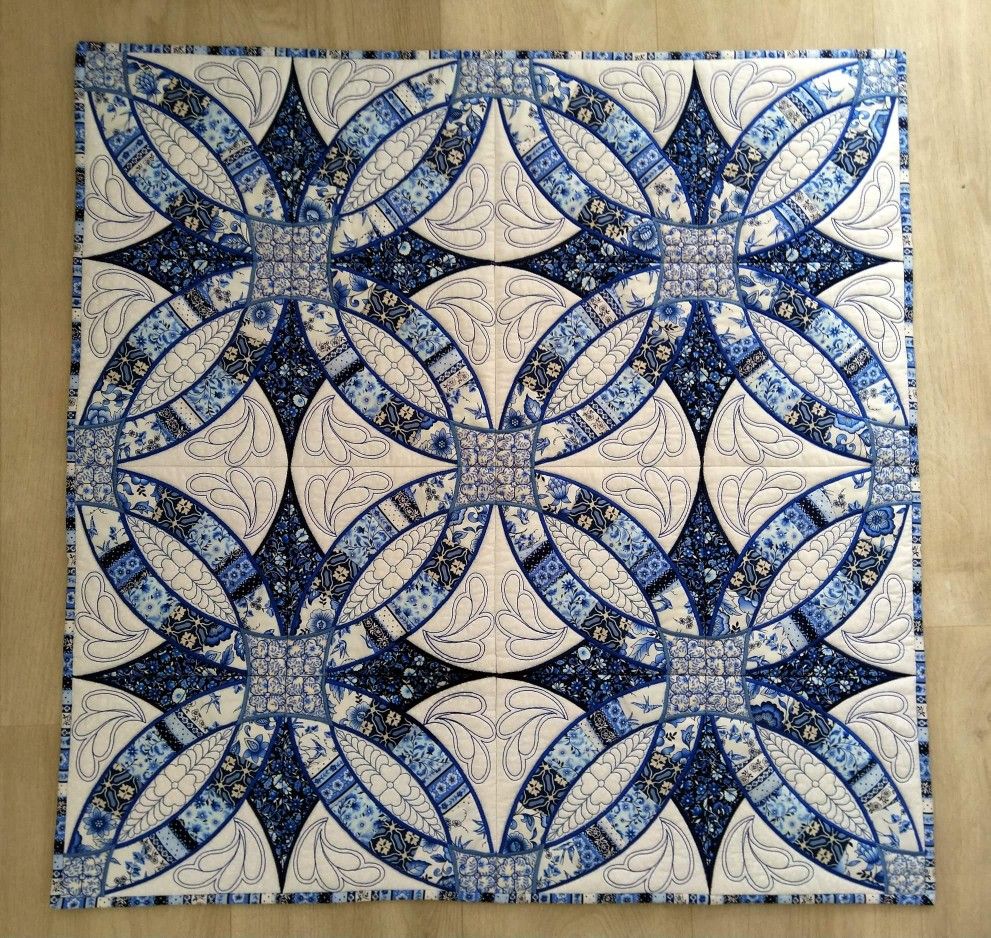
The Double Wedding Ring quilt is one of the most beloved and iconic quilt patterns of all time. With its beautiful interlocking rings and rich symbolism of unity and love, it’s a perfect project to gift or to keep as a personal treasure. Whether you’re making it for a wedding, anniversary, or simply as a timeless heirloom, this quilt pattern will challenge and inspire you in all the best ways.
In this comprehensive tutorial, we’ll walk through everything you need to start your own Double Wedding Ring quilt—from materials to cutting tips, step-by-step assembly instructions, ideas for personalization, and more. If you’re a beginner, don’t worry! This guide is crafted just for you with clear explanations and a cheerful, encouraging tone.
What Is the Double Wedding Ring Quilt Pattern?
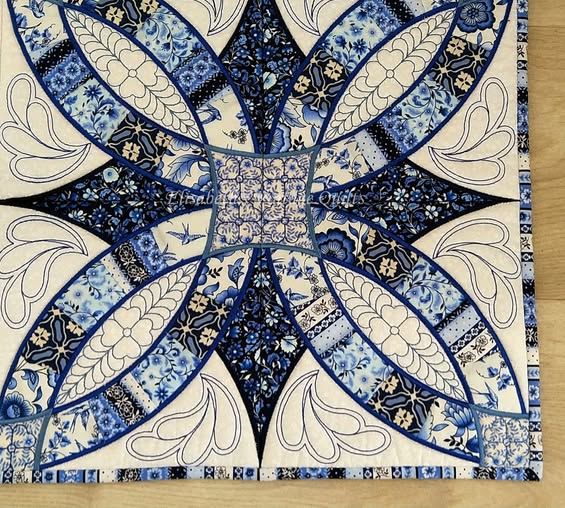
The Double Wedding Ring quilt pattern is known for its elegant design of interlocking circles, often made using curved piecing. Traditionally, it symbolizes love and commitment, making it a popular gift for newlyweds or to celebrate long-lasting relationships. This quilt is more than just a beautiful bedspread—it’s a deeply meaningful piece of art.
This quilt pattern dates back to the 1930s but has roots in earlier quilting traditions. It’s a striking design that showcases your quilting skills and provides endless opportunities for color play and scrap usage. The beauty of the pattern is in the balance between symmetry and creative freedom.
Many quilters use this pattern as a milestone project, but with modern tools and a bit of patience, even a beginner can create a stunning Double Wedding Ring quilt. The result is a quilt full of charm, sentiment, and handcrafted love.
Materials You Will Need
Before you begin, it’s important to gather all your supplies. You’ll need a mix of tools, fabrics, and basic quilting notions. Here’s a complete list of materials for a throw-size Double Wedding Ring quilt (approximately 60″ x 60″):
- Fabric for rings: A mix of 1/8-yard cuts or fat eighths in assorted colors or prints
- Background fabric: 2½ yards of solid or light-toned fabric
- Backing fabric: 3½ yards
- Batting: 64″ x 64″ piece
- Binding fabric: ½ yard
- Double Wedding Ring template set: You can purchase acrylic templates or print and cut them from template plastic
- Rotary cutter and mat
- Sewing machine and thread
- Pins, fabric glue, or clips
- Iron and ironing board
Choose high-contrast fabrics for the rings to make the overlapping shapes stand out, and select a subtle background to make the rings pop. You can go traditional with pastels or bold with modern prints—the choice is yours!
Cutting Your Fabric
Cutting for a Double Wedding Ring quilt requires a bit more precision than simple blocks due to the curved pieces. Start by preparing your fabrics and pressing them well before cutting.
Using your Double Wedding Ring template set, cut the following pieces:
- Arc segments (4 per ring): Use multiple fabric scraps or strips in coordinating colors.
- Melons (the football-shaped centers): From your background fabric.
- Center squares (to form the middle of each ring): Also from your background fabric.
Take your time with this step, especially if you’re using templates. It’s a good idea to cut a few test pieces first and label your parts with sticky notes to keep them organized.
If you’re using a rotary cutter, make sure your blade is sharp, especially when cutting curves. For added ease, you can use fabric glue sticks to gently tack pieces in place before sewing, making curved piecing much smoother for beginners.
Piecing the Arcs
The arcs are made by sewing small segments together in a curved line. Each arc usually consists of 4 segments joined in a gentle curve. Begin by pairing your segment fabrics in a pleasing color order.
Sew the segments together using a ¼” seam allowance, pressing seams open or to the side as preferred. When finished, your arc should have a gentle, curved rainbow appearance. Repeat this step to make the required number of arcs for your quilt size.
Once your arcs are sewn, attach them to the melon shapes. This is the trickiest part for most quilters because it involves curved piecing. Use plenty of pins, or try glue basting to keep the edges aligned. Take it slow, and remember: it’s okay if it’s not perfect! Quilting is about the journey as much as the final product.
Assembling the Rings
Once your arcs and melons are joined, it’s time to start forming the full rings. This involves connecting arcs into oval or circular units and attaching the background centers. Think of this stage as building quilt “blocks” even though the layout isn’t square.
Each block unit includes:
- 4 arcs forming a ring
- 4 melons between the arcs
- A center square inside the ring
Sew the arcs together at their ends, then attach them to the melons and the center square. It helps to lay out all the pieces before sewing to ensure proper placement and color balance. Press carefully and trim excess fabric only if necessary.
Once several rings are complete, you’ll start to see the interlocking design take shape as you join the ring units together. It’s incredibly satisfying to watch your quilt grow at this stage!
Quilting and Finishing Touches
After your top is assembled, layer your quilt with batting and backing fabric using your preferred basting method—spray basting, pin basting, or hand basting all work well. Smooth out all wrinkles and secure the layers firmly.
Quilting a Double Wedding Ring quilt is your chance to add texture and highlight the beautiful curved design. You can echo quilt around the rings, fill the background areas with feathers or loops, or stitch-in-the-ditch for a more subtle look.
Bind the quilt using a bias binding for the best finish, especially since the outer edges are curved. A standard straight-grain binding may cause puckering, so take the extra time to cut your binding on the bias for a professional result.
Personalization Ideas
One of the most fun aspects of the Double Wedding Ring quilt is how much you can make it your own. Try using:
- Scraps from old clothing: A sentimental choice for a family quilt
- A two-tone color scheme: For a minimalist, modern aesthetic
- Holiday fabrics: For a festive, seasonal version
You can even embroider names or dates in the center squares to commemorate weddings, anniversaries, or family reunions. Appliqué initials or small hearts for an extra romantic touch. Your Double Wedding Ring quilt can be as classic or quirky as you want it to be.
If you’re making it as a gift, consider attaching a label on the back with a sweet message. A quilt made with love deserves to be remembered for years to come.
Share Your Quilt with the World!
Now that you’ve completed your Double Wedding Ring quilt, it’s time to celebrate your work. Share your project on social media using hashtags like #DoubleWeddingRingQuilt, #QuiltPattern, and #QuiltLove to connect with the quilting community. Post your quilt progress, finished photos, or even the bloopers along the way—we all learn together!
If you followed this tutorial, we’d love to see what you made. Quilting is a craft that brings people together, one stitch at a time. Whether it’s your first quilt or your fiftieth, every piece you make carries your heart in it.
So grab your fabric, fire up the sewing machine, and get started on your very own Double Wedding Ring quilt. Let this timeless quilt pattern bring warmth, beauty, and love into your creative journey.