
If you love geometric designs and want to make a truly eye-catching project, the Eagle Star Pattern is a perfect choice. This beautiful quilt block combines bold symmetry, elegant lines, and a touch of artistry that gives it both strength and grace—just like its name suggests. Whether you’re a beginner looking for your first star quilt or an experienced crafter seeking a new challenge, this tutorial will guide you step by step through the process. Let’s dive into this inspiring quilting pattern and create something that shines!
1. Understanding the Eagle Star Quilt Pattern
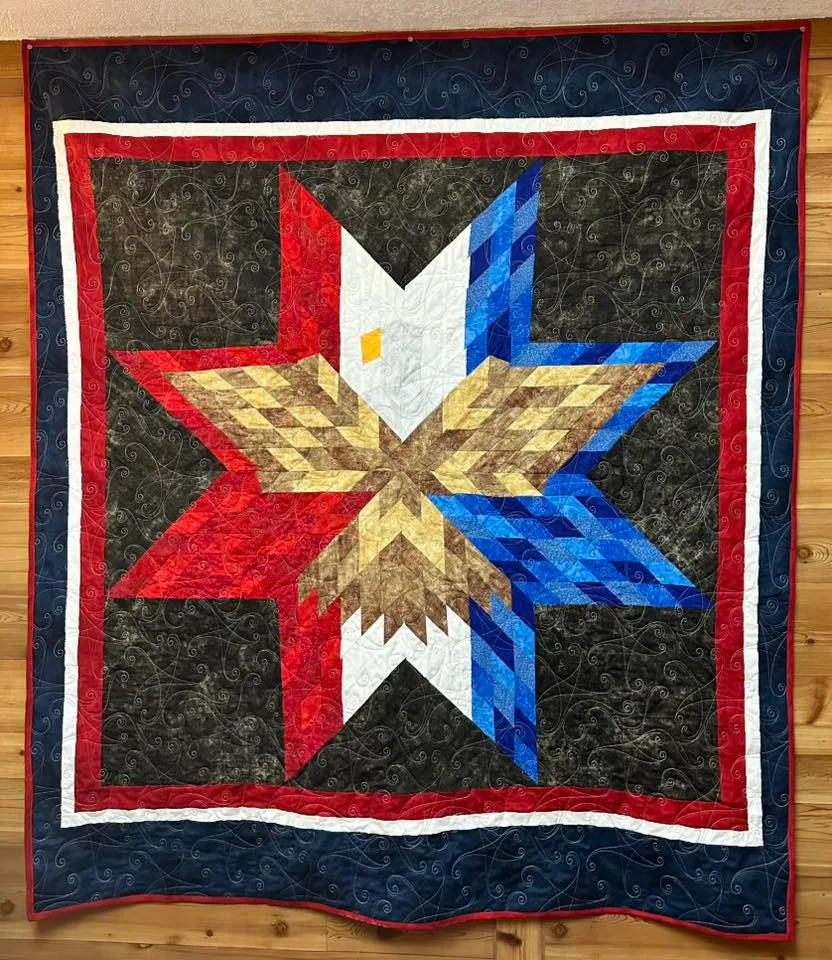
The Eagle Star is one of those classic quilt designs that instantly draws attention. Its sharp, radiating points resemble the wings of an eagle, symbolizing freedom and beauty in craftsmanship. This quilting pattern uses triangles and diamonds arranged in a symmetrical star shape, typically made with high-contrast colors to make the design pop.
Many quilters love the Eagle Star because it balances simplicity and sophistication. Even though it looks intricate, the pattern is made up of repeatable geometric units. Once you get the hang of cutting and joining the triangles, you’ll find it flows naturally. It’s also an excellent opportunity to practice precision sewing—skills that will serve you well in other quilt projects.
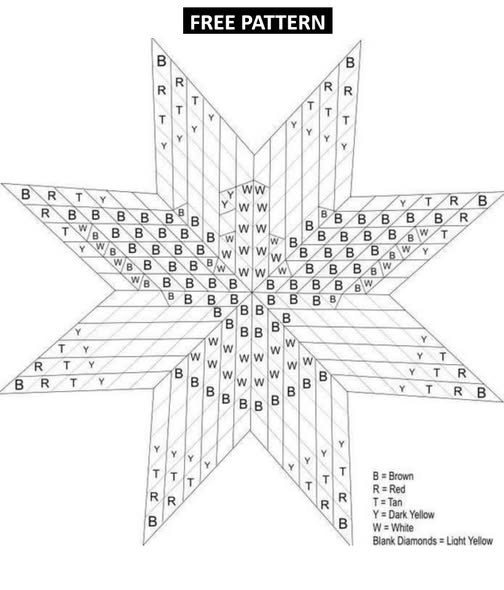
Before starting, spend a little time studying the pattern layout. Understanding where each piece fits will save you from confusion later. You can either draw your own diagram or print a digital template from a quilting site. Once you’re familiar with the structure, you’ll be ready to start cutting and assembling your beautiful Eagle Star quilt block.
2. Materials and Tools You’ll Need
Before you begin sewing, gather all the materials you’ll need. One of the joys of quilting is choosing the right fabrics—this pattern especially shines when you play with color contrasts. You’ll need at least two main fabrics: one light and one dark. A third accent color can add depth and give your star a more dynamic appearance.
Here’s a simple list to guide you:
- Fabric A (main star color) – ½ yard
- Fabric B (background color) – ½ yard
- Fabric C (accent or border color) – ¼ yard
- Quilting ruler and rotary cutter
- Cutting mat
- Iron and ironing board
- Pins or fabric clips
- Sewing machine (or needle for hand stitching)
- Thread to match your fabric
- Batting and backing fabric (if making a full quilt)
Once everything is set, take a moment to press your fabrics. Smooth, wrinkle-free material will make your cuts more accurate and your quilting pattern easier to assemble. Pre-washing your fabrics is also a good idea, as it prevents shrinkage after your quilt is finished.
3. Cutting the Fabric Pieces
Precision is key when working on star quilt blocks, and the Eagle Star is no exception. Start by cutting your fabrics into squares, triangles, and diamonds according to your pattern. You’ll generally need eight large triangles for the star points, eight smaller triangles for the secondary points, and a few background squares to complete the block.
Use your rotary cutter and ruler to ensure each piece is perfectly even. Small measurement errors can distort the star’s symmetry. If you’re new to quilting, label your fabric pieces with small sticky notes or masking tape to keep track of which piece goes where. This small step can save you a lot of frustration later!
When cutting the diamond pieces, take your time to align the ruler carefully along the 45° angle. A clean, straight edge will help your pieces fit together seamlessly. Once everything is cut, lay the pieces out on your workspace to preview the design. This step not only helps visualize the final look but also ensures you’re happy with your fabric color arrangement before sewing begins.
4. Sewing the Star Together
Now comes the fun part—seeing your Eagle Star take shape! Begin by sewing the small triangles together to form diamond units. Use a ¼-inch seam allowance, which is standard for most quilting patterns. After stitching, press each seam toward the darker fabric to prevent shadowing through the lighter areas.
Next, join your diamond units with the larger triangles to form the star points. Once all eight points are complete, arrange them in a circular layout to create the full star. Carefully pin each section before sewing, ensuring that the center points align perfectly. Take it slow—accuracy is more important than speed in this step.
When your star is assembled, attach the background squares around the edges. This will square off the block and make it ready for the next stage. Gently press the entire block flat, checking that all seams lie smoothly. You’ll be amazed how quickly your quilt begins to resemble the striking Eagle Star design.
5. Assembling the Quilt Top
With your star block ready, you can either make a single-block mini quilt or repeat the block pattern to create a full-sized quilt top. Each Eagle Star block can be joined with sashing or alternate blocks, depending on the look you’re going for. Using plain white or light-gray sashing can make each star stand out beautifully.
Lay out all your blocks before sewing them together. This is a great time to experiment with color balance and positioning. Once you’re satisfied, begin joining the rows one by one, always pressing seams as you go. Pressing keeps everything flat and professional-looking—a detail that makes all the difference in quilting.
After all rows are connected, add a border if desired. Borders not only frame your quilt beautifully but also help stabilize the edges. Choose a border color that complements your main design—something bold like navy blue or burgundy can really make your Eagle Star shine.
6. Quilting and Finishing Touches
Once your top is ready, it’s time to quilt it! Create your quilt sandwich by layering the backing fabric (right side down), batting in the middle, and your quilt top (right side up). Smooth everything out carefully and pin it in place. You can use safety pins, basting spray, or even hand basting if you prefer a traditional approach.
For quilting designs, straight-line stitching works beautifully with the Eagle Star pattern. Stitch along the star’s points to emphasize its geometric shape. If you’re feeling creative, you can also try free-motion quilting to add swirls or feathered designs that mimic the eagle’s wings. The choice is yours!
Finally, trim any excess fabric and attach your quilt binding. Fold the binding around the edges and sew it neatly in place. Give your finished quilt one last press, and admire your work—you’ve created something that combines precision, creativity, and craftsmanship.
7. Customization Ideas
The Eagle Star Pattern is endlessly versatile. For a bold, modern look, use solid fabrics in bright, contrasting colors like red and turquoise. If you prefer a more classic quilt, try soft blues, creams, and golds. You can also play with gradients or ombre fabrics to give your star a glowing, three-dimensional effect.
Another fun customization idea is to vary the background fabric for each block. This creates a scrappy, dynamic quilt that feels alive with color and texture. Metallic or batik fabrics can also add an elegant sparkle, making your quilt perfect as a wall hanging or gift piece.
For an extra-special touch, consider adding embroidery or appliqué details to the center of the star. Simple stitching in metallic thread can mimic rays of light or feathers—tying back beautifully to the “Eagle” theme. Let your imagination guide you; quilting is as much about personal expression as it is about precision.
8. Share Your Eagle Star Quilt!
You’ve completed your Eagle Star quilting pattern, and now it’s time to celebrate your achievement! Whether you made a cozy lap quilt, a decorative wall piece, or a stunning bedspread, your creation deserves to be seen. Take photos of your finished quilt in natural light to showcase its texture and colors.
Share your project on social media or with your local quilting community. You’ll be surprised how inspiring it can be for other beginners to see your journey—from choosing fabrics to finishing your final stitch. Every quilt tells a story, and yours can encourage others to start sewing their own.
Quilting connects people through creativity and tradition. The Eagle Star Pattern is not just a design—it’s a symbol of freedom, artistry, and dedication. So, grab your fabrics, start your next project, and don’t forget to share your masterpiece with the world. Happy quilting!