
The Hunter’s Star is one of those classic designs that looks incredibly intricate at first glance, but with the right approach, it becomes surprisingly accessible—even for beginners. This traditional quilting pattern features bold geometric movement and beautiful contrast, making it a favorite for both modern and traditional quilters. If you’ve been searching for an easy way to bring this timeless block into your quilting journey, this tutorial will guide you step by step. In this article, you’ll learn how to understand the construction of the Hunter’s Star, prepare your materials, assemble your blocks, and bring the entire quilt together with confidence. The goal is not only to teach you the process but to help you enjoy the creativity and relaxation that come with quilting. Whether you’re making a cozy throw or a full-size bed quilt, the Hunter’s Star is a striking pattern that always impresses. Let’s dive into the process and discover how simple and enjoyable this beautiful design can be. By the end, you’ll feel inspired and ready to sew your very own Easy Hunter’s Star Quilt with clear steps, customization ideas, and confidence in your growing quilting skills.
Understanding the Hunter’s Star Pattern
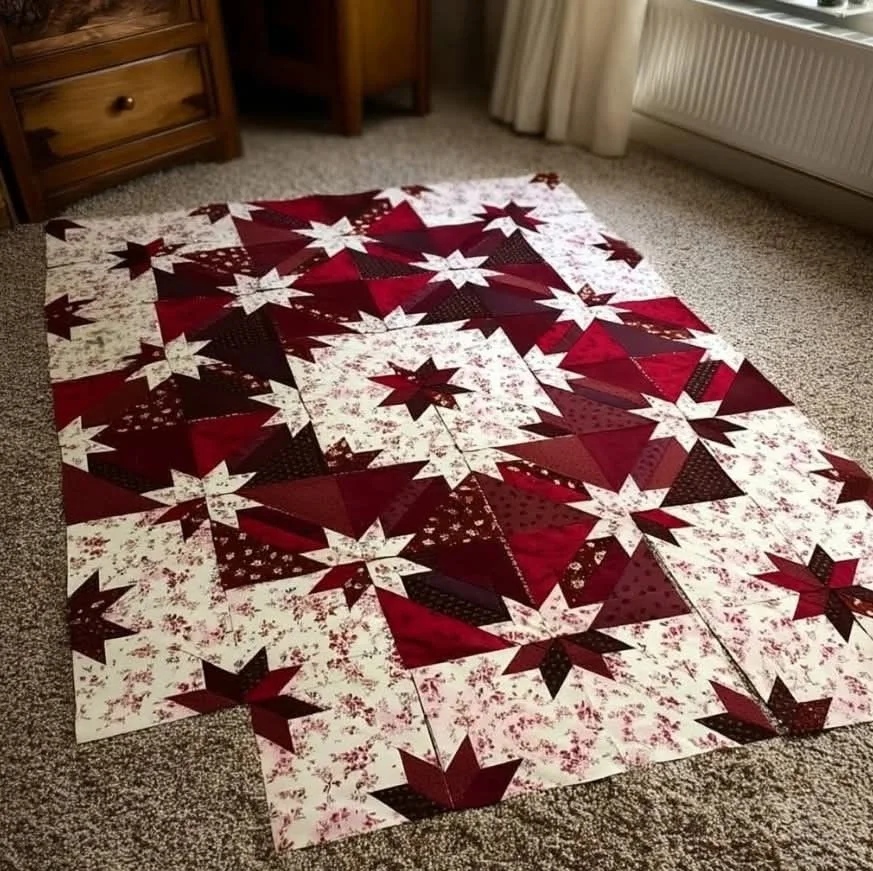
The Hunter’s Star that many crafters admire today originates from early American quilting traditions. Although the design looks like it requires complicated angles and specialty rulers, the beginner-friendly method in this tutorial uses simple squares and half-square triangles. This makes the pattern not only approachable but also enjoyable for new quilters who want to expand their skills without stress. The magic of this quilting pattern lies in its strong visual impact. Two contrasting colors create a star shape that appears to overlap and interlock, forming a dynamic, eye-catching layout. When arranged across a full quilt, the repeated blocks create movement and depth that feel both modern and timeless. Many quilters love the Hunter’s Star because it looks complex, yet becomes very rhythmic and relaxing once you understand the block structure. Another advantage of this pattern is its versatility. You can easily adapt it to different quilt sizes and color palettes, from bold jewel tones to subtle pastels. It also pairs beautifully with holiday fabrics or themed collections. Once you grasp the block assembly method your creativity can shine, allowing you to personalize the design to match your style, home décor, or the preferences of someone you’re gifting the quilt to.
Materials You Will Need
Before you begin sewing your Hunter’s Star Quilt, gather all the essential supplies. One of the great things about this quilting pattern is that it doesn’t require advanced tools. You can make it using basic quilting equipment, making it a perfect project for beginners or those who prefer simple, budget-friendly setups. Choosing high-contrast fabrics will give your stars crisp, defined edges. You can use solids for a bold and modern look or prints for a softer, more textured effect. For beginners, solids or tone-on-tone fabrics make it easier to see your seams and maintain accuracy. Prewashing your fabrics is optional but can help prevent color bleeding in the finished quilt. Once you’ve gathered your materials, prepare your workspace for cutting and ironing. Having a clean and organized area makes the quilting process smoother and more enjoyable. Since the Hunter’s Star is constructed from repeated blocks, cutting your pieces carefully at the beginning will help ensure consistency throughout the project.
Materials List: Assorted quilting cotton in two contrasting colors; rotary cutter, quilting ruler, and cutting mat; sewing machine with a ¼-inch presser foot; thread in a matching or neutral color; iron and ironing board; pins or clips; batting; backing fabric; binding fabric.
Cutting the Fabric
To create the Easy Hunter’s Star Quilt, you’ll start by cutting squares and half-square triangles (HSTs). The simplified method used in this tutorial keeps the cutting process straightforward while still producing sharp, clean star points. Beginners often find this approach less intimidating because it avoids working with diamonds or bias edges. Begin by cutting equal-sized squares from each of your two main fabrics. The size of your squares will determine the finished size of your quilt blocks. For example, 6-inch squares create medium blocks suitable for lap quilts, while 8-inch squares are great for throw quilts. Once your squares are cut, pair each light square with a dark square, placing them right sides together. Next, you will create half-square triangles. Draw a diagonal line from corner to corner on the lighter fabric square. Stitch a ¼-inch seam on both sides of that line. After sewing, cut along the drawn line to create two identical HSTs. Press them open and square them to the correct size. This method ensures your triangles turn out uniform and crisp, which is essential for the precise look of the Hunter’s Star design.
Assembling the Hunter’s Star Block
After cutting your HSTs and squares, it’s time to assemble the block layout. Each Hunter’s Star block is built using combinations of squares and triangles arranged in a symmetrical pattern. Even though the final result looks intricate, the actual construction feels intuitive once you see how the pieces fit together. Begin by laying out squares and HSTs in your chosen configuration. Position the HSTs so that the darker fabric forms a star point pointing toward the center of the block. The remaining squares act as background pieces that support the star shape. Take your time arranging the pieces until the star form becomes clear—this step helps ensure accuracy later. Once you’re satisfied with the layout, start sewing the pieces into rows. Use a consistent ¼-inch seam allowance and press each row flat before joining them together. When sewing the rows, align your seams carefully to keep the star points sharp. After the block is complete, give it a final press and trim any uneven edges. Your first Hunter’s Star block is now ready, and the rest will come together smoothly as you repeat the process.
Joining the Blocks and Building the Quilt Top
When you have completed enough blocks for your desired quilt size, you can begin assembling the quilt top. One of the exciting things about this quilting pattern is that each block connects seamlessly to the next, creating a continuous flow of stars across the quilt. As you lay out the blocks, the secondary patterns will emerge naturally, giving your quilt a beautiful sense of movement. Start by arranging the blocks on a flat surface or design wall. Move them around until you achieve a harmonious balance of colors and shapes. Some quilters prefer a symmetrical layout, while others enjoy the organic feel of alternating the placement of darker and lighter sections. There’s no wrong choice here—let your creativity guide you. After finalizing your layout, sew the blocks into rows, then sew the rows together to complete the quilt top. Be sure to press each seam as you go to keep your quilt flat and reduce bulk. Once the quilt top is finished, you can prepare it for quilting by layering it with batting and backing fabric. Smooth out any wrinkles and secure the layers with pins or basting spray.
Quilting and Binding the Finished Quilt
Now that your quilt top is assembled, it’s time to quilt the layers together. This step gives your project durability, texture, and visual depth. For beginners, simple straight-line quilting is the easiest option and works beautifully with the strong geometric shapes of the Hunter’s Star quilting pattern. You can stitch in the ditch, follow the seams, or quilt diagonal lines across the star shapes. If you’re feeling more adventurous, you can experiment with free-motion quilting. Swirls, loops, or feather motifs add elegance and contrast to the straight lines of the quilt pattern. Just remember to practice on a scrap quilt sandwich before quilting your actual project. The goal is not perfection—it’s creativity and enjoyment. Finally, prepare your binding. Cut strips of fabric, sew them together, and press them in half lengthwise. Attach the binding around the edges of your quilt using a ¼-inch seam, then fold it to the back and hand-stitch or machine-stitch it in place. This step adds a clean, professional finish that highlights the beauty of your newly completed Hunter’s Star Quilt.
Customization Ideas
One of the best parts of quilting is the endless room for personalization, and the Hunter’s Star is no exception. You can tailor this pattern to any style—from modern minimalism to rustic charm—by simply adjusting your fabric choices and layout. This makes it a versatile quilt that can suit any occasion or décor. Try using a monochromatic palette for a sophisticated look. Choose several shades of the same color and pair them with a crisp white background. The result is a soft gradient effect that feels modern and chic. If you prefer a bolder design, mix vibrant prints with contrasting solids to make the star shapes pop with energy and personality. You can also enlarge or shrink the blocks depending on the size of the quilt you want to create. Larger blocks work well for quick weekend quilts, while smaller blocks offer a more intricate and detailed finish. No matter your choices, the Hunter’s Star adapts beautifully, allowing you to express your creativity and put your unique stamp on the project.
Final Thoughts – Share Your Beautiful Quilt
Creating an Easy Hunter’s Star Quilt is a rewarding experience that blends creativity, skill-building, and relaxation.
Even though the pattern looks intricate, the beginner-friendly method in this guide makes the process smooth and enjoyable.
Whether you’re new to quilting or already exploring more advanced designs, this classic quilting pattern is a wonderful addition to your craft journey.
As you finish your quilt, take a moment to admire how the colors, shapes, and textures come together in a harmonious design.
Every stitch tells a story, and every completed quilt becomes a treasured piece—whether you keep it for yourself or gift it to someone special.
Handmade quilts carry warmth in more ways than one. I would love to see your version of the Hunter’s Star Quilt!
Feel free to share photos, post your progress online, or inspire other makers by showing what you’ve created.
Your project might be the spark that encourages another beginner to start their own quilting adventure. Happy quilting!