
Creating a quilt can be a fun and rewarding experience, especially when you incorporate adorable cat designs into your patchwork. The Easy Applique Patchwork Cats quilt is a fantastic project for beginners and seasoned quilters alike. In this tutorial, we will walk you through each step of the process, from fabric selection to final assembly. Whether you are using a quilt app for design inspiration or following quilt patterns, this guide will help you craft a charming feline-themed quilt with ease.
Choosing the Right Fabrics for Your Cat Applique Quilt
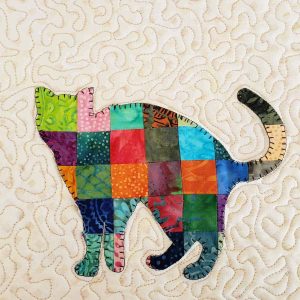
Selecting the right fabric is the first step in making your applique patchwork cats stand out. Opt for quilt-friendly cotton fabrics in a variety of colors and patterns to give your cats personality. You may also choose solid backgrounds to make the cat appliques pop.
For a cohesive look, stick to a color palette that complements your home decor or the recipient’s preferences. If you are making this as a gift, consider using fun cat-themed prints for extra charm. Using high-quality quilt fabrics ensures durability and makes the applique process easier.
Additionally, pre-washing your fabric prevents shrinkage and color bleeding. After washing, iron the fabric to smooth out wrinkles before cutting your pieces. This preparation step is essential for achieving clean, precise edges when working with quilt patterns.
Preparing Your Applique Templates and Quilt Blocks
Before you start sewing, you need to prepare the cat applique shapes. You can either hand-draw your cat silhouettes or use templates available in various quilt apps. Print or trace the shapes onto freezer paper or fusible webbing for stability.
Once you have your templates ready, cut them out carefully. If using fusible web, attach it to the back of your fabric pieces according to the manufacturer’s instructions. This will help your applique pieces adhere smoothly to the quilt blocks.
Next, cut your quilt blocks to the desired size. A standard size for this project is 12-inch squares, but you can adjust based on your quilt dimensions. Lay out your cat appliques on each block to determine placement before ironing or pinning them in place.
Stitching the Cat Applique onto the Quilt Blocks
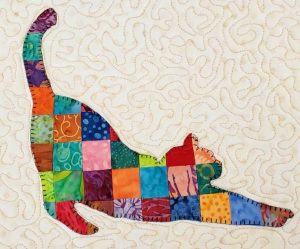
Now it’s time to stitch the applique onto your quilt blocks. There are several techniques you can use, such as raw-edge applique, satin stitching, or blanket stitching. If you prefer a traditional look, hand-stitching around the edges adds a charming, homemade touch.
Using a quilt app can help you explore different stitch styles and patterns. If using a sewing machine, adjust your stitch length and width to ensure smooth curves and secure edges. A zigzag or satin stitch works well to prevent fraying.
For added detail, consider embroidering features like whiskers, eyes, or a little bow on your applique cats. These finishing touches personalize your quilt and bring your feline characters to life.
Assembling the Quilt Top
Once all your cat appliques are securely stitched, it’s time to assemble the quilt top. Arrange your quilt blocks in a grid pattern, ensuring that the colors and applique placements are well-balanced.
Sew the blocks together in rows, pressing the seams open or to one side as you go. Using quilt patterns as a reference can help with precise alignment. For a more playful look, you can rotate some of the cat blocks for variety.
After piecing together all the rows, sew them together to complete the quilt top. Give it a final press with an iron to smooth out any seams before moving on to the quilting process.
Adding Batting and Backing
Now that your quilt top is complete, you’ll need to add batting and backing to give it structure. Cut a piece of batting that is slightly larger than your quilt top, usually about 2 inches wider on all sides.
For the backing, select a coordinating fabric that enhances your design. Lay the backing fabric right-side down, place the batting on top, and then position your quilt top, right-side up. Smooth out any wrinkles and secure the layers with quilting pins or spray adhesive.
If you are using a quilt app to design your layout, you can preview different backing options before making a final decision. This helps ensure that your quilt’s overall aesthetic remains cohesive.
Quilting and Binding the Finished Quilt
Now comes the fun part—quilting! You can opt for machine quilting, hand quilting, or even tie quilting, depending on your skill level and available time. Stitching around the appliques in a free-motion style adds depth and texture.
For a simple and modern look, consider using straight-line quilting. This technique involves sewing evenly spaced lines across the quilt top, creating a clean, geometric effect. Be sure to use a walking foot on your sewing machine to keep the layers from shifting.
Once the quilting is complete, trim any excess batting and backing. Bind the edges with a 2.5-inch fabric strip, folding it over to create a neat and durable border. Secure the binding with machine or hand stitching for a polished finish.
Final Touches and Care Instructions
Before gifting or displaying your quilt, give it a final press with an iron and inspect for any loose threads. A light washing can help soften the fabric and settle the stitches.
Store your quilt in a cool, dry place to maintain its quality. If you’re planning to gift it, consider adding a personalized label with the recipient’s name and the date of completion.
By following this Easy Applique Patchwork Cats tutorial, you’ll create a heartwarming quilt that showcases your love for quilting and feline friends. Whether you’re using a quilt app for inspiration or handcrafting each piece, this project is a fun way to experiment with quilt patterns and applique techniques. Happy quilting!