
Creating an Eight Pointed Star Quilt Block is a rewarding and enjoyable quilting project. This traditional pattern has been a favorite among quilters for generations, offering both elegance and complexity. In this tutorial, we will go through a step-by-step guide to making this beautiful quilt block, covering fabric selection, cutting measurements, and assembly techniques.
Understanding the Eight Pointed Star Quilt Block
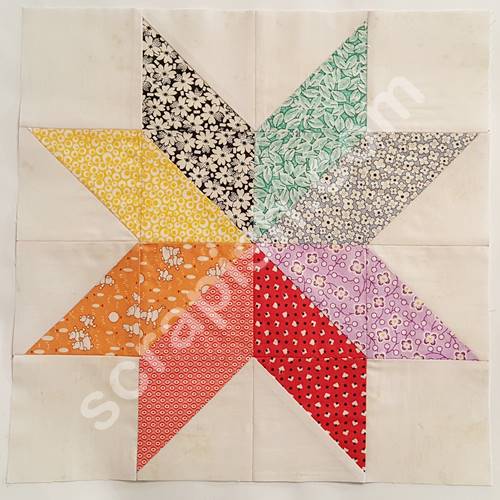
The Eight Pointed Star Quilt Block is a classic design that features a symmetrical star with sharp, defined points. This block can be created using various techniques, including traditional piecing and paper piecing.
This quilt pattern is versatile and can be customized with different fabric choices and color schemes. Whether you choose a modern, vibrant palette or a classic, subdued look, the result is always striking.
Mastering this pattern requires careful alignment and precise sewing. By following this tutorial, you will learn the essential techniques to achieve clean, crisp star points and a perfectly balanced quilt block.
Materials and Tools Needed
To create an Eight Pointed Star Quilt Block, you will need a selection of fabrics, a rotary cutter, a quilting ruler, and a sewing machine. Here is a list of essential materials:
- Fabric A (background): 4 squares (4.5″ x 4.5″)
- Fabric B (star points): 8 squares (3″ x 3″)
- Fabric C (center star): 1 square (4.5″ x 4.5″)
- Rotary cutter and self-healing mat for precise cutting
- Quilting ruler for accurate measurements
- Sewing machine with a ¼” foot to ensure even seams
Choosing high-quality cotton fabric will help maintain the structure of the block and prevent fraying. Pre-washing the fabric is also recommended to avoid shrinkage after assembling the quilt.
Cutting the Fabric Pieces
Accurate cutting is crucial when making a quilt block. Begin by preparing all the fabric pieces based on the dimensions mentioned earlier. Using a rotary cutter and ruler ensures precision.
For the star points, take Fabric B squares (3″ x 3″) and cut them diagonally to form triangles. These triangles will be used to create the star’s eight points.
The background squares (Fabric A) and the center star square (Fabric C) should remain in their original dimensions. Ensuring that all pieces are measured correctly will make assembly easier and more accurate.
Assembling the Star Points
Start by sewing the triangle pieces together to form the star points. Take two triangles and align them along the diagonal edge, stitching them together with a ¼” seam allowance.
Press the seams open to reduce bulk and create a smooth surface. Repeat this step for all eight triangles to create the four larger star points.
Once all points are sewn together, arrange them around the center square (Fabric C) to ensure correct positioning before sewing them to the background fabric.
Sewing the Quilt Block Together
To assemble the block, start by attaching the star points to the center square. Align each point carefully, making sure that the seams match up properly.
Sew the top and bottom rows first, then attach them to the center. Next, stitch the left and right sections to complete the block. Use pins to hold pieces in place and maintain alignment.
After sewing, press all seams open or to the side, depending on preference. This will help the block lie flat and maintain a professional appearance.
Trimming and Final Touches
Once the block is fully assembled, measure it to ensure it matches the intended size (typically 12.5” x 12.5” before sewing into a quilt top). Trim any excess fabric if necessary.
Check that all points align correctly and adjust if needed. A well-aligned quilt block enhances the overall quilt pattern and adds a polished look.
At this stage, you can also decide if you want to add sashing or borders to complement your design. This step is optional but can enhance the overall aesthetic of your quilt.
Tips for Achieving Perfect Points
One of the most challenging aspects of making an Eight Pointed Star Quilt Block is achieving sharp, precise points. Here are some helpful tips:
- Use a scant ¼” seam allowance to prevent fabric from shrinking the block size.
- Press seams carefully to reduce bulk and ensure crisp points.
- Pin fabric pieces before sewing to prevent shifting and misalignment.
Practicing on scrap fabric before starting your actual quilt block can help you refine your technique and gain confidence in your sewing skills.

Variations and Design Ideas
There are many ways to modify the Eight Pointed Star Quilt Block to create unique designs. Some popular variations include:
- Scrappy star block: Using different fabric scraps for each star point creates a vibrant, eclectic look.
- Ombre effect: Selecting fabrics in gradient shades can add depth and dimension to the star.
- Two-tone design: Using only two contrasting colors can create a striking, minimalist quilt pattern.
Experimenting with different fabric combinations and layouts allows for endless creativity in quilt-making.
Conclusion
The Eight Pointed Star Quilt Block is a timeless and beautiful addition to any quilt project. With careful cutting, precise sewing, and attention to detail, you can create a stunning quilt block that showcases your quilting skills.
By following this tutorial, you have learned the step-by-step process to complete this intricate design successfully. Whether you use this block as part of a larger quilt or as a standalone project, the results will be a cherished piece of handmade art.