
Creating handmade items for babies is one of the most rewarding experiences in the world of sewing. A soft, comfortable baby hat is not only adorable but also practical, helping keep little ones warm and protected. With this Fabric Baby Hat Free Pattern, you can create a charming accessory that is gentle on delicate skin and perfect for newborn photos, baby showers, or everyday wear.
This tutorial was designed especially for beginners who want to improve their sewing skills while making something meaningful. Even if you are just starting your journey with a sewing pattern, this project is approachable and enjoyable. With only a few materials and basic techniques, you will be able to create a professional-looking baby hat.
In this guide, you will learn everything step by step: the materials needed, how to prepare the sewing pattern, the full construction process, and some creative ways to personalize the final result. By the end, you will have a lovely handmade hat and the confidence to continue exploring new sewing projects.
Why a Fabric Baby Hat is a Perfect Beginner Sewing Project
One of the reasons a baby hat is such a great project for beginners is its simplicity. Most baby hats require only a small amount of fabric and basic stitches. This makes the project ideal for practicing sewing techniques without feeling overwhelmed by complicated construction steps.
Another advantage is that baby hats are quick to complete. Many sewists can finish this project in less than an hour once the sewing pattern pieces are prepared. Because it’s so fast, you can easily make several hats in different colors and fabrics, which is perfect for gifts or donations.
Finally, this project is a great way to use fabric scraps. If you have leftover cotton, knit, or jersey fabric from previous sewing projects, they can easily be transformed into adorable baby hats. It’s a wonderful way to reduce waste while creating something meaningful and beautiful.
Materials Needed for the Fabric Baby Hat
Before beginning your project, gather all the materials needed for the sewing pattern. Having everything ready will make the process smoother and more enjoyable.
You will need soft fabric suitable for babies. Cotton jersey, interlock knit, or soft cotton blends work wonderfully because they are breathable and comfortable. Avoid rough fabrics, as baby skin is extremely delicate.
Materials list:
- Soft cotton knit or jersey fabric (about 25 cm / 10 inches)
- Matching thread
- Fabric scissors or rotary cutter
- Sewing pins or clips
- Sewing machine (or hand sewing needle)
- Printed baby hat sewing pattern
- Measuring tape
- Fabric marker or chalk
- Iron
Using high-quality materials will improve the final result and ensure that the baby hat remains soft and comfortable after multiple washes.
Preparing the Sewing Pattern and Fabric
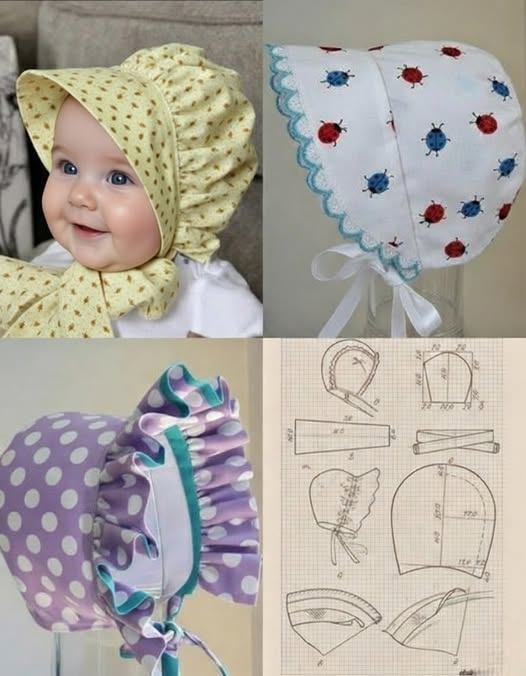
The first step in this project is preparing the sewing pattern. Many baby hat patterns include two curved pieces that form the shape of the hat when sewn together. Print the pattern at full scale and cut out the pieces carefully.
Next, prepare your fabric. Wash and dry it before cutting to prevent shrinking later. Press the fabric with an iron to remove wrinkles, as smooth fabric makes cutting and sewing much easier and more accurate.
Fold the fabric with the right sides facing inward. Place the sewing pattern pieces on top and pin them securely. Using fabric scissors or a rotary cutter, carefully cut around the pattern pieces. Take your time during this step, as precise cutting leads to a better-fitting hat.
Step-by-Step Sewing Instructions
Now comes the most exciting part: assembling your baby hat through sewing. This step-by-step process is simple and beginner-friendly.
Step 1: Pin the pieces together
Place the two fabric pieces together with the right sides facing each other. Carefully align the curved edges and pin them in place. This will help keep the fabric stable while you sew.
Step 2: Sew the curved seam
Using your sewing machine, sew along the curved edge of the hat following the sewing pattern seam allowance (usually about 1 cm or ⅜ inch). Sew slowly and guide the fabric gently to maintain the curved shape.
Step 3: Reinforce the seam
After sewing the seam, trim any excess fabric if necessary. You can also sew a zigzag stitch along the edge or use a serger to prevent fraying and give the hat a clean, professional finish.
Creating the Hat Hem
Once the main structure of the hat is sewn, the next step is finishing the bottom edge. This part gives the hat its final polished look.
Fold the bottom edge of the hat about 1–2 cm toward the inside. Pin the fold in place so the hem stays even all around. Press it lightly with an iron to create a crisp edge before sewing.
Sew around the folded edge using a stretch stitch or a zigzag stitch if you are using knit fabric. This allows the hem to stretch comfortably when the hat is placed on the baby’s head.
After finishing the hem, turn the hat right side out. At this point, you will already see the adorable shape created by the sewing pattern, and your baby hat is almost complete.
Creative Ideas to Personalize Your Baby Hat
One of the best parts of sewing is the ability to personalize your projects. A simple baby hat can easily be transformed into something unique with a few creative touches.
You might add a small fabric bow, a soft pom-pom, or even tiny fabric ears for a playful look. These small details can turn a basic sewing pattern into a charming handmade gift.
Another idea is mixing fabrics. For example, you could use a patterned fabric for the main hat and a solid color for the hem. This contrast adds visual interest and allows you to experiment with different combinations while practicing your sewing skills.
You can also personalize the hat with embroidery or small appliqués. A tiny heart, star, or the baby’s initials can make the hat feel extra special and memorable.
Tips for Sewing Baby Items Successfully
When working on baby projects, comfort and safety are always the top priorities. Choosing soft, breathable fabrics ensures that the finished hat feels gentle against the baby’s skin.
Keep seams smooth and avoid bulky stitching. When following a sewing pattern, trimming excess seam allowance can help the hat sit comfortably without creating rough edges inside.
It’s also helpful to test your stitches on scrap fabric before starting the final sewing. This allows you to adjust tension, stitch length, and stretch settings, ensuring the best possible result for your baby hat.
Final Thoughts on This Fabric Baby Hat Free Pattern
This Fabric Baby Hat Free Pattern is a wonderful project for anyone beginning their sewing journey. It combines simplicity, creativity, and practicality, making it both enjoyable and useful. With just a small piece of fabric and a few basic tools, you can create a beautiful handmade item.
Projects like this help build confidence when working with a sewing pattern. As you complete each step, you develop important skills such as cutting accurately, sewing curves, and finishing hems neatly.
Most importantly, handmade baby items carry a special emotional value. Whether you are making the hat for your own child, a friend’s baby, or as a thoughtful gift, the love and care put into the sewing process will always be appreciated.
If you try this tutorial, we would love to see your finished project. Feel free to share your handmade baby hat with friends, family, or online crafting communities. Your creativity may inspire others to start their own sewing adventure and discover the joy of making something beautiful by hand.