Creating your own bag is one of the most rewarding projects in the world of sewing. A fabric hobo bag is especially perfect for beginners because it combines simplicity with style. With its soft curves, roomy interior, and comfortable shoulder strap, this type of bag is both practical and fashionable. If you’ve been looking for a sewing project that feels achievable yet impressive, this tutorial is for you.
In this step-by-step guide, you’ll learn how to create a beautiful fabric hobo bag using a simple sewing pattern. Whether you’re new to sewing or just want a relaxing project, this tutorial will walk you through everything—from materials to finishing touches. By the end, you’ll have a handmade bag you’ll be proud to use or gift.
Let’s get started and bring this stylish, functional accessory to life.
Why Make a Fabric Hobo Bag?
A fabric hobo bag is a fantastic project for anyone interested in sewing because it teaches essential techniques while remaining approachable. The curved shape helps you practice cutting and stitching along non-straight edges, which is a valuable skill in many sewing projects. At the same time, the construction is simple enough that beginners won’t feel overwhelmed.
Another reason to love this sewing pattern is its versatility. You can make it casual, elegant, colorful, or minimalist depending on your fabric choices. Cotton prints, denim, linen, or even recycled fabric all work beautifully. This means you can create a bag that perfectly matches your personal style.
Finally, making your own bag is sustainable and meaningful. Instead of buying something mass-produced, you create a unique piece with your own hands. It’s a small but powerful way to embrace creativity and conscious living through sewing.
Materials You’ll Need
Before starting your sewing project, gather all your materials. Having everything ready will make the process smoother and more enjoyable.
You will need:
- Outer fabric (about 50–70 cm depending on size)
- Lining fabric (same amount as outer fabric)
- Fusible interfacing (optional, for structure)
- Thread matching your fabric
- Fabric scissors or rotary cutter
- Pins or clips
- Sewing machine
- Iron
Choosing the right fabric is key to your final result. Medium-weight fabrics like cotton canvas or linen are ideal for beginners because they’re easy to handle. If you prefer a softer, slouchy bag, lightweight cotton works well. Adding interfacing can give your bag more structure if desired.
Don’t forget to prewash your fabric before starting. This prevents shrinkage later and ensures your bag maintains its shape after washing.
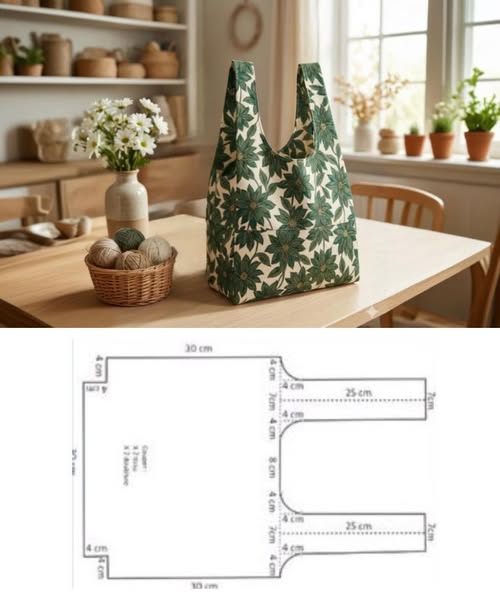
Understanding the Sewing Pattern
The beauty of this sewing pattern lies in its simplicity. The bag is typically made from two identical outer pieces and two lining pieces, all cut using the same curved shape. The long extension at the top forms the strap, eliminating the need to attach separate handles.
The dimensions shown in the pattern image help guide your cutting. The total height, width, and curve placement define the overall shape of the bag. Even if you slightly adjust the measurements, the design will still work as long as both sides match.
Take a moment to study the pattern before cutting. Understanding where the bottom, sides, and strap are located will make the sewing process much easier. If needed, draw the pattern on paper first and test it with inexpensive fabric.
Cutting Your Fabric
Start by folding your fabric in half, right sides together. Place your pattern on top and cut carefully around the shape. Repeat this process for both the outer fabric and the lining fabric.
Accuracy is important here. Smooth, clean cuts will ensure that your pieces align properly when sewing. If the edges are uneven, the bag may twist or not sit correctly.
If you’re using interfacing, cut it using the same pattern and fuse it to the wrong side of your outer fabric pieces. This step adds durability and helps the bag hold its shape over time.

Sewing the Outer Bag
Place the two outer fabric pieces right sides together. Pin or clip around the edges, leaving the top (strap opening) unsewn.
Begin sewing along the sides and bottom using a standard seam allowance (about 1 cm). Take your time when sewing the curved section—go slowly and pivot as needed to maintain a smooth line.
Once sewn, trim any excess fabric and clip small notches along the curved edges. This helps the fabric lay flat when turned right side out. Turn the bag and gently push out the curves for a clean shape.
Sewing the Lining
Repeat the same process with the lining fabric. Place the two lining pieces right sides together and sew around the edges, again leaving the top open.
However, this time leave a small gap (about 8–10 cm) along the bottom seam. This opening will be used later to turn the entire bag right side out.
Press the seams with an iron to give your lining a neat and professional finish. This small step makes a big difference in the final look of your sewing project.
Assembling the Bag
Now comes the exciting part—bringing everything together. Turn the outer bag right side out, but keep the lining inside out.
Insert the outer bag into the lining so that right sides are facing each other. Align the edges around the top opening and pin them together carefully.
Sew all the way around the top edge, connecting the outer fabric and lining. Once done, pull the entire bag through the gap left in the lining. You’ll see your bag take shape instantly.
Close the gap in the lining with a simple stitch, either by hand or machine. Then push the lining inside the bag and press the top edge neatly.
Finishing Touches
To give your bag a polished look, topstitch around the upper edge. This helps keep the lining in place and adds a professional finish.
You can also press the entire bag with an iron to smooth out any wrinkles. Take your time here—good pressing is one of the secrets to beautiful sewing results.
At this stage, your fabric hobo bag is complete and ready to use. Try it on your shoulder and admire your work—you’ve just created something functional and stylish from scratch.
Personalization Ideas
One of the best parts of using a sewing pattern is the ability to customize your project. You can easily adapt this hobo bag to reflect your personality and needs.
Consider adding:
- An internal pocket for keys or phone
- A magnetic snap or zipper closure
- Decorative stitching or embroidery
- A contrasting lining for a pop of color
You can also experiment with fabric combinations. Try mixing prints, using denim for durability, or even repurposing old clothing for a sustainable twist.
If you want a more structured bag, add thicker interfacing or even a base insert. For a softer, casual look, skip the interfacing and use lightweight fabric.
Tips for Beginners
If you’re new to sewing, don’t worry—this project is very beginner-friendly. The key is to go slowly and enjoy the process rather than rushing to the finish.
Always test your stitches on scrap fabric before sewing your final pieces. This helps you adjust tension and avoid mistakes. Using pins or clips generously will also keep your fabric aligned.
Remember, imperfections are part of handmade creations. Each small flaw tells a story and helps you grow your skills. With practice, your sewing will become more precise and confident.
Final Thoughts
Making your own fabric hobo bag is more than just a sewing project—it’s a creative journey. From choosing fabrics to stitching the final seam, every step allows you to express yourself and build confidence.
This sewing pattern is perfect for beginners but also enjoyable for experienced crafters looking for a quick and satisfying project. The result is a stylish, functional bag that you can proudly say you made yourself.
Now it’s your turn. Gather your materials, start sewing, and enjoy the process. When your bag is finished, don’t forget to share your creation with friends, family, or even on social media. Your handmade piece might inspire someone else to start their own sewing journey too.