
If you love spending time with family and friends over a card game, you know how challenging it can be to keep cards organized—especially for kids or anyone with limited dexterity. A Fabric Playing Card Holder is a clever and charming solution. It not only keeps your cards neatly displayed but also adds a personal handmade touch to your game nights. Even better, this project is quick, budget-friendly, and ideal for beginners.
In this tutorial, you’ll learn exactly how to make your own fabric card holder. Whether you’re a sewing enthusiast or a quilt lover looking for a small, satisfying project, this step-by-step guide will walk you through the process. We’ll cover the materials you need, the cutting and sewing steps, and even ideas for customization. The best part? You can use leftover scraps from your last quilt pattern project to make something both practical and pretty.
By the end of this post, you’ll have a fabric card holder that’s as unique as your fabric choices. Plus, it makes a thoughtful handmade gift for game lovers. Let’s get started and turn your fabric stash into something useful and delightful.
Why Make a Fabric Playing Card Holder?
One of the great things about a Fabric Playing Card Holder is its simplicity. It’s a project that doesn’t require advanced sewing skills, so beginners can dive in with confidence. At the same time, experienced sewists can enjoy the freedom to get creative with colors, patterns, and textures. It’s also a perfect project for trying out that mini quilt pattern you’ve been meaning to test.
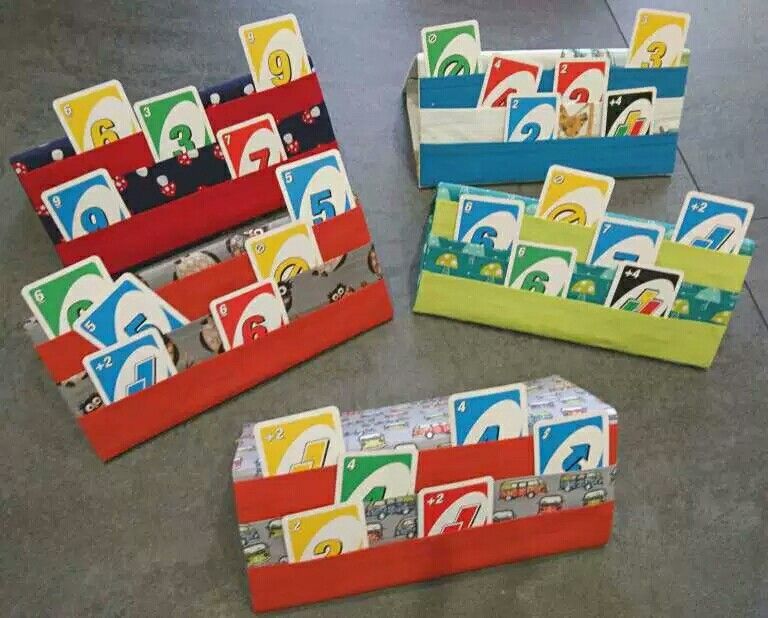
These card holders are practical too. They allow the cards to be displayed in a fan shape so you can see all of them at a glance. This is especially useful for kids who may struggle to hold multiple cards, or for adults who simply prefer a more comfortable way to play. It’s a small accessory that can make a big difference during game nights.
Finally, this is a wonderful scrap-busting project. If you’ve been working on a large quilt and have leftover strips or squares, you can easily repurpose them here. It’s an eco-friendly way to reduce waste while making something functional and fun.
Materials You’ll Need
Before you begin, gather all your supplies. Having everything ready will make the process smooth and enjoyable. Here’s what you’ll need:
- Fabric: Two pieces of cotton fabric (outer and lining), each measuring 12” x 8”.
- Batting: One piece of thin quilt batting, 12” x 8”.
- Bias tape: Around 30” in length for binding the edges.
- Thread: To match or contrast with your fabric.
- Sewing machine: Although you could sew by hand, a machine will make it quicker.
- Pins or clips: To hold layers in place.
- Scissors or rotary cutter: For precise cutting.
- Quilting ruler: Optional but helpful for accuracy.
- Iron and ironing board: To press seams for a neat finish.
If you’ve worked on a recent quilt pattern, you may already have most of these items on hand. The beauty of this project is that you can mix and match fabrics to create a look that matches your game night style.
Step-by-Step Instructions
Step 1: Cut the Fabric and Batting
Cut two rectangles of fabric, one for the outside and one for the lining, both measuring 12” x 8”. Cut a matching piece of thin quilt batting. You can use leftover quilt scraps for this step, making your project even more eco-friendly and unique.
Step 2: Layer and Quilt the Pieces
Layer the outer fabric right side down, batting in the middle, and lining fabric right side up. Use pins or clips to secure them together. At this stage, you can add a simple quilt pattern to give the piece more texture. For example, you might stitch diagonal lines across the surface or create a grid pattern.
Step 3: Create the Card Slots
Fold the bottom edge of the layered piece up about 3 inches to form the first card pocket. Pin in place. Then, fold the bottom up again by another 3 inches to form the second pocket. The pockets will overlap slightly, giving space for the cards to fan out.
Step 4: Sew the Sides
Sew along the left and right edges of the folded fabric to secure the pockets. Backstitch at the start and end to reinforce the seams. Make sure your stitches are straight and even for a polished look.
Step 5: Add the Binding
Use bias tape to bind the raw edges of the card holder. Start at one corner, fold the tape over the edge, and sew carefully. Binding not only finishes the edges but also adds a decorative touch—especially if you choose a bright or patterned tape.
Step 6: Final Press
Give your Fabric Playing Card Holder a final press with the iron. This will set the seams and make the holder look crisp and professional. Now it’s ready for game night!
Customization Ideas
One of the joys of making your own Fabric Playing Card Holder is that you can customize it to suit your taste or the person you’re making it for. Here are a few ideas to inspire you:
- Theme Fabric: Use prints that match the game’s theme—like playing card motifs, casino-inspired patterns, or whimsical designs.
- Patchwork Style: Piece together small fabric scraps using a quilt pattern before cutting your rectangles. This creates a colorful, one-of-a-kind card holder.
- Personalization: Add embroidered initials, a name tag, or a small appliqué for a personal touch.
- Seasonal Variations: Make holders with Christmas fabrics for holiday game nights, or bright floral prints for summer gatherings.
The beauty of a project like this is that no two have to be the same. You can create a whole collection in different colors and styles to suit any occasion.
Tips for Beginners
If you’re new to sewing or quilting, don’t be intimidated. This project is small and forgiving. Here are a few tips to help you succeed:
- Test Your Stitching: Practice sewing a straight line on a fabric scrap before working on your actual project.
- Use Clips Instead of Pins: Especially when working with multiple layers, clips can be easier to manage.
- Press as You Go: Ironing each step will help your layers stay flat and your final product look professional.
- Start with Simple Quilting: A few diagonal lines or a basic grid is enough to add structure without complicating the project.
With each Fabric Playing Card Holder you make, your skills will improve—and soon you’ll be ready to tackle larger quilt projects.
Why This Project Makes a Great Gift
Handmade items always carry extra meaning, and a Fabric Playing Card Holder is no exception. It’s thoughtful, functional, and shows that you’ve put time and care into making something special. Because it’s a small project, you can easily make several in different colors for friends and family.
These holders are also great for charity craft fairs or as additions to game night gift baskets. Paired with a deck of cards and maybe some snacks, they become part of a fun, themed gift set. And since you can use leftover fabric and batting, the cost to make them is minimal, making them an economical choice as well.
Final Thoughts and Invitation to Share
If you make one using this tutorial, I’d love to see it! Share your finished card holder on social media or with your sewing group. Every handmade piece tells a story, and yours could inspire someone else to try their hand at sewing or quilting. So grab your fabric, thread, and creativity, and let’s keep the joy of handmade projects alive—one stitch at a time.