
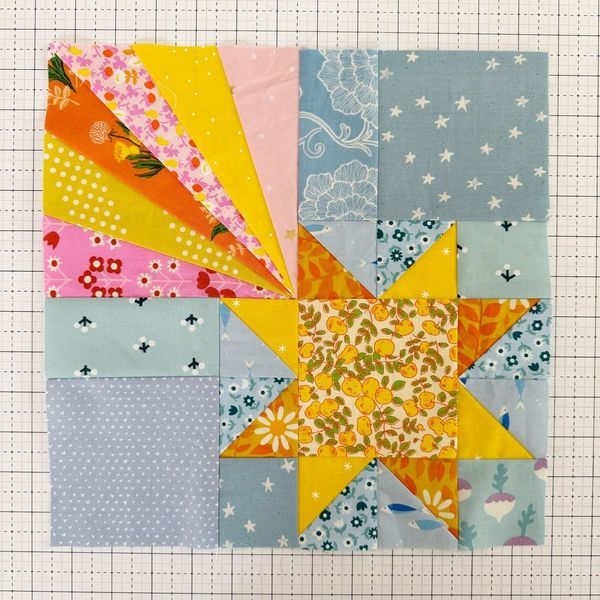
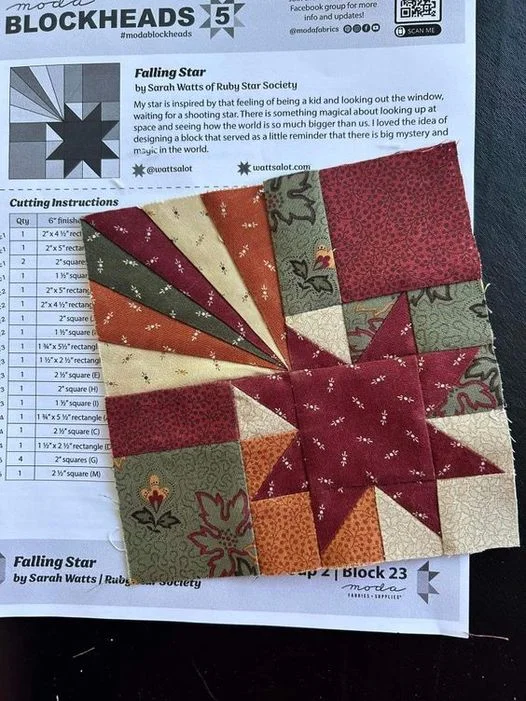
The Falling Star quilt pattern is a stunning and dynamic design that combines traditional quilting techniques with a modern aesthetic. This pattern is perfect for both beginners and experienced quilters looking to create a striking piece. In this tutorial, we will guide you step by step through the process of making a Falling Star quilt, including fabric selection, cutting measurements, and assembly instructions.
Choosing the Right Fabrics
Selecting the perfect fabrics is the first step to creating a beautiful Falling Star quilt. The right combination of colors and textures can enhance the visual impact of the design, making the star appear to shine and fall across the quilt top.
When choosing fabrics, consider using a mix of solid and patterned fabrics. A dark background with bright, contrasting star points will create a dramatic effect. If you prefer a softer look, pastel colors with a light background can give your quilt a delicate and airy feel.
Quilting cotton is the most commonly used fabric for this pattern due to its durability and ease of use. Pre-washing your fabric is also recommended to prevent shrinkage and color bleeding after assembling your quilt.
Cutting the Fabric Pieces
Accurate cutting is essential for achieving sharp and precise points in your Falling Star quilt. Taking the time to measure and cut correctly will ensure that all pieces fit together seamlessly during the piecing process.
For a standard Falling Star quilt block (12-inch finished size), you will need the following fabric pieces:
- Background Fabric: (4) 4.5” x 4.5” squares, (4) 5” x 5” squares
- Star Fabric: (1) 4.5” x 4.5” center square, (8) 5” x 5” squares
- Binding and Backing: Cut according to your finished quilt size
Using a rotary cutter, quilting ruler, and cutting mat will help you achieve precision when cutting fabric. Be sure to label each piece to avoid confusion during the assembly process.
Creating Half-Square Triangles (HSTs)
Half-square triangles (HSTs) are a key component of the Falling Star pattern. These triangles form the star points and give the quilt its characteristic shape.
To make HSTs, take each 5” x 5” square from the star and background fabrics. Pair one background square with one star square, right sides together. Draw a diagonal line from corner to corner using a fabric marker.
Sew a 1/4-inch seam on both sides of the drawn line, then cut along the marked line to create two HST units. Press the seams open or toward the darker fabric to reduce bulk and improve accuracy when sewing the quilt top together.
Assembling the Falling Star Block
Once your HSTs are ready, it’s time to lay out your pieces to form the Falling Star block. Arranging the pieces before sewing will help you visualize the final design and make any necessary adjustments.
Place the 4.5” x 4.5” center square in the middle. Arrange four HSTs around the center to form the star points, ensuring the colors contrast properly. Position the remaining background squares around the edges to complete the block layout.
Sew the pieces together row by row, pressing the seams in opposite directions for each row. Then, join the rows, ensuring the seams align perfectly for a professional finish.
Joining Blocks and Completing the Quilt Top
Once you have assembled multiple Falling Star blocks, you will need to arrange them into a cohesive quilt top. The number of blocks you use will depend on the desired quilt size.
For a lap-sized quilt, a 4×5 layout (20 blocks) is a great choice. A larger quilt, such as a queen-size, may require a 6×7 block layout. Experiment with the placement to achieve the most visually appealing arrangement.
Sew the blocks together in rows, then join the rows to complete the quilt top. Press all seams carefully to ensure a flat, polished look before adding borders.
Adding Borders and Finishing the Quilt
Borders frame the quilt and add a final touch to the design. A simple solid border enhances the Falling Star pattern, while a pieced border can add extra flair.
Cut border strips to the desired width (typically 2.5” to 4.5”). Attach the top and bottom borders first, pressing seams outward, then add the side borders.
Once the quilt top is complete, layer it with batting and backing fabric. Baste the layers together using safety pins or temporary adhesive spray to prevent shifting during quilting.
Quilting and Binding
Quilting the layers together enhances the Falling Star pattern and provides durability. Straight-line quilting along the seams emphasizes the geometric design, while free-motion quilting can add a more artistic touch.
After quilting, trim any excess fabric and batting. Cut binding strips (2.5” wide) and join them end to end. Fold the binding in half lengthwise and attach it to the quilt edges, folding over to the back and stitching in place for a neat finish.
Final Thoughts
The Falling Star quilt is a rewarding project that blends creativity with precision. By carefully selecting fabrics, cutting accurately, and assembling the blocks with care, you can create a quilt that showcases both skill and artistic vision.
Whether you make it as a gift or keep it as a treasured piece, this quilt pattern is sure to become a favorite. Try experimenting with different color combinations to make your Falling Star quilt uniquely yours!