
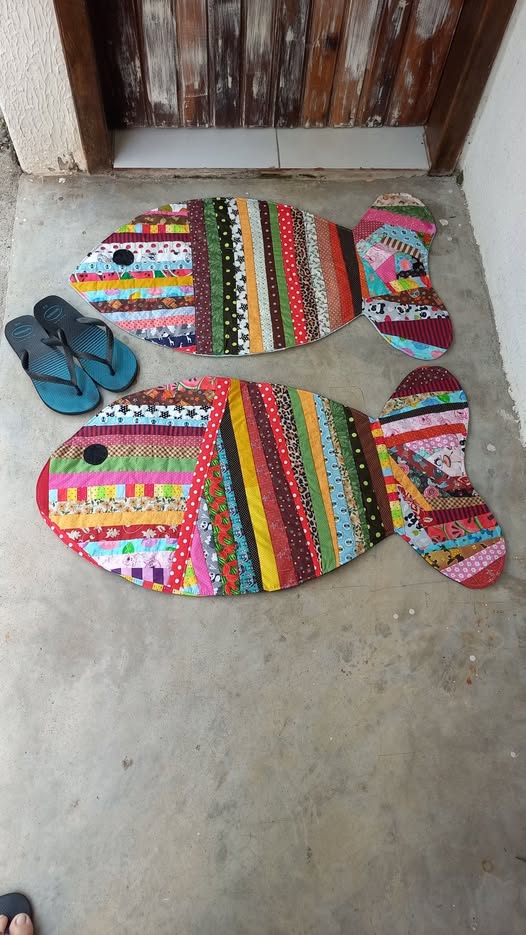
Creating beautiful projects from leftover fabric is one of the most satisfying parts of quilting. A Fish Rug Made From Scraps is a playful and creative way to transform small pieces of fabric into something both decorative and practical. This project combines the charm of scrap quilting with the fun shape of a fish, making it perfect for kitchens, children’s rooms, craft spaces, or even beach houses.
Many quilters accumulate fabric scraps over time. Instead of letting those pieces sit unused, this rug gives them new life. The colors, textures, and patterns come together to create a vibrant design that feels unique every time it’s made. Because each scrap is different, no two fish rugs will ever look the same.
This tutorial will guide you through the complete process of creating a scrap fish rug using a simple quilt technique and a beginner-friendly quilting pattern. Even if you are new to sewing or quilting, you can follow these steps and create a cheerful rug that will brighten any space.
Why Make a Fish Rug From Fabric Scraps
One of the biggest advantages of this project is sustainability. Quilters often keep baskets full of leftover fabric pieces from previous quilts and sewing projects. A scrap fish rug is the perfect opportunity to use those pieces creatively while reducing waste.
Another wonderful aspect of this project is its freedom. Traditional quilts often require precise color planning and repeated patterns. In contrast, this fish rug embraces variety. The mix of scraps creates a lively, textured surface that celebrates the beauty of quilting in a relaxed and artistic way.
Finally, this project is beginner-friendly. The quilting pattern for the fish shape is simple and forgiving. Instead of complex piecing techniques, you will mainly focus on arranging scraps, sewing them together, and shaping the rug. This makes it a great project for learning quilting basics while still producing a charming finished piece.
Materials Needed for the Fish Rug Quilt
Before starting your fish rug, gather all the necessary materials. Having everything ready will make the sewing process smoother and more enjoyable.
Fabric scraps are the most important element of this project. You can use cotton quilting fabric, old shirts, leftover quilt pieces, or even small fabric samples. Try to include a variety of colors and patterns to create a lively fish design.
Materials list:
• Assorted cotton fabric scraps
• Fabric for backing (about 1 yard)
• Batting or thick interfacing for padding
• Sewing machine
• Thread matching your fabric colors
• Fabric scissors or rotary cutter
• Cutting mat and quilting ruler
• Pins or clips
• Fabric marker or chalk
• Paper for drawing the quilting pattern
• Optional: non-slip rug backing
If you want your rug to be thicker, you can also use two layers of batting. This will make the finished quilt rug more cushioned and durable.
Creating the Fish Quilting Pattern
The first step in making your fish rug is designing the shape. The fish outline will serve as the main quilting pattern for your project. Don’t worry about making it perfect — simple shapes often look the best.
Start by drawing a large fish shape on a piece of paper or pattern paper. The design should include the body, tail, and a small circle for the eye. The body should be oval or slightly rounded, while the tail can be a triangle or heart shape.
Once you are happy with the drawing, cut out the pattern pieces. You will have one large body piece and a tail piece. These paper pieces will be used to guide the layout of your scrap quilt sections and help you maintain the fish shape while sewing.
Preparing and Arranging the Fabric Scraps
Now comes one of the most enjoyable parts of the project: arranging the scraps. Lay your fabric pieces on a flat surface and begin organizing them by color, size, or pattern.
Start building a patchwork panel large enough to cover the fish body pattern. Sew scraps together randomly to create a patchwork quilt section. Press the seams flat as you go to keep the fabric smooth and easy to handle.
Continue adding pieces until your patchwork panel is larger than the fish template. This allows room for trimming later. The beauty of this type of quilt is that imperfections add character, so feel free to experiment with bold colors and unexpected combinations.
Cutting the Fish Shape
After creating your patchwork panel, place the fish body pattern on top of the fabric and trace around it using fabric chalk or a washable marker.
Cut carefully along the outline to create the main fish body piece. Repeat the process with another scrap arrangement if you want a different color pattern for the tail.
You can also cut small fabric circles or shapes for the fish eye and decorative scales. These details add personality and help turn a simple quilt into a charming rug design.
Assembling the Quilt Layers
Once all the pieces are cut, it is time to assemble the layers of the rug. A quilt usually consists of three main layers: the top fabric, the batting, and the backing fabric.
Lay the backing fabric on your work surface with the right side facing down. Place the batting on top, smoothing it out so there are no wrinkles. Finally, place the fish patchwork piece on top with the right side facing up.
Pin or clip the layers together around the edges. This quilt sandwich will form the base of your fish rug and prepare it for quilting stitches that hold everything securely in place.
Quilting the Fish Rug
Quilting stitches not only hold the layers together but also add beautiful texture to the project. For beginners, simple straight-line quilting works perfectly.
You can sew lines across the fish body from head to tail, or follow the natural curve of the fish shape. Another fun idea is to stitch curved lines that resemble fish scales.
Take your time during this step and sew slowly. Quilting is about creativity and relaxation. The stitches will transform your patchwork into a finished quilt rug with depth and durability.
Finishing the Edges
After quilting is complete, trim any excess batting and backing fabric around the fish shape. Leave about half an inch of seam allowance around the edge.
To finish the rug, you can use quilt binding or fold the backing fabric over the edge and stitch it down. Binding adds a professional look and protects the edges from wear.
Sew the binding carefully around the fish shape, especially around curves and the tail area. Once the edges are finished, your fish rug will look polished and ready to use.
Creative Personalization Ideas
One of the best parts of working with a scrap quilt project is the opportunity to personalize the design. Every fish rug can reflect your style and creativity.
You can create themed fish rugs using specific colors. Blue and turquoise scraps can create an ocean-inspired look, while warm colors like orange and red can give your fish a tropical personality.
Other creative ideas include adding embroidered details, stitching decorative scales, or using buttons for the fish eye. Some quilters even add small fabric bubbles or seaweed shapes around the fish to create a playful underwater scene.
Where to Use Your Fish Rug Quilt
A fish rug made from scraps can brighten many areas of your home. In a kitchen, it adds a cheerful handmade touch near the sink or stove.
In children’s rooms, the playful fish shape can make the space feel more fun and colorful. Kids often love the vibrant patchwork and imaginative design.
Craft rooms are another perfect location for this project. The rug reflects the creative spirit of quilting and reminds you that even the smallest scraps can become something beautiful.
Share Your Fish Rug With the Quilting Community
Completing a handmade project always brings a special sense of accomplishment. A scrap fish rug is not only practical but also a wonderful way to celebrate creativity and resourcefulness in quilting.
Every rug tells a story through its fabrics. Some scraps may come from previous quilts, clothing, or meaningful projects. When combined into a new quilting pattern, they create a piece filled with memories and color.
Once your fish rug quilt is finished, consider sharing it with others. Post photos in quilting groups, share your progress online, or gift the rug to someone special. Your project might inspire another beginner to start their own quilting journey and discover the joy of creating something beautiful from simple scraps.