
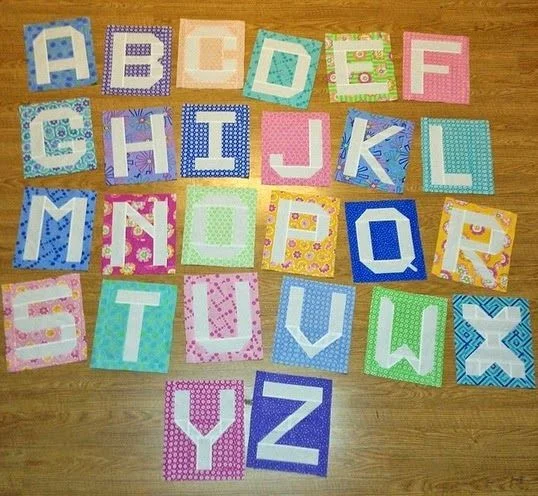
Creating a quilt that tells a story or spells a message is both fun and functional. One of the most creative ways to personalize your quilt is with an alphabet quilt pattern. Whether you want to make a baby quilt, a wall hanging, or a memory piece, an alphabet quilt allows you to combine letters in your favorite colors and fabrics. In this tutorial, you’ll learn how to make your own Free Quilt Pattern Alphabet – Free Pattern, with exact fabric cuts and simple steps.
This article is packed with everything you need to get started: a breakdown of materials, precise measurements, layout suggestions, and assembly tips. You’ll also find SEO-friendly advice for choosing the best quilt patterns and using them to make quilts that stand out. Alphabet quilts are perfect for showcasing your creativity, spelling out names, initials, or even full quotes.
Let’s dive into this rewarding project and explore how to turn your vision into a stunning quilt using a simple but eye-catching letter-based design. It’s time to master the art of personalized quilt creation.
Why Choose an Alphabet Quilt Pattern?
Alphabet quilt patterns are incredibly versatile, making them a favorite among both beginners and experienced quilters. They can be used to spell out a child’s name on a baby quilt, form motivational words for a wall hanging, or commemorate special events. The design potential is endless.
These types of quilt patterns also make great educational tools for kids. You can create quilts that help children learn the alphabet in a tactile and visual way. Soft, colorful letters are not only fun but also comforting and interactive.
Another benefit of alphabet quilts is the personal touch they offer. Whether you’re gifting the quilt or making it for your own home, using meaningful letters and messages creates a deep emotional connection with the final product.
Materials You’ll Need
Before diving into the sewing process, it’s important to gather all necessary materials. Here’s a basic list to help you get started on your alphabet quilt project:
- Fat quarters or fabric scraps in various colors for each letter
- Solid background fabric (1.5–2 yards depending on size)
- Batting (cotton or polyester, 1.5–2 yards)
- Backing fabric (same size as your quilt top)
- Thread, rotary cutter, quilting ruler, and cutting mat
Make sure your fabric choices contrast well so the letters are clearly visible. High contrast between the letters and the background will help them stand out, especially if you’re spelling names or phrases.
Don’t forget to pre-wash your fabrics. Pre-washing helps avoid shrinking after the quilt is finished, ensuring your alphabet quilt patterns stay crisp and aligned.
Cutting Instructions for Alphabet Quilt Blocks
Each letter will be created using simple geometric shapes. For this tutorial, we’ll use 6.5″ x 6.5″ square blocks for each letter, which will finish at 6″ x 6″ once sewn into the quilt. Below are the base cuts for one block:
- Background fabric: (1) 6.5” x 6.5” square
- Letter pieces (color fabric): cut depending on the letter shape (see below)
- Optional sashing: (2) 2” x 6.5” strips for vertical, (2) 2” x 10.5” for horizontal
Each letter (A-Z) can be pieced using rectangles, squares, and triangles. For example, to create the letter “A,” you’ll need:
- (2) 1.5” x 6.5” strips (sides of the “A”)
- (1) 1” x 4” strip (crossbar of the “A”)
- (1) 3” x 3” square cut diagonally (to form the slanted tops)
Repeat this format to construct the rest of the alphabet. You can also find printable templates online to help with complex letter shapes.
Step-by-Step Assembly Instructions
- Cut and Prepare Fabric
Begin by cutting your background squares and letter pieces based on the alphabet you want to spell. Lay each piece on the background square before sewing to check the composition. - Sew Letter Blocks
Start piecing each letter using a ¼” seam allowance. Press seams open or to one side for a smoother finish. For curves or angled lines (such as in the letter “S” or “G”), consider using fusible applique or paper piecing. - Add Sashing (Optional)
To space out the letters or create word separation, add sashing between the blocks. Use 2” strips and sew them between letter blocks horizontally and vertically for a neat grid layout.
Once your blocks are sewn, arrange them in rows to ensure spelling and spacing are correct before final assembly.
Quilt Layout Options
Alphabet quilt patterns can be arranged in multiple ways. You can line up the letters in one long row, stack them in a grid, or design the layout to form names or inspirational phrases. Choose the layout that best suits your quilt’s final purpose.
For baby quilts, a 4-letter name with two border rows may be ideal. For wall hangings, consider three rows of letters with borders all around. You can also use cornerstones or patchwork filler blocks between the letters.
Adding color borders, additional applique designs, or quilting patterns in the sashing is another way to elevate the final design. Keep your quilt balanced by ensuring equal spacing and visual symmetry across the layout.
Quilting and Binding Your Alphabet Quilt
After assembling your top quilt layer, it’s time to layer, quilt, and bind. Create your quilt sandwich: backing (right side down), batting, and quilt top (right side up). Baste them together with safety pins or spray adhesive.
You can quilt in the ditch along the seams for a clean, modern look or choose free-motion quilting around each letter for added texture. Letters can also be outlined for emphasis, especially when made with bright or patterned fabrics.
Finish your quilt with a simple binding using 2.5” strips folded in half and sewn around the edges. Hand-stitch the back of the binding for a neat finish or machine-stitch for durability.
Downloading and Using a Quilt App
To simplify your alphabet quilt journey, consider downloading a quilt app. Many quilting apps offer free alphabet templates, design boards, and calculators for fabric needs. They’re excellent tools for planning your layout digitally before sewing.
Look for apps like Quiltspace, Quiltography, or Quilter’s Companion. These apps often include user forums where you can see other people’s versions of the same pattern for inspiration.
By using a quilt app, you can visualize different colorways, try out font styles, and stay organized during your project. It’s a modern way to enhance your traditional quilting hobby.
Final Thoughts on Alphabet Quilt Patterns
Alphabet quilt patterns offer a wonderful way to personalize your projects while experimenting with bold design elements. From simple initials to full names or messages, they bring a unique touch to any quilt.
With a few simple cuts and layout techniques, you can create a piece that’s meaningful, colorful, and perfect for any occasion. Whether you’re making a baby gift or a home décor accent, alphabet quilts never go out of style.
So grab your fabrics, fire up your sewing machine, and start stitching your own Free Quilt Pattern Alphabet – Free Pattern today. Don’t forget to share your final quilt with the community—you might just inspire the next great quilter!