
The Friendship Star Quilt Block is a charming and timeless design that carries a beautiful message of unity and connection. This classic quilt pattern has been passed down for generations and is often used in memory quilts or projects celebrating bonds between loved ones. With its simple yet symbolic star motif, this quilt block is a wonderful starting point for beginners who want to explore the world of quilting.
Whether you’re new to quilting or looking for a relaxing and meaningful project, the Friendship Star quilt pattern is ideal. It’s composed of basic shapes like half-square triangles and squares, making it easy to assemble while offering creative flexibility. Even with minimal sewing experience, you’ll find this pattern enjoyable and achievable.
In this tutorial, you’ll learn everything you need to create your own Friendship Star Quilt Block—from gathering materials to the final stitch. You’ll also discover ideas for customizing the block to match your style or commemorate someone special. Let’s dive into the heartwarming world of quilting with this beautiful design.
Materials You Will Need
Before you begin sewing your Friendship Star Quilt Block, it’s important to gather all the necessary materials. Start with 100% cotton quilting fabric, which is durable and easy to work with. You’ll need a light fabric for the background, a contrasting color for the star points, and an optional third color if you want to add more dimension to the block.
Here’s a complete list of supplies:
- Light-colored fabric for the background (e.g., white or cream)
- Dark or medium-colored fabric for the star (e.g., blue, red, or any favorite color)
- Rotary cutter or fabric scissors
- Quilting ruler
- Cutting mat
- Sewing machine or hand sewing supplies
- Iron and ironing board
- Thread and pins
Choose fabrics that reflect the theme of friendship or any specific recipient. For example, floral prints, soft pastels, or bold solids can all tell different stories through your quilt pattern. Pre-washing your fabric is recommended to avoid shrinkage or bleeding later.
Cutting the Fabric Pieces
The Friendship Star Quilt Block traditionally finishes at 9” x 9”, though you can scale it up or down depending on your quilt project. To make one standard 9” block, you will cut the following fabric pieces:
From the background fabric:
- (5) 3½” x 3½” squares
From the star fabric:
- (2) 4” x 4” squares (for making 4 half-square triangles)
- (1) 3½” x 3½” square (center of the star)
To create the half-square triangles (HSTs), pair the 4” squares from both the background and star fabric. You’ll need two of each to make four HST units. This allows the star’s points to pop against the light background and form the iconic rotating star shape.
Accurate cutting is essential for getting crisp points and a polished finish. Using a rotary cutter and quilting ruler on a self-healing mat makes this step easier and more precise. Always double-check your measurements before cutting.
Sewing the Half-Square Triangles (HSTs)
Now let’s sew the half-square triangles—these form the star points of your quilt pattern. Take one 4” background square and one 4” star square. Place them right sides together, and draw a diagonal line from corner to corner on the back of one square using a fabric pencil or chalk.
Sew a seam ¼” on both sides of the drawn line. Once stitched, cut along the diagonal line to yield two triangle units. Press the seams toward the darker fabric and trim each unit to measure 3½” x 3½” using your quilting ruler.
Repeat this process with the second pair of 4” squares. After completion, you’ll have a total of four HSTs, which are essential to building the star. This step helps beginners practice sewing accurate seams and pressing, both fundamental to quilt-making.
Assembling the Quilt Block
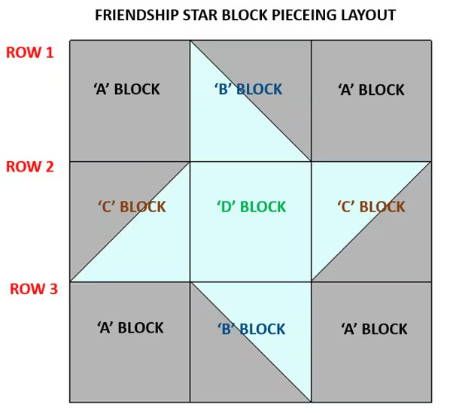
Now it’s time to arrange and sew the Friendship Star Quilt Block. Lay out your nine squares in a 3×3 grid as follows:
- Top row: HST – background – HST
- Middle row: background – star center – background
- Bottom row: HST – background – HST
Make sure the triangles in the HSTs rotate in a clockwise direction to form the star shape. Once satisfied with the layout, sew the squares together row by row, using a consistent ¼” seam allowance. Press seams after each row—pressing them in alternating directions can help the rows nest neatly when joined.
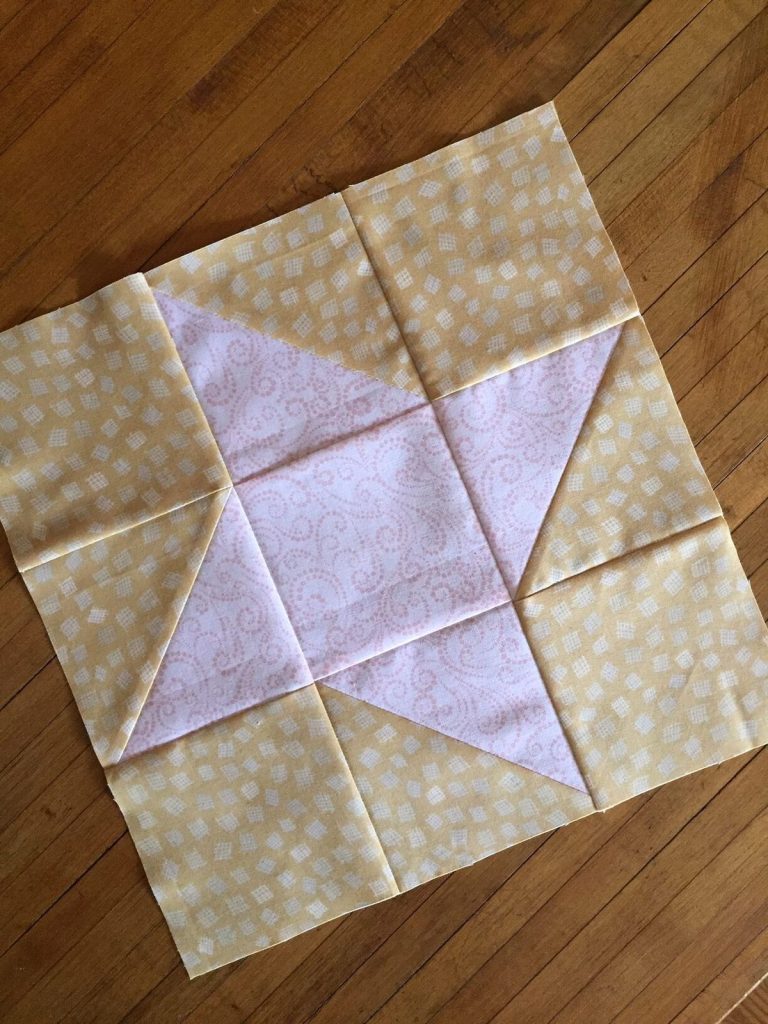
After all three rows are sewn, stitch them together to form the full block. Give the finished block a final press, flattening seams and ensuring the star stands out clearly. Your Friendship Star Quilt Block is now complete and ready to be used in a larger quilt.
Ideas for Customizing Your Friendship Star
The simplicity of the Friendship Star Quilt Block leaves plenty of room for creativity. You can experiment with different fabric styles, such as batiks, solids, or vintage prints, to create unique visual effects. Try making a scrappy version by using different fabrics for each star point to give your quilt a whimsical touch.
Consider enlarging the block size or turning it into a mini quilt, pillow cover, or tote bag panel. Multiple blocks sewn together can create a stunning throw or bedspread. You might alternate the Friendship Star block with plain squares, sashing, or other quilt blocks to add variety and contrast.
If you’re making a quilt for a special occasion, like a birthday or graduation, try incorporating embroidered names or messages into the center of each star block. This personalization adds meaning and makes your quilt a treasured keepsake.
Common Mistakes to Avoid
Even though the Friendship Star Quilt Block is beginner-friendly, a few common errors can affect the outcome. First, always double-check that your HSTs are trimmed to exactly 3½” square. Inconsistent sizes can throw off the alignment of the final block.
Another mistake is not pressing seams carefully. Pressing isn’t just about flattening fabric—it’s about helping the pieces fit together smoothly and accurately. Always press seams as you go and don’t skip this step.
Finally, watch your seam allowance. Quilting relies on a consistent ¼” seam throughout. If your seams vary too much, your block may end up too small or too large, and the points might not line up. Using a quarter-inch presser foot can help maintain accuracy.
Wrapping Up and Sharing Your Project
Congratulations on completing your very first Friendship Star Quilt Block! You’ve now learned how to cut fabric, create half-square triangles, and piece together a classic quilt pattern with meaning and beauty. This project is a wonderful addition to any quilting journey and a perfect handmade gift to celebrate friendship.
If you enjoyed making this quilt block, consider creating a full quilt using multiple Friendship Stars in various colors. Share your progress on quilting forums, social media, or local guilds—your work may inspire someone else to begin their quilting journey too!
We’d love to see your creations! Tag your photos with #FriendshipStarQuilt or #QuiltPatternJoy and spread the joy of quilting one star at a time. Whether you’re crafting for yourself or someone special, may your stitches always carry love, creativity, and connection.