
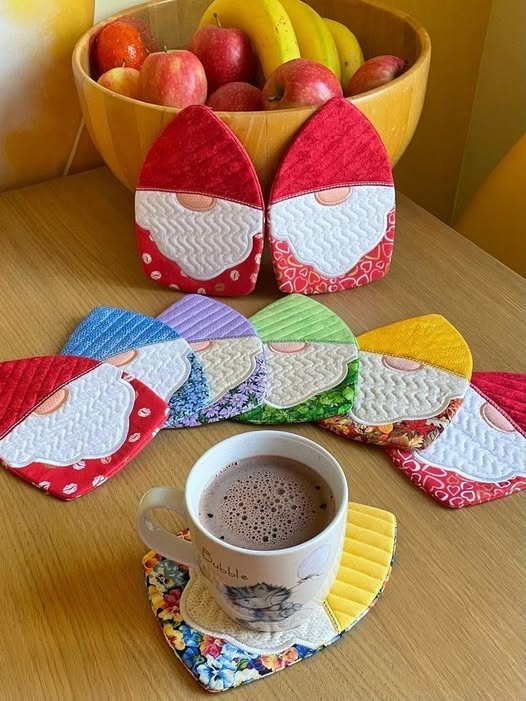
If you’re looking for a fun and festive sewing project, these gnome-shaped coasters are the perfect blend of charm and practicality. They protect your table from heat or moisture while adding a cozy touch to your home décor — especially during holidays or gift-giving seasons. Whether you’re a beginner just learning to sew or an experienced crafter seeking something new, this sewing pattern is both simple and delightful to make.
In this tutorial, you’ll learn everything from materials to step-by-step assembly, plus creative ways to personalize your gnome coasters. Let’s dive into this cheerful and whimsical project!
Materials You’ll Need
Before you begin your sewing adventure, gather the following supplies. Having everything ready will make your process smooth and enjoyable.
- Fabric Scraps:
Use colorful cotton fabric pieces for the hat, beard, face, and base. Mix patterns and textures to make each gnome unique. Quilting cottons work best because they’re easy to cut and sew. - Batting or Felt:
A layer of batting gives your coaster thickness and insulation. You can also use felt for a simpler, flatter version. - Thread:
Choose colors that match or contrast with your fabrics — red for Christmas, pastels for spring, or bold hues for a cheerful kitchen look. - Sewing Tools:
You’ll need fabric scissors, pins or clips, a needle, and a sewing machine (though you can sew by hand if you prefer a slower pace). - Pattern Template:
Draw or print a gnome-shaped sewing pattern. The design includes a hat, beard, and face shape — all easy to trace and cut. - Iron and Ironing Board:
Pressing the fabric before and after stitching helps your coaster look neat and professional.
Having these materials ready will allow you to jump straight into crafting your adorable gnome coasters!
Step 1: Preparing and Cutting the Fabric
Start by printing or sketching your gnome coaster pattern. Each coaster will need several pieces: the hat, face, beard, and backing.
- Cut the Base:
Using your template, cut one base piece from your chosen fabric and one from the batting. These will be the main structure of your coaster. - Cut the Gnome Features:
Next, select different fabrics for the hat, beard, and nose. This is where you can play with colors — red hats for classic Christmas gnomes, green for St. Patrick’s Day, or floral for springtime. - Layer and Iron:
Once all your pieces are cut, iron them flat. This helps the layers sit smoothly when you begin sewing.
By carefully cutting and preparing your fabrics, you’re setting the foundation for a clean, polished look. Precision at this stage will make the rest of your sewing project much easier.
Step 2: Assembling the Gnome Face
Now comes the fun part — giving your gnome some personality!
- Place the Beard:
Position the beard piece on the lower section of the base fabric. Pin it in place. The curved edge should sit just below the hat area. - Add the Nose:
The nose should overlap slightly with the top of the beard. A small oval piece of peach or beige fabric works perfectly. - Attach the Hat:
Place the hat piece on top, overlapping the nose. Adjust until everything looks balanced.
Once all pieces are positioned, stitch around each section using a small zigzag or straight stitch. This step defines the gnome’s face and secures each part firmly.
For beginners, this section is a great way to practice appliqué sewing techniques. Take your time and enjoy watching your little gnome come to life!
Step 3: Quilting and Adding the Back
Adding texture with simple quilting lines gives your coasters durability and charm.
- Quilt the Front:
Stitch gentle diagonal or wavy lines across the hat and beard areas. This not only strengthens the coaster but adds beautiful visual interest. - Attach the Backing:
Place the backing fabric right sides together with the gnome front. Add the batting underneath. Clip or pin the layers carefully. - Sew the Edges:
Sew around the perimeter, leaving a small opening to turn the coaster right side out. Once done, trim any excess fabric and carefully turn your coaster through the opening.
Press with an iron, then close the opening using a small invisible stitch. You now have a soft, padded, and beautifully shaped gnome coaster ready to use!
Step 4: Personalizing Your Gnome Coasters
One of the best parts of this sewing pattern is how customizable it is. You can make a whole family of gnomes — each one reflecting a different season, mood, or personality.
- Color Themes:
Use red and white for Christmas, yellow for summer, green for spring, or blue for winter. Each hue brings a new vibe to your table décor. - Add Details:
Stitch little buttons, embroidery lines, or even a small felt flower onto the hat. You can also add tiny fabric hearts for Valentine’s Day or stars for festive occasions. - Gift Ideas:
Bundle four gnome coasters together with a ribbon — they make adorable handmade gifts for friends, teachers, or family members. Add a tag that says, “You’ve been gnomed with love!”
These creative touches turn a simple sewing project into something truly special and personal.
Step 5: Using and Caring for Your Coasters
Your gnome coasters aren’t just cute — they’re practical too!
- Everyday Use:
Place them under mugs of coffee, tea, or hot chocolate to protect your table surfaces. Their quilted design absorbs condensation and heat easily. - Cleaning:
Machine wash on a gentle cycle or hand wash in lukewarm water. Air dry flat to maintain their shape. - Storage:
Stack them neatly in a small basket on your kitchen counter or coffee table. They’ll be ready to impress guests anytime.
With minimal care, your gnome coasters will stay charming for years to come — a cozy reminder of your creativity and sewing skills.
Creative Variations to Try
Once you master the basic gnome coaster sewing pattern, try experimenting with new ideas!
- Patchwork Hats: Use small fabric scraps to create a hat made of different patterns — perfect for quilters who love mixing prints.
- Themed Gnomes: Make gnomes with pumpkin hats for fall, Santa hats for Christmas, or pastel hats for Easter.
- Gnome Family Set: Create sets of three — Papa Gnome, Mama Gnome, and Baby Gnome — each with a unique color or size.
This flexibility makes the project endlessly enjoyable. Every gnome you sew tells its own little story.
Share Your Gnome Creations!
There’s something magical about turning fabric into something so joyful and useful. Now that you’ve completed your set of gnome-shaped coasters, it’s time to show them off!
Share photos of your finished coasters on social media, quilting groups, or with friends who love sewing projects. Use hashtags like #GnomeCoaster, #SewingPattern, and #HandmadeDecor to connect with other makers.
And if someone asks where you got them — smile and say, “I made them myself!” You’ll inspire others to pick up a needle, thread, and start their own gnome adventure.
Final Thoughts
This Gnome-Shaped Coasters Sewing Pattern is proof that practical items can also be playful works of art. With just a few fabric scraps and a little creativity, you can create something that brings warmth to your home — one stitch at a time.
So grab your fabric, fire up your sewing machine, and let your imagination take over. Whether you make one or a dozen, these gnome coasters are sure to bring smiles and spark conversation around your table.
Happy sewing, and may your home always be filled with cozy gnomes and warm mugs!